PyTorch 编译器、OpenAI Triton 与 XLA 后端
Chapter 14. PyTorch Compiler, OpenAI Triton, and XLA Backends
本章目录
- PyTorch 编译器深入剖析
- TorchDynamo:字节码捕获与图提取
- AOT Autograd 对前向与反向传播的融合
- PrimTorch IR(Prims)简化算子集
- TorchInductor 后端代码生成
- 使用 TorchInductor 进行自动调优
- 动态形状与可变序列长度
- 禁用 PyTorch 编译器并回退到 Eager 模式
- 性能提示与生成代码调试
- 调试数值正确性与精度
- 解释并最小化图断点
- 图断点与 TorchDynamo explain()
- 尽量减少图重编译
- 使用 allow_in_graph 将函数和代码块标记为安全
- 处理图中断的技巧
- 调试编译器阶段、图断裂(graph break)与性能
- 使用 OpenAI Triton 编写自定义内核
- Triton 编程模型
- 在 Triton 中访问共享内存
- 向 PyTorch 注册自定义内核
- 调优内核启动参数
- 自动调优 Triton 内核
- 高级 Triton 内核实现
- 使用 Triton 实现线程束专用化
- 分块与持久化 GEMM 内核(Triton)
- 使用 Triton 的软件流水与双缓冲
- 使用 Triton Proton 剖析器进行性能剖析
- PyTorch XLA 后端
- 关键要点
- 结语
In Chapter 13, we discussed multiple ways to optimize and tune PyTorch-based training and inference workloads. We touched on the PyTorch compiler and how it automates kernel fusion and other kernel-level techniques to improve performance with very little changes to your code.在第 13 章中,我们讨论了多种优化和调优基于 PyTorch 的训练与推理工作负载的方法。我们提到了 PyTorch 编译器,以及它如何自动化内核融合和其他内核级技术,从而只需对代码做极少改动即可提升性能。
In this chapter, we dive deeper into the dynamic PyTorch compilation stack, including components like TorchDynamo, Ahead-of-Time Autograd (AOT Autograd), and PrimTorch Intermediate Representation (IR) (aka Prims or Prims IR)—as well as compiler backends like TorchInductor, Accelerated Linear Algebra (XLA), and OpenAI’s Triton ecosystem. The PyTorch compiler stack is shown in Figure 14-1.在本章中,我们将深入探讨动态 PyTorch 编译栈,包括 TorchDynamo、Ahead-of-Time Autograd(AOT Autograd)和 PrimTorch 中间表示(IR)(又称 Prims 或 Prims IR)等组件,以及 TorchInductor、加速线性代数(XLA)和 OpenAI 的 Triton 生态等编译器后端。PyTorch 编译器栈如图 14-1 所示。
We also cover tools for debugging the compilation pipeline as well as libraries for scaling PyTorch across multi-GPU and multinode clusters. We will then explore how torch.compile works under the hood and how to handle dynamic shapes and variable sequence lengths efficiently.我们还会介绍用于调试编译流水线的工具,以及用于将 PyTorch 扩展到多 GPU 和多节点集群的库。随后我们将探讨 torch.compile 在底层是如何工作的,以及如何高效地处理动态形状和可变序列长度。
We will also examine the PyTorch compiler’s integration with the OpenAI Triton ecosystem. Our goal is to accelerate and scale our PyTorch models and applications without sacrificing the flexible, eager-execution development experience of PyTorch.我们还将考察 PyTorch 编译器与 OpenAI Triton 生态的集成。我们的目标是在不牺牲 PyTorch 灵活、即时执行(eager execution)的开发体验的前提下,加速并扩展我们的 PyTorch 模型和应用。
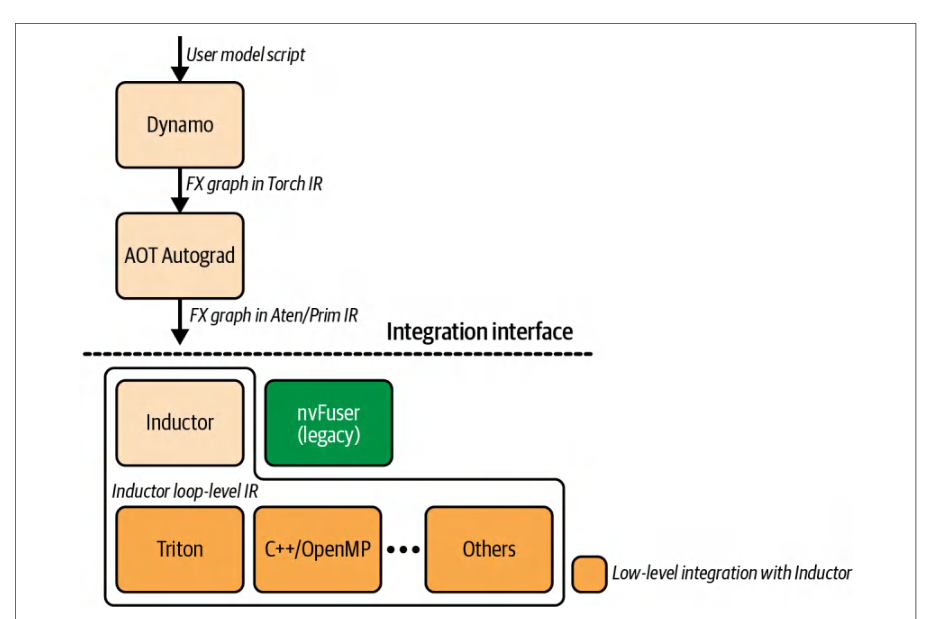
PyTorch 编译器深入剖析
PyTorch Compiler Deep Dive
As described in Chapter 13, PyTorch’s torch.compile will compile your PyTorch code (and models) to produce significant speedups. In most cases, you can do this in just a single line of code, as shown next. We’ll talk about the different options as we go along:如第 13 章所述,PyTorch 的 torch.compile 会编译你的 PyTorch 代码(和模型),从而带来显著的加速。在大多数情况下,只需一行代码即可完成,如下所示。我们会在后续内容中讨论各种不同的选项:
compiled_model = torch.compile(model,
  mode="max-autotune",
#  ...
)
This section breaks down the PyTorch compilation pipeline steps, including Torch-Dynamo’s graph capture, AOT Autograd’s combined forward/backward graph optimization, PrimTorch IR, and TorchInductor’s code generation. This pipeline is responsible for producing optimized kernels for the target GPU hardware and is shown in Figure 14-2.本节将拆解 PyTorch 编译流水线的各个步骤,包括 TorchDynamo 的图捕获、AOT Autograd 对前向/反向图的联合优化、PrimTorch IR,以及 TorchInductor 的代码生成。该流水线负责为目标 GPU 硬件生成优化后的内核,如图 14-2 所示。
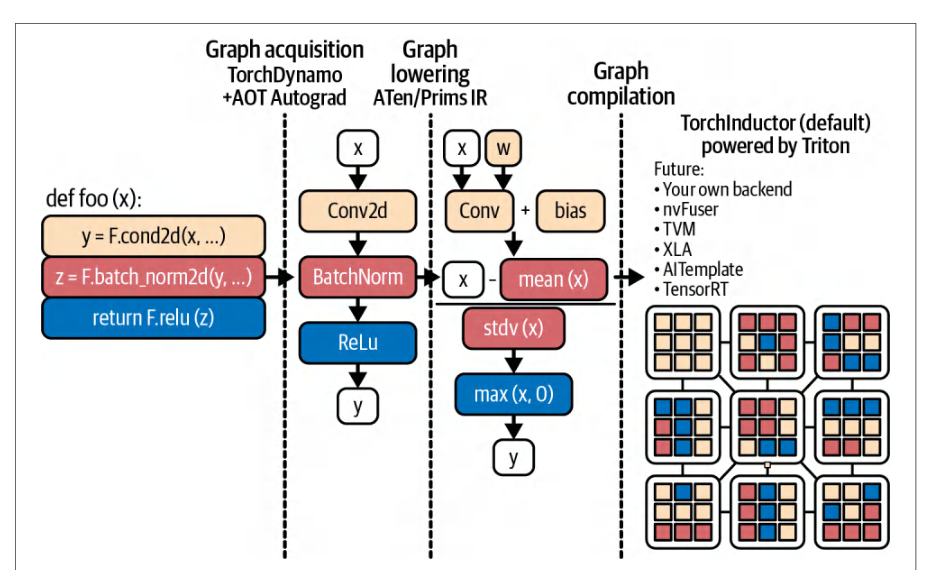
TorchDynamo:字节码捕获与图提取
TorchDynamo for Bytecode Capture and Graph Extraction
TorchDynamo, or just Dynamo, is the first stage of torch.compile. It hooks into Python’s frame-evaluation mechanism to intercept model execution at the bytecode level.TorchDynamo(简称 Dynamo)是 torch.compile 的第一个阶段。它挂接到 Python 的帧求值机制上,在字节码层面拦截模型执行。
Dynamo hooks into CPython’s frame evaluation to identify tensor-producing bytecode regions and constructs an execution graph for those regions. It then executes the compiled graph using the chosen backend. Unsupported code is left to run eagerly.Dynamo 挂接到 CPython 的帧求值机制,识别产生张量的字节码区域,并为这些区域构建执行图。随后它使用所选后端执行编译后的图。不受支持的代码则留待以即时执行方式运行。
This interception and rewriting mechanism is what lets TorchDynamo capture sequences of PyTorch operations into a graph representation that can be optimized by the next steps, AOT Autograd and PrimTorch IR, covered in the next sections.正是这种拦截与重写机制,使 TorchDynamo 能够将一系列 PyTorch 操作捕获为图表示,从而可由后续步骤——下一节将介绍的 AOT Autograd 和 PrimTorch IR——进行优化。
TorchDynamo leverages the CPython Frame Evaluation API (PEP 523) to capture the operations safely—and with minimal overhead. Normally, the Python interpreter executes each operation one by one. With Dynamo enabled, however, the interpreter redirects its execution to Dynamo, which aggregates the tensor operations into a graph before executing them. This enables whole-graph optimizations like kernel fusion, which reduces per-operation Python and host-side overhead.TorchDynamo 利用 CPython 帧求值 API(PEP 523)安全地捕获这些操作,且开销极小。通常情况下,Python 解释器会逐条执行每个操作。但在启用 Dynamo 后,解释器会将执行重定向到 Dynamo,由 Dynamo 先把张量操作聚合成图,再执行它们。这使内核融合等整图优化成为可能,从而降低逐操作的 Python 与主机侧开销。
Instead of launching a new GPU kernel for each operation and paying per-operation Python overhead, the compiled graph can fuse many operations into one or a few kernels. This reduces dispatch overhead and improves memory access patterns.编译后的图不会为每个操作启动一个新的 GPU 内核并为此付出逐操作的 Python 开销,而是可以把许多操作融合进一个或少数几个内核。这降低了调度开销,并改善显存访问模式。
In Chapter 13, we saw how Python overhead and many small operations can bottleneck models. We also saw that TorchDynamo addresses this issue by batching small operations into larger units when possible—assuming the chain of operations is graph-friendly and doesn’t cause too many graph breaks.在第 13 章中,我们看到了 Python 开销和大量小操作如何使模型出现瓶颈。我们也看到了 TorchDynamo 通过在可能时把小操作合并成更大的单元来解决这个问题——前提是这条操作链对图友好,并且不会造成过多的图断裂(graph break)。
When TorchDynamo is enabled by torch.compile, it inspects each Python opcode. Whenever it encounters a PyTorch tensor operation such as arithmetic or a neural network layer, it doesn’t execute it immediately. Instead, Dynamo appends the operation as a node in an FX graph and defers execution to the compiled backend for captured regions. TorchDynamo continues this process until it hits some code it can’t handle. At this point, a graph break occurs (more on this in a bit), and the unsupported operations run in regular, noncompiled eager mode.当 TorchDynamo 由 torch.compile 启用时,它会检查每一条 Python 操作码。每当遇到 PyTorch 张量操作(例如算术运算或某个神经网络层)时,它并不会立即执行该操作。相反,Dynamo 会把这个操作作为节点追加到一张 FX 图中,并把被捕获区域的执行推迟到编译后端。TorchDynamo 会持续这一过程,直到遇到它无法处理的代码。此时就会发生图断裂(稍后会详细说明),而那些不受支持的操作则以常规的、未编译的 eager 模式运行。
TorchDynamo tries to compile as large a portion of your program as possible into a single graph, but it will fall back to Python eager execution when it can’t proceed due to unsupported constructs such as complex control flow or non-PyTorch library calls. It does this to ensure correctness.TorchDynamo 会尽可能把你程序中更大的一部分编译进单张图,但当它因不受支持的构造(例如复杂的控制流或非 PyTorch 库调用)而无法继续时,就会回退到 Python eager 执行。它这样做是为了确保正确性。
After a block of unsupported operations has passed, Dynamo will resume capturing subsequent operations into a new graph after that point. This mix of compiled and noncompiled execution gives you the best of both worlds: you keep PyTorch’s flexibility where needed but compile everything else for speed.在一段不受支持的操作过去之后,Dynamo 会在该点之后恢复捕获后续操作,并放入一张新的图。这种编译执行与未编译执行的混合让你兼得两者之长:在需要的地方保留 PyTorch 的灵活性,其余一切则为速度而编译。
You can use torch.compiler.set_stance("fail_on_recompile") to force Dynamo to raise an error to catch unsafe recompilations. It will log the reason for recompile and help you debug the graph break. This gives you full visibility into why your graph is splitting. The code is shown here:你可以使用 torch.compiler.set_stance("fail_on_recompile") 强制 Dynamo 抛出错误,以捕获不安全的重新编译。它会记录重新编译的原因,并帮助你调试图断裂。这让你能完全看清图为何被切分。代码如下所示:
// 在图断裂、重编译时失败
torch.compiler.set_stance("fail_on_recompile")
compiled_model = torch.compile(model,
  mode="max-autotune",
  ...
)
// fail on graph breaks, recompiles
torch.compiler.set_stance("fail_on_recompile")
compiled_model = torch.compile(model,
  mode="max-autotune",
  ...
)
This way, you can refactor the code paths that are causing the break—or mark them as expected graph boundaries with torch._dynamo.allow_in_graph(), as you’ll see in a bit. Once your graph is clean, you can switch back to torch.com piler.set_stance("eager_on_recompile"). Remember, setting this back will cause TorchDynamo to silently fall back to eager mode if a subsequent graph break occurs.这样,你就可以重构那些导致断裂的代码路径——或者用 torch._dynamo.allow_in_graph() 把它们标记为预期的图边界,稍后你会看到这一点。一旦你的图变得干净,就可以切回 torch.com piler.set_stance("eager_on_recompile")。请记住,切回该设置后,如果后续再发生图断裂,TorchDynamo 会静默回退到 eager 模式。
The output of TorchDynamo’s capture is called an FX Graph of your code. FX is an intermediate representation (IR) in which each node is a call to a PyTorch aten operator or built-in Python function. For example, consider a simple Python function, as shown here:TorchDynamo 捕获的输出被称为你代码的 FX 图。FX 是一种中间表示(IR),其中每个节点都是对某个 PyTorch aten 运算符或内置 Python 函数的一次调用。例如,考虑如下所示的一个简单 Python 函数:
def f(x, y):
    z = x.sin() + y
    return z.sum()
Here, TorchDynamo will produce an FX Graph roughly equivalent to the following pseudocode:在这里,TorchDynamo 会生成一张大致等价于以下伪代码的 FX 图:
graph():  # FX IR 的伪代码
    %x : Tensor = Placeholder[target=x]
    %y : Tensor = Placeholder[target=y]
    %sin : Tensor = torch.sin(%x)
    %add : Tensor = torch.add(%sin, %y)
    %sum : Tensor = torch.sum(%add)
    return %sum
graph():  # pseudo-code for FX IR
    %x : Tensor = Placeholder[target=x]
    %y : Tensor = Placeholder[target=y]
    %sin : Tensor = torch.sin(%x)
    %add : Tensor = torch.add(%sin, %y)
    %sum : Tensor = torch.sum(%add)
    return %sum
The FX Graph nodes correspond to Placeholder inputs and calls to primitive ATen operations like aten::sin, aten::add, aten::sum, clearly representing the computation graph structure. Once constructed, this FX Graph is handed off to AOT Autograd for combined forward-pass and backward-pass tracing.FX 图的节点对应于 Placeholder 输入以及对 aten::sin、aten::add、aten::sum 等基础 ATen 操作的调用,清晰地表示了计算图结构。构建完成后,这张 FX 图会被交给 AOT Autograd,用于对前向传播与反向传播进行联合跟踪。
AOT Autograd’s generated forward and backward combined trace is then sent to a backend compiler such as TorchInductor or XLA to perform kernel fusion and generate optimized device code. TorchDynamo itself remains framework-agnostic and focuses on accurate, low-overhead graph capture. TorchDynamo delegates all heavy optimizations to downstream compiler stages.随后,AOT Autograd 生成的前向与反向联合跟踪结果会被发送给 TorchInductor 或 XLA 等后端编译器,以执行内核融合并生成优化后的设备代码。TorchDynamo 本身保持框架无关,专注于准确、低开销的图捕获。TorchDynamo 把所有重量级优化都委托给下游编译阶段。
TorchDynamo inserts guards on Python values—such as tensor shapes, dtypes, and even global variables—that affect the graph trace. These guards ensure that if something changes that was assumed to be constant (e.g., tensor shape or dtype), the compiled graph is invalidated and recompiled if needed. This allows robust handling of dynamic shapes and model modifications—at the cost of additional recompilations when assumptions are violated.TorchDynamo 会在影响图跟踪的 Python 值上插入守卫(guard)——例如张量形状、dtype,甚至全局变量。这些守卫确保:一旦某个被假定为常量的东西发生变化(例如张量形状或 dtype),已编译的图就会失效,并在需要时重新编译。这使得动态形状和模型修改能够得到稳健处理——代价是当假设被违反时需要额外的重新编译。
Using the default dynamic=None, the compiler will specialize using the observed shapes. When it encounters dynamic shapes, it will recompile a more dynamic kernel. It may recompile again if it later detects additional sources of dynamism.使用默认的 dynamic=None 时,编译器会基于观测到的形状进行特化。当遇到动态形状时,它会重新编译出一个更具动态性的内核。如果之后检测到更多动态性来源,它可能再次重新编译。
In practice, this means you’ll see one extra compilation on the first varying-shape input—and only one extra compile. If you already know which input dimensions will vary, you can use torch._dynamo.mark_dynamic(tensor, dim) before running your model. This will preempt the initial compile.在实践中,这意味着在第一个形状变化的输入上你会看到一次额外的编译——而且仅有一次额外编译。如果你已经知道哪些输入维度会变化,可以在运行模型之前使用 torch._dynamo.mark_dynamic(tensor, dim)。这将预先阻止最初的那次编译。
You can further tune the compiler’s “stance” with torch.compiler.set_stance() to change how and when TorchDynamo falls back to eager or recompiles. A stance governs the compiler’s tolerance or strictness in the face of errors or fallbacks. This gives you more control of the trade-off between developer feedback and uninterrupted execution. The following are the stances as of this writing:你还可以用 torch.compiler.set_stance() 进一步调整编译器的“立场(stance)”,以改变 TorchDynamo 回退到 eager 模式或重新编译的方式与时机。立场决定了编译器在面对错误或回退时的容忍度或严格程度。这让你能更好地控制开发者反馈与不中断执行之间的权衡。以下是撰写本书时的各种立场:
default
The compiler tries to compile what it can, silently falling back to eager execution when unsupported code is encountered. This is the standard, default setting, which causes normal compilation behavior and fallbacks.编译器会尽力编译它能编译的部分,遇到不支持的代码时静默回退到 eager 执行。这是标准的默认设置,会带来正常的编译行为和回退。
fail_on_recompile
If a graph break or unsupported operation is encountered, the compiler raises an error. This is useful during development when you want to catch unexpected breaks or uncompiled paths.如果遇到图中断(graph break)或不支持的操作,编译器会抛出错误。这在开发阶段很有用,可用于捕获意外的中断或未被编译的路径。
eager_on_recompile
When a recompile is necessary, run the code in eager mode. If compiled code is already cached (and valid for the input), it should still be used.当需要重新编译时,以 eager 模式运行代码。如果已编译的代码已被缓存(且对当前输入有效),仍应使用它。
force_eager
Use eager mode and ignore all torch.compile directives.使用 eager 模式,并忽略所有 torch.compile 指令。
By capturing whole sequences of operations, TorchDynamo can perform whole-graph optimizations like kernel fusion to reduce launch overhead and minimize memory movement. It also eliminates Python-layer overhead for those fused operations. Figure 14-3 compares eager versus compiled modes, including the compiler cache.通过捕获完整的操作序列,TorchDynamo 可以执行整图优化,例如内核融合,以减少启动开销并最小化内存移动。它还为这些融合后的操作消除了 Python 层开销。图 14-3 对比了 eager 模式与编译模式,包括编译器缓存。
Instead of executing each small operation and kernel launch separately, the compiler can fuse many operations into a single kernel. This reduces CPU-GPU synchronization points and improves memory locality. Otherwise, the GPU would be bottlenecked with lots of fine-grained operations, heavy synchronization, and excessive global memory accesses.编译器不再逐个执行每个小操作和内核启动,而是可以将许多操作融合进单个内核。这减少了 CPU-GPU 同步点并改善了内存局部性。否则,GPU 会因大量细粒度操作、繁重的同步以及过多的全局内存访问而成为瓶颈。
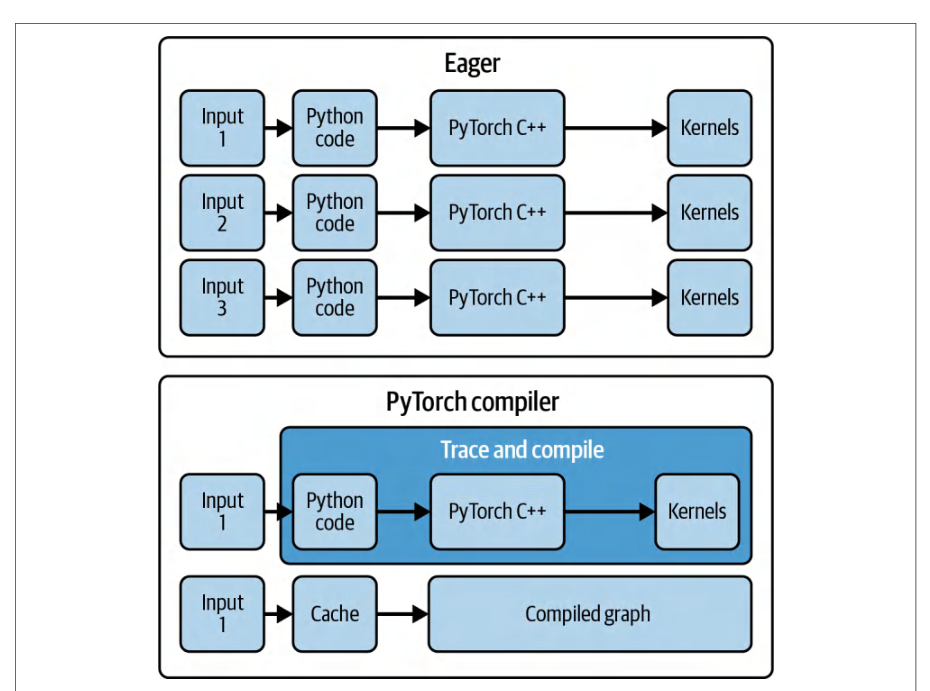
TorchDynamo continues capturing until a graph break is needed. A graph break can be triggered by unsupported Python constructs (like certain control flows, e.g., an if statement using a Python bool instead of tensor operations) or by unsupported operations. When a graph break occurs, the current graph segment ends, and Dynamo falls back to eager mode for the code that can’t be captured. After that, TorchDynamo will start a new graph trace once it returns to traceable code.TorchDynamo 会持续捕获,直到需要发生图中断。图中断可能由不支持的 Python 构造(例如某些控制流,如使用 Python 布尔值而非张量运算的 if 语句)或不支持的操作触发。发生图中断时,当前图段结束,Dynamo 对无法捕获的代码回退到 eager 模式。之后,一旦回到可跟踪的代码,TorchDynamo 就会开始新的图跟踪。
You can successfully implement compiler-graph-friendly conditionals in PyTorch by expressing the logic as pure PyTorch tensor operations, including torch.where() with a mask. Here is an example that replaces a non-graph-friendly Python if statement with a pure-tensor operation masking approach:在 PyTorch 中,你可以将逻辑表达为纯 PyTorch 张量运算(包括带掩码的 torch.where()),从而成功实现编译器图友好的条件分支。下面是一个示例,用纯张量运算的掩码方法替换了对图不友好的 Python if 语句:
# 根据数据相关的张量条件计算布尔掩码
# 掩码形状 (batch_size,1) 可广播到 x 的形状
mask = x.sum(dim=1, keepdim=True) > 0
# 使用 torch.where 在两个张量表达式之间逐元素选择
# 当 mask 为 True 时选取 f(x),否则选取 g(x)
out = torch.where(mask, f(x), g(x))
# Compute a boolean mask from a data-dependent tensor condition
# mask shape (batch_size,1) broadcastable to x’s
mask = x.sum(dim=1, keepdim=True) > 0
# Use torch.where to select element-wise between two tensor expressions
# picks f(x) where mask is True, otherwise g(x)
out = torch.where(mask, f(x), g(x))
This avoids a Python if x.sum() > 0: statement, which causes a graph break. It does this by staying entirely within PyTorch’s graph-friendly tensor operations. In this case, TorchDynamo captures the whole sequence, including the mask and torch.where() without breaking the graph.这样可避免使用 Python 的 if x.sum() > 0: 语句,因为该语句会导致图中断。其做法是完全保持在 PyTorch 对图友好的张量运算之内。在此例中,TorchDynamo 捕获整个序列,包括掩码和 torch.where(),而不会中断图。
With each new release, PyTorch expands which operations can be captured without causing a graph break. For instance, high-level conditional primitives like torch.cond can capture certain if/else logic in graphs. Specifically, both branches are traced and compiled. torch.cond requires a boolean scalar predicate. Both branches must return the same structure and dtypes. And shapes must be consistent at runtime. Data-dependent branches will often lead to graph breaks.随着每个新版本的发布,PyTorch 不断扩大可在不引起图中断的前提下被捕获的运算范围。例如,像 torch.cond 这样的高层条件原语可以在图中捕获某些 if/else 逻辑。具体而言,两个分支都会被跟踪并编译。torch.cond 要求一个布尔标量谓词。两个分支必须返回相同的结构和 dtypes。并且形状在运行时必须保持一致。数据相关的分支往往会导致图中断。
AOT Autograd 对前向与反向传播的融合
AOT Autograd Fusion for Forward and Backward Passes
Once TorchDynamo has captured an FX Graph for as much of the forward pass as possible, the next compiler phase is AOT Autograd. AOT Autograd runs the Dynamo-captured forward graph through PyTorch’s autograd engine in “functional” mode to record the backward operations. This is how the static backward graph is produced (this is in contrast to relying on PyTorch’s default autograd engine to execute the backward-pass operations one by one).一旦 TorchDynamo 尽可能多地捕获了前向传播的 FX 图(FX Graph),编译器的下一个阶段就是 AOT Autograd。AOT Autograd 以“函数式”模式让 Dynamo 捕获的前向图通过 PyTorch 的自动微分引擎运行,以记录反向运算。静态反向图正是由此产生的(这与依赖 PyTorch 默认自动微分引擎逐个执行反向传播运算形成对比)。
In essence, AOT Autograd generates a joint forward-backward graph that can then be optimized and fused as a whole. And it guarantees the same forward and backward results as eager mode.本质上,AOT Autograd 生成一个前向-反向联合图,随后可以将其作为一个整体进行优化和融合。并且它保证前向和反向结果与 eager 模式相同。
AOT Autograd works by tracing the forward graph through the autograd engine to capture the gradient computations. It effectively runs the forward graph with torch.autograd.forward_ad (or a similar technique) to record which operations are needed for the backward computations. The result is a combined forward and backward graph. The combined graph can then be optimized using common-subexpression elimination, etc. Later, it’s compiled by a backend like TorchInductor or XLA.AOT Autograd 的工作方式是让前向图通过自动微分引擎进行跟踪,以捕获梯度计算。它实际上使用 torch.autograd.forward_ad(或类似技术)运行前向图,以记录反向计算需要哪些运算。结果是一个前向与反向合并的图。随后可以使用公共子表达式消除等方法对该合并图进行优化。之后,它由 TorchInductor 或 XLA 之类的后端编译。
By planning both the forward and backward ahead of time, the PyTorch compiler can holistically fuse across the boundary of the forward and backward passes together. This results in ahead-of-time fusion of operations that span the two phases. For example, it can fuse an elementwise operation in the forward pass with the corresponding elementwise gradient computation in the backward pass, if possible, into one kernel.通过提前规划前向和反向,PyTorch 编译器可以跨越前向与反向传播的边界进行整体融合。这实现了跨这两个阶段的运算的提前融合。例如,在可能的情况下,它可以将前向传播中的逐元素运算与反向传播中对应的逐元素梯度计算融合为一个内核。
The compiler can also eliminate overhead by reusing intermediate results between forward and backward computations when safe to do so. This can improve performance greatly for model training workloads in which backward operations can dominate the overall runtime.在安全的情况下,编译器还可以通过在前向与反向计算之间复用中间结果来消除开销。对于反向运算可能主导整体运行时的模型训练工作负载,这可以大幅提升性能。
Without AOT Autograd, PyTorch would need to execute each backward operation separately using the default PyTorch autograd engine—independently of the forward pass. With AOT Autograd, the graph of execution is optimized holistically.如果没有 AOT Autograd,PyTorch 就需要使用默认的 PyTorch 自动微分引擎逐个执行每个反向运算——与向前传播相互独立。有了 AOT Autograd,执行图得以整体优化。
The resulting joint graph produced by AOT Autograd is guaranteed to compute the same results (this is why graph breaks are needed when the graph can’t guarantee correctness). This joint graph can be further optimized because the whole sequence of operations, forward and backward, is known.AOT Autograd 生成的联合图保证计算出相同的结果(这正是当图无法保证正确性时需要图中断的原因)。由于前向与反向的整个运算序列都是已知的,该联合图可以进一步优化。
By fusing operations and memory usage across the forward and backward passes, we reduce memory accesses and kernel-launch overhead. PyTorch’s compiled mode automatically uses AOT Autograd under the hood when you call torch.compile for operations and workloads that involve gradients, such as model training.通过跨前向与反向传播融合运算和显存使用,我们减少了显存访问和内核启动开销。当你对涉及梯度的运算和工作负载(例如模型训练)调用 torch.compile 时,PyTorch 的编译模式会在底层自动使用 AOT Autograd。
In short, AOT Autograd is used by torch.compile to compute gradients ahead of time during model training. It handles most autograd operations seamlessly and guarantees the same results as eager mode. It reuses buffers across the forward and backward passes to reduce peak memory usage. And while this phase is mostly invisible to the end user, it’s a key component to enabling large speedups in modern AI model training workloads.简而言之,torch.compile 使用 AOT Autograd 在模型训练期间提前计算梯度。它能无缝处理大多数自动微分操作,并保证与 eager 模式相同的结果。它在前向与反向传播之间复用缓冲区,以降低峰值显存占用。虽然这一阶段对最终用户基本不可见,但它是现代 AI 模型训练工作负载实现大幅加速的关键组成部分。
PrimTorch IR(Prims)简化算子集
PrimTorch IR (Prims) Simplified Operator Set
Before handing the graph over to a low-level code generator, PyTorch performs an intermediate representation (IR) transformation known as PrimTorch IR (Prims) in some documentation and source code. PrimTorch IR is an IR that reduces the variety of operations in the graph down to a smaller core set of “primitive” operations, hence the name PrimTorch.在将图交给底层代码生成器之前,PyTorch 会执行一次中间表示(IR)变换,在某些文档和源代码中称为 PrimTorch IR(Prims)。PrimTorch IR 是一种 IR,它把图中的算子种类缩减为一个更小的核心“原语”(primitive)算子集合,PrimTorch 之名即由此而来。
For context, PyTorch has thousands (> 2,000) of operations in its full API. PrimTorch IR reduces this to a much smaller set of primitives on which the compiler can focus. In practice, PrimTorch IR defines around 250 primitive operations, such as basic arithmetic, reductions, copy, reshape, etc.作为背景,PyTorch 的完整 API 中有数千个(> 2,000)算子。PrimTorch IR 将其缩减为编译器可以专注的规模小得多的原语集合。在实践中,PrimTorch IR 定义了约 250 个原语算子,例如基本算术、归约、拷贝、重塑等。
Many complex or high-level PyTorch aten operations can be decomposed into these primitives with PrimTorch IR. For instance, an “in-place” PyTorch operation like x.add_(y) is lowered into a functional add followed by an explicit copy back into x’s storage, as shown here:借助 PrimTorch IR,许多复杂或高层的 PyTorch aten 算子都可以分解为这些原语。例如,像 x.add_(y) 这样的“原地”(in-place)PyTorch 算子会被下沉为一个函数式的 add,随后再显式 copy 回 x 的存储,如下所示:
%z    = aten::add(x, y)
%copy = aten::copy_(x, %z)    # 将 z 的数据写入 x
%z    = aten::add(x, y)
%copy = aten::copy_(x, %z)    # writes z’s data into x
Here, the IR contains a separate aten::copy_ node instead of a special in-place mutation. This makes all tensor updates explicit and simplifies downstream compiler kernels by treating mutations as ordinary copy operations.在这里,IR 包含一个独立的 aten::copy_ 节点,而不是特殊的原地修改。这使得所有张量更新都显式化,并将修改视为普通的拷贝操作,从而简化了下游的编译器内核。
Specifically, by converting in-place mutations into functional operations plus distinct copy nodes, the compiler no longer has to reason about aliasing or hidden side effects. As a result, fusion passes and memory-planning algorithms can operate on a purely functional dataflow. This allows more aggressive kernel fusion and predictable, high-performance code generation.具体而言,通过将原地修改转换为函数式操作加上独立的拷贝节点,编译器不再需要推理别名(aliasing)或隐藏的副作用。因此,融合遍和内存规划算法可以基于纯函数式的数据流运行。这允许更激进的内核融合以及可预测的高性能代码生成。
PrimTorch IR also helps with things like eliminating aliasing and mutation in the graph. It tries to convert operations into a form that does not perform in-place updates when possible since these can complicate optimization. The output of the PrimTorch IR pass is an FX Graph that contains only aten IR and PrimTorch IR operations. The FX Graph is then ready for lowering by the backend.PrimTorch IR 还有助于消除图中的别名和修改。它会尽可能尝试将算子转换为不执行原地更新的形式,因为这些操作会使优化复杂化。PrimTorch IR 遍的输出是一个仅包含 aten IR 和 PrimTorch IR 算子的 FX Graph。随后该 FX Graph 即可交由后端进行下沉(lowering)。
By doing this IR standardization, PrimTorch IR provides a stable, simplified interface for compiler backends to target. Instead of having to implement thousands of PyTorch operations, a backend like TorchInductor only needs to support the 250 primitives—other higher-level operations are derived from the primitives. This greatly reduces complexity.通过这种 IR 标准化,PrimTorch IR 为编译器后端提供了一个稳定、简化的目标接口。像 TorchInductor 这样的后端无需实现数千个 PyTorch 算子,只需支持这 250 个原语——其他高层算子都由这些原语派生而来。这极大地降低了复杂度。
And since most high-level operations (e.g., 2,000+ PyTorch ops) can be decomposed into the existing primitives, the set of PrimTorch IR primitives evolves relatively slowly—even as PyTorch adds new operations to adapt to new algorithms, models, and techniques.并且,由于大多数高层算子(例如 2,000+ 个 PyTorch 算子)都可以分解为已有的原语,PrimTorch IR 原语集合的演进相对缓慢——即使 PyTorch 为适应新算法、模型和技术而不断新增算子也是如此。
To summarize the pipeline so far: TorchDynamo captures a graph, AOT Autograd adds a backward pass and forms a joint forward-backward graph, and then Prim-Torch IR canonicalizes the operations to a leaner, more primitive set. At this point, we have a fairly standard, device-agnostic representation of the whole computation— including the forward and backward passes—in terms of core operations. Now let’s turn to the actual code-generation stage performed by the compiler backend.小结一下目前的流水线:TorchDynamo 捕获图,AOT Autograd 添加反向传播并形成前向-反向联合图,然后 PrimTorch IR 将算子规范化为一组更精简、更原语化的集合。此时,我们得到了一个相当标准、与设备无关的完整计算表示——包括前向和反向传播——以核心算子来表达。接下来,让我们转向编译器后端实际执行的代码生成阶段。
TorchInductor 后端代码生成
TorchInductor Backend Code Generation
The final stage of the torch.compile stack is the compiler backend. TorchInductor, or Inductor, is PyTorch’s default compiler backend. Inductor takes the optimized, joined forward and backward FX Graph consisting of aten + PrimTorch IR operations and generates high-performance code for the target hardware, including NVI-DIA GPUs, AMD GPUs, CPUs, and others.torch.compile 栈的最后一个阶段是编译器后端。TorchInductor(简称 Inductor)是 PyTorch 的默认编译器后端。Inductor 接收由 aten + PrimTorch IR 算子构成的、经过优化并合并的前向与反向 FX Graph,为目标硬件生成高性能代码,涵盖 NVIDIA GPU、AMD GPU、CPU 等。
TorchInductor works by lowering the graph to a loop-level, define-by-run IR that it compiles to efficient code. Internally, Inductor represents operations as loops over multidimensional data. It automatically groups nodes from the FX Graph into fused loop blocks when possible. Each group becomes a kernel during code generation.TorchInductor 的工作方式是将图*降低*为循环级的、定义即运行(define-by-run)的 IR,再将其编译为高效代码。在内部,Inductor 将算子表示为对多维数据的循环。它会在可能时自动把 FX Graph 中的节点分组为融合的循环块。每个分组在代码生成阶段成为一个内核。
Inductor also supports symbolic shapes, which allow dynamic dimensions. The IR is somewhat higher-level than raw CUDA, as it represents things like elementwise computations as loops over tensor indices. The IR is user-inspectable, which helps debugging and even extending.Inductor 还支持符号形状(symbolic shapes),从而允许动态维度。该 IR 的层次比原始 CUDA 略高,因为它把逐元素计算之类的内容表示为对张量索引的循环。该 IR 可供用户检查,这有助于调试甚至扩展。
TorchInductor’s IR can also be used for ahead-of-time compilation flows with torch.export() and AOTInductor. AOTInductor compiles artifacts produced by torch.export for AOT use cases such as packaging and deployment. This allows saving and reusing the compiled code across runs. Export is highlighted in the context of torch.compile() in Figure 14-4.TorchInductor 的 IR 也可用于配合 torch.export() 和 AOTInductor 的提前编译(ahead-of-time)流程。AOTInductor 编译 torch.export 生成的产物,用于打包和部署等 AOT 场景。这样可以保存编译后的代码并在多次运行之间复用。图 14-4 在 torch.compile() 的语境下重点展示了导出(export)。
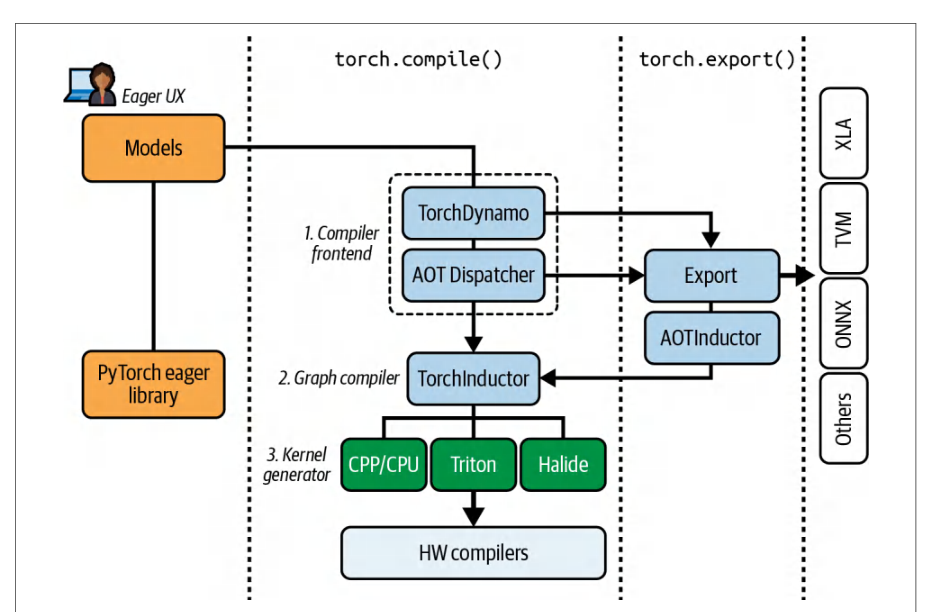
For NVIDIA GPU backends, TorchInductor uses OpenAI’s Triton JIT compiler to generate the actual GPU kernels. Triton is a CUDA-like domain-specific language (DSL) written in Python. Triton also includes a compiler for its DSL (we’ll cover Triton more in a bit).对于 NVIDIA GPU 后端,TorchInductor 使用 OpenAI 的 Triton JIT 编译器生成实际的 GPU 内核。Triton 是一种用 Python 编写的、类似 CUDA 的领域特定语言(DSL)。Triton 还包含针对其 DSL 的编译器(稍后我们会更详细地介绍 Triton)。
TorchInductor translates its loop-level IR into Triton code and then uses the Triton compiler to convert the Triton code into NVIDIA PTX directly using LLVM. Remember that PTX is NVIDIA’s low-level instruction set architecture (ISA) for its NVIDIA GPUs.TorchInductor 将其循环级 IR 转换为 Triton 代码,然后使用 Triton 编译器,借助 LLVM 将 Triton 代码直接转换为 NVIDIA PTX。请记住,PTX 是 NVIDIA 为其 NVIDIA GPU 定义的底层指令集架构(ISA)。
The loop-level IR is implemented in Python, which makes it easy to inspect and extend. For example, suppose a graph has an operation z = x.permute(1,0) + x[2,:]. Inductor might represent this operation with the following IR:循环级 IR 用 Python 实现,因此易于检查和扩展。例如,假设某个图有一个算子 z = x.permute(1,0) + x[2,:]。Inductor 可能用以下 IR 表示该算子:
def inner_fn(index: List[sympy.Expr]):
    i1, i0 = index  # 各维度的索引变量
    tmp0 = ops.load("x", i1 + i0*size1)         # x[i1, i0]
    tmp1 = ops.load("x", 2*size1 + i0)          # x[2, i0]
    return ops.add(tmp0, tmp1)                 # 逐元素加法
torchinductor.ir.Pointwise(
    device=torch.device("cuda"), dtype=torch.float32,
    inner_fn=inner_fn, ranges=[size0, size1]
)
def inner_fn(index: List[sympy.Expr]):
    i1, i0 = index  # index variables for dims
    tmp0 = ops.load("x", i1 + i0*size1)         # x[i1, i0]
    tmp1 = ops.load("x", 2*size1 + i0)          # x[2, i0]
    return ops.add(tmp0, tmp1)                 # elementwise add
torchinductor.ir.Pointwise(
    device=torch.device("cuda"), dtype=torch.float32,
    inner_fn=inner_fn, ranges=[size0, size1]
)
Here, size0 and size1 are the dimensions of the input, x. And inner_fn describes how to compute one element of the output. The Pointwise node represents a loop nest over those ranges that applies inner_fn elementwise to produce the output.这里,size0 和 size1 是输入 x 的维度。inner_fn 描述如何计算输出的一个元素。Pointwise 节点表示对这些范围的一个循环嵌套,它逐元素地应用 inner_fn 以产生输出。
This is a define-by-run style IR. By running this IR, it’s executing Python that iterates and calls ops.load + ops.add. Inductor then generates the corresponding NVIDIA PTX code using the Triton JIT compiler and LLVM.这是一种定义即运行风格的 IR。运行该 IR 时,实际执行的是迭代并调用 ops.load + ops.add 的 Python 代码。随后 Inductor 使用 Triton JIT 编译器和 LLVM 生成相应的 NVIDIA PTX 代码。
使用 TorchInductor 进行自动调优
Autotuning with TorchInductor
TorchInductor includes an autotuner built on Triton’s autotuning capabilities, which we’ll describe in an upcoming section. The autotuner finds the best launch configuration for each generated GPU kernel. The autotuned configuration is cached per kernel so that subsequent runs don’t need to redo the tuning step.TorchInductor 包含一个自动调优器,它构建在 Triton 的自动调优(autotuning)能力之上,我们将在后续小节中介绍。该自动调优器会为每个生成的 GPU 内核寻找最佳启动配置。自动调优得到的配置按内核缓存,因此后续运行无需重新执行调优步骤。
The first time you compile code with the TorchInductor backend, it will spend extra time benchmarking different kernel variants using different block sizes, tile sizes, etc. Inductor picks the fastest variant and uses this going forward. Kernel autotuning increases initial compile-time latency, but the resulting kernels are highly optimized for runtime.首次使用 TorchInductor 后端编译代码时,它会花费额外时间,使用不同的块大小、瓦片大小等对不同内核变体进行基准测试。Inductor 会挑选最快的变体并在后续沿用。内核自动调优会增加初始编译时延,但生成的内核在运行时高度优化。
Beyond kernel fusion and autotuning, TorchInductor applies many low-level optimizations. These include index simplification to reduce complex index arithmetic in loops, common-subexpression elimination within the generated code, and efficient memory planning to reuse buffers and reduce allocations.除了内核融合与自动调优之外,TorchInductor 还应用了许多底层优化。这些优化包括:索引简化,以减少循环中复杂的索引运算;生成代码内的公共子表达式消除;以及高效的内存规划,以复用缓冲区并减少分配。
TorchInductor also uses CUDA Graphs to capture sequences of kernels at runtime for faster graph replay with minimal CPU overhead. By default, Inductor will try to wrap its generated kernels into a CUDA Graph to reduce launch overhead on each iteration. This is especially beneficial for inference—or when running any code or model with many kernels.TorchInductor 还使用 CUDA 图在运行时捕获内核序列,从而以极小的 CPU 开销实现更快的图重放。默认情况下,Inductor 会尝试将其生成的内核包装进一个 CUDA 图,以减少每次迭代的启动开销。这对推理尤其有益——或者在运行任何包含大量内核的代码或模型时。
The end result of TorchInductor is highly optimized, device-specific code for your workload. In many cases, Inductor achieves performance close to, or even exceeding, hand-tuned libraries. For instance, Inductor can fuse an entire sequence of elementwise operations, including activations and pointwise transformations, into a single kernel. It can even fuse certain patterns of matrix multiplication followed by elementwise operations like bias-add + activation into one launch. This is relatively difficult to do by hand—and requires ongoing maintenance.TorchInductor 的最终结果是为你的工作负载生成高度优化、特定于设备的代码。在许多情况下,Inductor 能达到接近甚至超过手工调优库的性能。例如,Inductor 可以将整个逐元素操作序列(包括激活函数和逐点变换)融合进单个内核。它甚至可以将某些矩阵乘法后接逐元素操作(如 bias-add + 激活)的模式融合为一次启动。这相对难以手工完成——并且需要持续维护。
The PyTorch compiler uses heuristics and backends that may route certain operations (e.g., large GEMMs) to high-performance libraries such as cuBLAS/cuBLASLt or CUTLASS. It can even emit Triton kernels for fusable patterns. In practice, TorchInductor selects and caches whichever path performs best—or is known to be optimal for the given shapes.PyTorch 编译器使用启发式规则和后端,可能将某些操作(例如大型 GEMM)路由到 cuBLAS/cuBLASLt 或 CUTLASS 等高性能库。它甚至可以为可融合的模式生成 Triton 内核。在实践中,TorchInductor 会选择并缓存表现最佳的路径——或已知对给定形状最优的路径。
For transformer models, TorchInductor will fuse the layernorm and residual connection elementwise operations around a large GEMM—while still using cuBLAS for the actual GEMM computation itself. Or, for models with irregular memory access, Inductor’s custom Triton kernel can outperform an existing library’s kernel by doing just the work that’s needed—and not benefit from a general-purpose library like cuBLAS or CUTLASS.对于 Transformer 模型,TorchInductor 会将大型 GEMM 周围的 layernorm 和残差连接逐元素操作融合起来——同时仍然使用 cuBLAS 进行实际的 GEMM 计算本身。或者,对于显存访问不规则的模型,Inductor 的自定义 Triton 内核可以通过只做所需的工作而胜过现有库的内核——而不是从 cuBLAS 或 CUTLASS 这样的通用库中获益。
On modern GPUs, PyTorch’s compiler can work with NVIDIA’s Transformer Engine (TE) for certain transformer blocks and layers. However, PyTorch does not automatically substitute NVIDIA TE kernels when you call torch.compile. TE is a separate library that you must use explicitly via its modules or fused ops. But when you call TE APIs, torch.compile can compile and fuse around them. This complements the generated Triton kernels to provide maximum performance.在现代 GPU 上,PyTorch 的编译器可以针对某些 Transformer 块和层与 NVIDIA 的 Transformer Engine(TE)协同工作。然而,当你调用 torch.compile 时,PyTorch 并不会自动替换为 NVIDIA TE 内核。TE 是一个独立的库,必须通过其模块或融合算子显式使用。但当你调用 TE API 时,torch.compile 可以围绕它们进行编译与融合。这与生成的 Triton 内核相辅相成,共同提供最大性能。
In essence, TorchInductor does the heavy lifting of turning code and models into high-performance GPU kernels. With each PyTorch release, hardware coverage is expanding and new optimized techniques are emerging. For example, PyTorch provides FlexAttention, a new attention operator that TorchInductor can compile into fused kernels approaching FlashAttention performance. Specifically, FlexAttention’s fused kernels have been measured to reach up to ~85–90% of modern FlashAttention performance in both forward and backward passes, while allowing more flexibility including block-sparsity and custom masks. To enable the fast paths, set the following torch.backend.cuda attributes to True:本质上,TorchInductor 承担了将代码和模型转换为高性能 GPU 内核的重任。随着每个 PyTorch 版本的发布,硬件覆盖范围不断扩大,新的优化技术层出不穷。例如,PyTorch 提供了 FlexAttention,这是一个新的注意力算子,TorchInductor 可以将其编译为融合内核,性能接近 FlashAttention。具体而言,实测 FlexAttention 的融合内核在前向和反向传播中均可达到现代 FlashAttention 性能的约 85–90%,同时提供更高的灵活性,包括块稀疏性和自定义掩码。要启用这些快速路径,请将以下 torch.backend.cuda 属性设置为 True:
# 确保已启用 SDPA 快速路径
torch.backends.cuda.enable_flash_sdp(True)
torch.backends.cuda.enable_math_sdp(True)
torch.backends.cuda.enable_mem_efficient_sdp(True)
# Ensure SDPA fast paths are enabled
torch.backends.cuda.enable_flash_sdp(True)
torch.backends.cuda.enable_math_sdp(True)
torch.backends.cuda.enable_mem_efficient_sdp(True)
When using torch.nn.attention.flex_attention, make sure your inputs meet the fast-path constraints. This way, TorchInductor can emit the fused Triton kernels.使用 torch.nn.attention.flex_attention 时,请确保输入满足快速路径的约束条件。这样 TorchInductor 才能生成融合的 Triton 内核。
TorchInductor and Triton support automated warp specialization on modern GPUs. The compiler will enable it selectively when it’s deemed beneficial. Warp specialization can be tuned using Triton meta-parameters such as num_consumer_groups and num_buffers_warp_spec. These optimizations further improve GEMM throughput. Triton’s automatic warp specialization supports TMA and tensor descriptor APIs on modern GPU targets including Blackwell (e.g., tcgen05).TorchInductor 和 Triton 在现代 GPU 上支持自动线程束专用化。编译器会在认为有益时有选择地启用它。线程束专用化可通过 Triton 元参数(如 num_consumer_groups 和 num_buffers_warp_spec)进行调优。这些优化进一步提升 GEMM 吞吐量。Triton 的自动线程束专用化在现代 GPU 目标(包括 Blackwell,例如 tcgen05)上支持 TMA 和 tensor descriptor API。
In short, many models run significantly faster with torch.compile, though the exact gains depend on your models’ characteristics. The first time you run torch.compile, you pay a compile and autotune cost, but subsequent runs use the cached graph and kernels for lightning-fast execution.简而言之,许多模型在使用 torch.compile 后运行速度显著提升,但具体收益取决于模型的特征。首次运行 torch.compile 时需要付出编译和自动调优的开销,但后续运行会使用缓存的图和内核,从而实现极快的执行速度。
动态形状与可变序列长度
Dynamic Shapes and Variable Sequence Lengths
A major challenge with LLM training and inference is the variable-sized sequence inputs. In traditional compilers and accelerators, varying shapes often cause recompilation or otherwise require padding inputs to a fixed, common size. This section discusses how dynamic shape tracing works in torch.compile to handle variable-length sequences.LLM 训练和推理的一大挑战是可变大小的序列输入。在传统编译器和加速器中,变化的形状往往会导致重新编译,或者需要将输入填充到固定的统一尺寸。本节讨论 torch.compile 中动态形状跟踪如何工作,以处理可变长度序列。
Fortunately, the PyTorch compiler stack is designed to handle dynamic shapes gracefully. Specifically, it allows models to accept different input sizes without recompiling every time by using the SymPy library to represent unknown dimensions symbolically, as we’ll cover in a bit.幸运的是,PyTorch 编译器栈在设计上能够优雅地处理动态形状。具体来说,它使用 SymPy 库以符号方式表示未知维度,使模型能够接受不同的输入尺寸而无需每次都重新编译,我们稍后会介绍这一点。
The PyTorch compiler will automatically mark dimensions as dynamic if it observes changes in their size. TorchInductor starts with static assumptions and then generalizes on recompile if it detects shape variability. You typically see one extra compile for the first new shape. By setting the dynamic=True flag upfront, you will force the compiler to consider all dimensions as dynamic from the start. However, remember that setting dynamic=True will disable CUDA Graphs. Prefer marking the code with only known varying dimensions using torch._dynamo.mark_dynamic().如果 PyTorch 编译器观察到某些维度的大小发生变化,就会自动将这些维度标记为动态。TorchInductor 从静态假设开始,若检测到形状可变性,则在重新编译时进行泛化。通常你会看到针对第一个新形状多出一次编译。通过预先设置 dynamic=True 标志,可以强制编译器从一开始就将所有维度视为动态。但请记住,设置 dynamic=True 会禁用 CUDA 图。更可取的做法是使用 torch._dynamo.mark_dynamic() 仅标记已知会变化的维度。
TorchDynamo and TorchInductor insert a guard-like sequence_length <= 256 (or whatever range you specify) during tracing on dynamic dimensions to generate code that works for a variety and range of sizes. For instance, if an output size is x.size(0) + y.size(0), Inductor can represent that as a symbolic expression and ensure the generated code works for any values that satisfy the guard conditions.TorchDynamo 和 TorchInductor 在对动态维度进行跟踪时,会插入类似 sequence_length <= 256(或你指定的任意范围)的守卫条件,以生成适用于多种尺寸和范围的代码。例如,如果某个输出尺寸为 x.size(0) + y.size(0),Inductor 可以将其表示为符号表达式,并确保生成的代码对满足守卫条件的任意取值都有效。
When Dynamo encounters a new shape for sequence_length, it sets a new guard such as sequence_length <= 1024 and compiles the kernels under this new assump-tion—treating the dimension as dynamic from that point on. Later, if a longer sequence is seen that violates the guard, the compiler will recompile a new version of the graph that handles the larger range. Over time, it builds up a cache of compiled kernels for each different shape range.当 Dynamo 遇到 sequence_length 的新形状时,它会设置新的守卫条件,例如 sequence_length <= 1024,并在这一新假设下编译内核——从此将该维度视为动态。之后,如果出现更长的序列违反了该守卫条件,编译器会重新编译一个新版本的图来处理更大的范围。随着时间推移,它会为每个不同的形状范围积累起一份已编译内核的缓存。
You can also manually mark expected dynamic dimensions on a tensor with torch._dynamo.mark_dynamic(tensor, dim) to preempt a recompile. You can also use torch.compiler.set_stance(), which lets you adjust how recompilations are handled. For instance, you can use an eager-on-recompile stance to fall back to eager mode after a certain number of recompiles. We’ll discuss best practices for avoiding recompiles in a bit.你也可以用 torch._dynamo.mark_dynamic(tensor, dim) 手动在张量上标记预期的动态维度,从而预先避免重新编译。还可以使用 torch.compiler.set_stance(),它让你调整重新编译的处理方式。例如,你可以采用 eager-on-recompile 立场,在重新编译达到一定次数后回退到 eager 模式。稍后我们会讨论避免重新编译的最佳实践。
TorchInductor attempts to generalize shapes after the first recompilation instead of repeatedly specializing on each new shape. For instance, it will emit conditional code inside the generated kernel using an if statement so that one kernel works for a range of sequence_lengths without erroring out. This reduces the need for separate compilation for every single size.TorchInductor 会在首次重新编译之后尝试对形状做泛化,而不是针对每个新形状反复特化。例如,它会在生成的内核中使用 if 语句发出条件代码,使一个内核就能适用于一定范围的 sequence_length 而不报错。这减少了对每个单独尺寸分别编译的需求。
For context, a simple but inefficient way to handle variable-length sequences without supporting dynamic shapes is to pad all input sequences to the max length in the batch. This way, you can use one static computation for all inputs. While padding simplifies the implementation, it is inefficient when input lengths vary widely since a lot of compute is wasted on the meaningless padding tokens.作为背景,在不支持动态形状的情况下处理变长序列,一种简单但低效的方法是把所有输入序列填充到批内的最大长度。这样,你就可以对所有输入使用同一套静态计算。填充虽然简化了实现,但当输入长度差异很大时效率很低,因为大量算力被浪费在无意义的填充 token 上。
Padding can hurt GPU utilization if the maximum length is much bigger than the average length of all the inputs. With dynamic shape-compilation, however, we can let the compiler generate code that only iterates up to the actual sequence length of each input. Dynamic shapes let you avoid excessive padding for variable lengths.如果最大长度远大于所有输入的平均长度,填充会损害 GPU 利用率。而借助动态形状编译,我们可以让编译器生成只迭代到每个输入实际序列长度的代码。动态形状让你能够避免为变长输入做过度的填充。
Let’s look at a typical text-based generative AI scenario in which sequence lengths continue to grow as the generation progresses. Compiling with dynamic shapes can consistently outperform eager execution—even as sequence length increases.让我们看一个典型的文本生成式 AI 场景:随着生成过程的推进,序列长度不断增长。使用动态形状编译可以稳定地优于 eager 执行——即使序列长度不断增加。
In contrast, if one were to pad everything to a power-of-two length to use static shapes, it would introduce a lot of wasted computation and increase compile time due to larger tensor sizes. In other words, using dynamic shapes provides better compile-time performance and runtime performance and easier usage since you don’t have to manually pad the inputs.相反,如果为了使用静态形状而把所有内容填充到 2 的幂长度,就会引入大量浪费的计算,并且由于张量尺寸更大而增加编译时间。换言之,使用动态形状能带来更好的编译期性能和运行时性能,使用也更简单,因为你不必手动填充输入。
With dynamic shapes, you can compile once and use the same compiled model on inputs of different shapes. If the variations are within the supported range, one compiled model can handle multiple configurations.借助动态形状,你可以只编译一次,并将同一个已编译模型用于不同形状的输入。如果变化范围落在受支持的区间内,一个已编译模型就能处理多种配置。
Internally, TorchInductor uses the SymPy library to represent dynamic dimensions symbolically. It will propagate these symbols through the IR so that an expression like在内部,TorchInductor 使用 SymPy 库以符号方式表示动态维度。它会将这些符号在 IR 中传播,从而使如下表达式
z.size(0) = x.size(0) + y.size(0) can be handled symbolically. Inductor will reduce conditions to guard expressions.z.size(0) = x.size(0) + y.size(0) 能够以符号方式处理。Inductor 会将条件归约为守卫表达式。
If a guard fails because the dimension fell outside an expected range—or a data-dependent condition changed, Inductor will trigger a recompile. In essence, TorchInductor attempts to compile a general kernel for a range of sizes instead of a single fixed size.如果某个守卫失败——原因是维度超出了预期范围,或者某个数据相关条件发生了变化——Inductor 就会触发重新编译。本质上,TorchInductor 尝试针对一定尺寸范围编译一个通用内核,而不是针对单一固定尺寸。
Dynamic shape has significantly improved in recent releases. However, certain operations may force shape specialization if the compiler can’t handle them symbolically. In this case, the compiler might insert more guards, which, if violated often, could lead to frequent recompilations and negate the benefits of compiling.动态形状在近期的版本中已有显著改进。然而,如果编译器无法以符号方式处理某些算子,这些算子可能会强制进行形状特化。在这种情况下,编译器可能插入更多守卫,而这些守卫若经常被违反,就可能导致频繁重新编译,从而抵消编译带来的收益。
Data-dependent control flow still triggers specialization. Use dynamic shapes for varying sequence lengths but not for truly data-dependent branches.数据相关的控制流仍会触发特化。对于变化的序列长度可以使用动态形状,但对于真正数据相关的分支则不要使用。
It’s worth noting that as of this writing, CUDA Graph replay requires static shapes (and fixed memory addresses). And only limited parameter updates are supported on instantiated graphs. Memory addresses and kernel-launch topology must remain compatible with capture. As such, enabling dynamic shapes will typically disable graph capture for those regions. This prevents the compiler from gaining the performance benefits of CUDA Graphs, including reduced kernel-launch overhead.值得注意的是,截至本文写作时,CUDA Graph 重放要求静态形状(以及固定内存地址)。并且在已实例化的图上仅支持有限的参数更新。内存地址与内核启动拓扑必须与捕获过程保持兼容。因此,启用动态形状通常会使这些区域无法进行图捕获。这使编译器无法获得 CUDA Graph 带来的性能收益,包括降低内核启动开销。
It’s recommended to profile your system to see if dynamic shapes are worth using for your use case. In certain cases, it might be better to pad to a fixed size, use static shapes with CUDA Graphs, and achieve higher throughput by not having to recompile for each unique length. In other cases, dynamic shapes will be better.建议对你的系统进行性能剖析,以判断动态形状在你的使用场景中是否值得采用。在某些情况下,填充到固定尺寸、配合 CUDA Graph 使用静态形状,并通过避免为每个不同长度重新编译来获得更高吞吐量,可能是更好的选择。在其他情况下,动态形状则更优。
You should profile different approaches to find what works best for you. When you do this, be sure to monitor memory usage. Code that supports dynamic shapes will incur a slightly higher memory footprint due to the additional guards and generalized code needed for the maximum range.你应当对不同的方案进行性能剖析,找出最适合自己的做法。在此过程中,务必监控显存使用情况。支持动态形状的代码会带来略高的显存占用,因为需要额外的守卫以及为覆盖最大范围而生成的通用代码。
In short, dynamic shape support means you don’t have to disable torch.compile for variable-length inputs common in LLM models. By supporting dynamic shapes, the PyTorch compiler can perform kernel fusion and other optimizations across different input sizes.简而言之,动态形状支持意味着你不必因为 LLM 模型中常见的变长输入而禁用 torch.compile。通过支持动态形状,PyTorch 编译器可以跨不同输入尺寸执行内核融合及其他优化。
禁用 PyTorch 编译器并回退到 Eager 模式
Disabling the PyTorch Compiler and Reverting Back to Eager Mode
If you want to completely disable torch.compile without changing your code— useful for A/B testing performance and isolating issues—you can use the @torch.com piler.disable decorator to disable compilation for that function. For region-scoped control, use torch.compiler.set_stance() as a context manager. This will force the code to run in eager mode. For example, you might want to disable compilation for complex data loading or one-time initialization logic to keep the compiled graph focused on computations. This is also useful around code that does not work well with tracing, as we’ll cover in a bit.如果你想在不改动代码的前提下完全禁用 torch.compile——这对于 A/B 测试性能和隔离问题很有用——可以使用 @torch.com piler.disable 装饰器来禁用该函数的编译。若要进行区域范围的控制,可将 torch.compiler.set_stance() 用作上下文管理器。这会强制代码以 Eager 模式运行。例如,你可能希望针对复杂的数据加载或一次性初始化逻辑禁用编译,以使编译后的图专注于计算。对于与跟踪配合不佳的代码,这一做法同样有用,我们稍后会讨论。
Or, you can simply change to use the eager backend as follows: torch.compile(model, backend="eager"). This will revert your code to run in eager mode. This lets you easily debug and compare correctness/performance results between compiled and eager modes.或者,你也可以简单地改为使用 eager 后端,如下所示:torch.compile(model, backend="eager")。这会让你的代码回退到以 eager 模式运行。这样你就能轻松调试,并在编译模式与 eager 模式之间比较正确性/性能结果。
torch.compiler.disable() and torch.compiler.set_stance() are a valuable escape hatches when certain operations don’t work with PyTorch compile—or you simply don’t want them in the graph for performance reasons. Speaking of performance, let’s explore ways to improve the performance of our compiled graphs and code using the PyTorch compiler logs.torch.compiler.disable() 和 torch.compiler.set_stance() 是很有价值的逃生舱(escape hatch):当某些操作无法与 PyTorch compile 配合工作,或者你出于性能考虑根本不想让它们进入计算图时,就可以使用它们。说到性能,接下来我们借助 PyTorch 编译器日志,探索提升已编译计算图和代码性能的方法。
性能提示与生成代码调试
Performance Hints and Debugging Generated Code
Another extremely useful logging option to enable is TORCH_LOGS="perf_hints". These logs will show you missed performance-optimization opportunities. For example, if a certain pattern could not be fused—or if a CUDA Graph could not be used— it will log a hint like “PerfHint: CUDA Graph not used because input is mutated” or “PerfHint: fell back to eager for random op,” etc. These hints guide you on what might be limiting the performance of your code or model.另一个极其有用的日志选项是启用 TORCH_LOGS="perf_hints"。这些日志会显示你错过的性能优化机会。例如,如果某个模式无法被融合——或者无法使用 CUDA 图——它就会记录一条提示,如“PerfHint: CUDA Graph not used because input is mutated”或“PerfHint: fell back to eager for random op”等。这些提示会指引你找出可能限制代码或模型性能的因素。
For deeper performance debugging and tuning, you likely want to see the exact code that TorchInductor generates. There are a couple of ways to inspect the code. First, you can set TORCH_LOGS="output_code" to print the generated code for each compiled graph. This will show the raw source code for the generated kernels. You can even modify the source code and further optimize, if needed.若要进行更深入的性能调试与调优,你很可能想查看 TorchInductor 生成的确切代码。有几种方式可以检查代码。首先,你可以设置 TORCH_LOGS="output_code" 来打印每个已编译计算图所生成的代码。这会显示所生成内核的原始源代码。如有需要,你甚至可以修改源代码并进一步优化。
You can also enable TorchInductor’s debug mode by setting TORCH_COMPILE_DEBUG=1. When you run your program with debug mode enabled, Inductor will create a debug directory (e.g., /tmp/torchinductor_<pid>/...) that contains the FX Graph (.fx), Inductor artifacts such as outputcode.py, fx_graph_runnable.py, IR dumps, and generated Triton sources.你也可以通过设置 TORCH_COMPILE_DEBUG=1 来启用 TorchInductor 的调试模式。在启用调试模式的情况下运行程序时,Inductor 会创建一个调试目录(例如 /tmp/torchinductor_<pid>/...),其中包含 FX Graph(.fx)、Inductor 产物(如 outputcode.py、fx_graph_runnable.py)、IR 转储以及生成的 Triton 源代码。
When reading the generated .triton code, you may notice Triton-specific constructs —or even raw PTX in advanced cases. If you also inspect the compiled PTX in the debug artifacts, you may see mma.sync instructions where tl.dot is lowered to Tensor Core operations. These logs, tools, and artifacts are incredibly useful for performance tuning because they let you see exactly what the compiler is doing. Understanding these can help you verify that the compiler is applying optimizations like kernel fusion, warp specialization, or double buffering. If you spot an inefficiency, you can manually create a custom Triton kernel for your specific use case.阅读生成的 .triton 代码时,你可能会注意到 Triton 特有的构造——在高级场景下甚至可能看到原始 PTX。如果你还检查调试产物中编译后的 PTX,可能会看到 mma.sync 指令,即 tl.dot 被下沉为张量核心操作的位置。这些日志、工具和产物对性能调优极为有用,因为它们让你确切看到编译器在做什么。理解这些内容有助于你验证编译器是否正在应用内核融合、线程束专用化或双缓冲等优化。如果发现效率低下的地方,你可以针对自己的具体用例手动编写自定义 Triton 内核。
调试数值正确性与精度
Debugging Numerical Correctness and Accuracy
While very rare, it’s possible that torch.compile produces a result that is numerically different compared to eager mode. If you suspect a bug in the compiler, there are a few strategies to verify and collect data before notifying the community and creating a GitHub issue.尽管非常罕见,但 torch.compile 确实有可能产生与 eager 模式在数值上不同的结果。如果你怀疑编译器存在缺陷,在通知社区并创建 GitHub issue 之前,有几种策略可用于验证并收集数据。
First, you can use PyTorch’s minifier tools to create reproducible scripts. PyTorch has a TorchDynamo minifier tool and TorchInductor minifier tool, which will try to reduce your program to the smallest version that still reproduces the error. It’s very helpful to create a small, reproducible script for the PyTorch team to use if needed. You would attach this file to your GitHub issue if it gets to this point.首先,你可以使用 PyTorch 的最小化工具(minifier)来创建可复现脚本。PyTorch 提供了 TorchDynamo 最小化工具和 TorchInductor 最小化工具,它们会尝试把你的程序缩减到仍能复现该错误的最小版本。创建一个小的可复现脚本对 PyTorch 团队非常有帮助(如有需要)。如果事情发展到那一步,你可以把这个文件附在你的 GitHub issue 上。
Additionally, you can configure TorchDynamo to debug numerical accuracy at each layer of the compiler stack. To help determine where a numerical discrepancy is introduced, you can set the following environment variables during compilation to compare eager mode to the different compiler stages and isolate if the issue is in TorchDynamo, AOT Autograd, or TorchInductor:此外,你可以配置 TorchDynamo 在编译器栈的每一层调试数值精度。为帮助确定数值差异是在哪一层引入的,你可以在编译期间设置以下环境变量,将 eager 模式与各个编译器阶段进行对比,从而定位问题出在 TorchDynamo、AOT Autograd 还是 TorchInductor:
# 在每个编译阶段之后转储输出
TORCHDYNAMO_REPRO_AFTER="aot"
TORCHDYNAMO_REPRO_LEVEL=4
# Dump the outputs after each compilation stage
TORCHDYNAMO_REPRO_AFTER="aot"
TORCHDYNAMO_REPRO_LEVEL=4
These settings will cause TorchDynamo to dump the graph after each stage—and run each graph in eager mode for comparison. This can help pinpoint which stage introduced the error.这些设置会让 TorchDynamo 在每个阶段之后转储计算图,并以 eager 模式运行每个图以进行对比。这有助于精确定位是哪个阶段引入了误差。
Specifically, setting TORCHDYNAMO_REPRO_AFTER="aot" tells TorchDynamo to dump the FX Graph and trigger the logic to generate a script to reproduce the error after the AOT Autograd stage. This is in contrast to generating the reproduction script after the initial Dynamo capture.具体而言,设置 TORCHDYNAMO_REPRO_AFTER="aot" 会告诉 TorchDynamo 在 AOT Autograd 阶段之后转储 FX 图,并触发生成复现错误脚本的逻辑。这与在初始 Dynamo 捕获之后生成复现脚本的做法相反。
Using TORCHDYNAMO_REPRO_LEVEL=4, TorchDynamo will run each dumped graph in eager mode and compare its outputs to the compiled version. This halts and saves a minimal reproduction script if any numeric mismatch is detected.使用 TORCHDYNAMO_REPRO_LEVEL=4 时,TorchDynamo 会以 eager 模式运行每个转储的图,并将其输出与编译版本进行对比。一旦检测到任何数值不匹配,就会中止并保存一个最小复现脚本。
If using random numbers (seeds) or sequences, you should make sure they are being generated consistently. By default, TorchInductor might not produce the exact same random seed or sequence as with eager mode. One reason is that fused or reordered kernels may not generate numbers in the same, expected order as eager mode.如果使用随机数(种子)或随机序列,应确保它们被一致地生成。默认情况下,TorchInductor 生成的随机种子或序列可能与 eager 模式不完全相同。原因之一是,融合或重排后的内核可能不会按 eager 模式所预期的那样以相同顺序生成数字。
If needed, you can set torch._inductor.config.fallback_random=True to force TorchInductor to generate random numbers exactly like it would with eager mode. This will incur a slight performance hit, but it may be required for numerical correctness when using the PyTorch compiler.如有需要,可以设置 torch._inductor.config.fallback_random=True,强制 TorchInductor 完全按照 eager 模式的方式生成随机数。这会带来轻微的性能损失,但在使用 PyTorch 编译器时,为保证数值正确性可能是必需的。
Numerical differences can also stem from floating-point precision. For example, if you use PyTorch automatic mixed precision (AMP) or BF16, the order of operations in a fused kernel might introduce slight numerical differences versus eager’s unfused sequence.数值差异也可能源于浮点精度。例如,如果你使用 PyTorch 自动混合精度(AMP)或 BF16,融合内核中的运算顺序可能与 eager 的非融合序列引入轻微的数值差异。
While such differences rarely affect convergence, they can in some cases. If you suspect precision-related instability, try disabling torch.compile and run the model in full FP32 to isolate the issue. You can also use torch.set_float32_matmul_preci sion('highest') to control TF32 usage and the accuracy-performance trade-off for full FP32 matmuls and maximum numerical accuracy.虽然这类差异很少影响收敛,但在某些情况下确实会影响。如果你怀疑是精度相关的不稳定性,可以尝试禁用 torch.compile 并以完整 FP32 运行模型以隔离问题。你还可以使用 torch.set_float32_matmul_preci sion('highest') 来控制 TF32 的使用,以及完整 FP32 matmuls 在精度与性能之间的权衡,从而获得最大数值精度。
It’s also important to understand that small discrepancies may arise from using mixed precision (e.g., FP16/BF16). You can enforce deterministic behavior by setting torch.use_deterministic_algorithms(True). This causes PyTorch to throw an error if a nondeterministic operation is used. While torch.compile does reduce some sources of nondeterminism by design, it’s still good practice to enable this flag during debugging.同样重要的是要理解,使用混合精度(例如 FP16/BF16)可能会产生小的差异。你可以通过设置 torch.use_deterministic_algorithms(True) 来强制确定性行为。这会使 PyTorch 在使用非确定性操作时抛出错误。虽然 torch.compile 在设计上确实减少了一些非确定性来源,但在调试期间启用该标志仍是良好实践。
Keep in mind, however, that not all operations have deterministic implementations. For example, the default torch.matmul() operation that relies on cuBLAS does not have a deterministic implementation.但请记住,并非所有操作都有确定性实现。例如,依赖 cuBLAS 的默认 torch.matmul() 操作就没有确定性实现。
Specifically, the cuBLAS implementation relies on parallel optimizations like split-K, which can reduce operations in varying orders. This results in floating-point results that aren’t bitwise reproducible across runs.具体来说,cuBLAS 实现依赖 split-K 等并行优化,这些优化会以不同顺序执行归约运算。这导致浮点结果在不同运行之间无法按位复现。
As such, enabling this setting may cause your code to fail unless there is a fallback alternative available. To enforce full determinism for cuBLAS-dependent operations like torch.matmul(), you need to call torch.use_deterministic_algorithms(True) and set the CUBLAS_WORKSPACE_CONFIG to a fixed size, as shown here:因此,启用该设置可能会导致代码失败,除非存在可用的回退方案。要为 torch.matmul() 这类依赖 cuBLAS 的操作强制完全确定性,需要调用 torch.use_deterministic_algorithms(True) 并将 CUBLAS_WORKSPACE_CONFIG 设置为固定大小,如下所示:
# 在启动 Python/PyTorch 进程之前设置此项
export CUBLAS_WORKSPACE_CONFIG=:4096:8   # 或 :16:8
# 与 PyTorch 进程一起使用此项
torch.use_deterministic_algorithms(True)
# Set this before starting the Python/PyTorch process
export CUBLAS_WORKSPACE_CONFIG=:4096:8   # or :16:8
# Use this with the PyTorch process
torch.use_deterministic_algorithms(True)
Here, the first value (e.g., 4096 or 16) selects the size of the cuBLAS workspace buffer in bytes rounded to an internal bucket. The second value (e.g., 8) selects how many such buffers are reserved. Set either :4096:8 or :16:8 as documented to enforce deterministic algorithms.这里,第一个值(例如 4096 或 16)选择 cuBLAS 工作区缓冲区的大小,单位为字节,并取整到内部桶。第二个值(例如 8)选择保留多少个这样的缓冲区。按文档所述设置 :4096:8 或 :16:8,以强制使用确定性算法。
To force cuBLAS to use deterministic algorithms under torch.use_determinis tic_algorithms(True), set CUBLAS_WORKSPACE_CONFIG to a supported value like :4096:8 or :16:8, as documented. If you enforce determinism without setting this, PyTorch will raise at runtime for operations that would otherwise select nondeterministic cuBLAS algorithms.要在 torch.use_determinis tic_algorithms(True) 下强制 cuBLAS 使用确定性算法,需按文档将 CUBLAS_WORKSPACE_CONFIG 设置为受支持的值,例如 :4096:8 或 :16:8。如果在未设置该项的情况下强制确定性,那么对于原本会选择非确定性 cuBLAS 算法的运算,PyTorch 会在运行时抛出错误。
Also, for critical workloads, you might temporarily disable certain compiler optimizations by setting flags like torch._inductor.config.triton.cudagraphs=False to better isolate the cause of a discrepancy. This disables CUDA Graph capture for TorchInductor-generated Triton kernels.此外,对于关键工作负载,你可以通过设置 torch._inductor.config.triton.cudagraphs=False 之类的标志,临时禁用某些编译器优化,以便更好地定位差异的成因。这会禁用针对 TorchInductor 生成的 Triton 内核的 CUDA 图捕获。
Debugging PyTorch compiler optimizations requires a slightly different mindset since you’re looking at the meta-level execution steps through logs and graph visualizations—in addition to the low-level generated code. Tools like torch._dynamo.explain() give a high-level overview of how your code is converted into graphs, graph breaks, and subgraphs, while the various TORCH_LOGS options let you peek into the decisions that the compiler makes—as well as the exact code that it generates.调试 PyTorch 编译器优化需要略微不同的思维方式,因为除了底层的生成代码之外,你还要通过日志和图可视化来审视元层面的执行步骤。torch._dynamo.explain() 之类的工具可以给出高层概览,说明你的代码如何被转换为图、图断点(graph break)和子图;而各种 TORCH_LOGS 选项则让你得以窥探编译器所做的决策,以及它生成的确切代码。
In short, with these combined tools and debugging mechanisms, you can iteratively eliminate graph breaks and make sure your model and code are fully captured and optimized. The payoff is worth it, as a well-compiled model can significantly outperform its eager-execution counterpart—especially for large LLM architectures in which every bit of performance improvement will add up.简而言之,借助这些组合起来的工具与调试机制,你可以迭代地消除图断点,确保模型和代码被完整捕获并优化。这样的回报是值得的,因为编译良好的模型可以显著优于其即时执行(eager execution)的对应版本——尤其是对于大型 LLM 架构,其中每一点性能提升都会累积起来。
解释并最小化图断点
Explaining and Minimizing Graph Breaks
When using torch.compile, diagnosing performance and correctness requires specialized tools. In this section, we’ll show you how to use various tools and best practices to debug and pinpoint excessive graph breaks. These include torch._dynamo.explain(), environment variables to log compiler decisions, and best practices for debugging both the captured graphs and the kernels that they generate.使用 torch.compile 时,诊断性能与正确性问题需要专门的工具。本节将展示如何使用各种工具和最佳实践来调试并定位过多的图断点,包括 torch._dynamo.explain()、用于记录编译器决策的环境变量,以及调试所捕获的图及其生成的内核的最佳实践。
图断点与 TorchDynamo explain()
Graph Breaks and TorchDynamo explain()
A graph break occurs when TorchDynamo cannot continue capturing a continuous sequence of operations into a single graph. When this happens, it falls back to eager execution for this part of the code.当 TorchDynamo 无法继续将一段连续的操作序列捕获到单个图中时,就会发生图断点。此时,它会针对这部分代码回退到即时执行。
Graph breaks are the enemy of performance. Each break means an optimized graph is cut short—and more Python overhead is introduced. If you compile a model and see only modest speedups, it may be caused by frequent graph breaks that are preventing large, fused graphs. Ideally, we want as few breaks as possible—ideally one large graph for the whole model or whole training step.图断点是性能的大敌。每一次断点都意味着优化后的图被截断,并引入更多 Python 开销。如果你编译了模型却只看到有限的加速,原因可能是频繁的图断点阻碍了大型融合图的形成。理想情况下,我们希望断点尽可能少——最好整个模型或整个训练步骤只有一个大图。
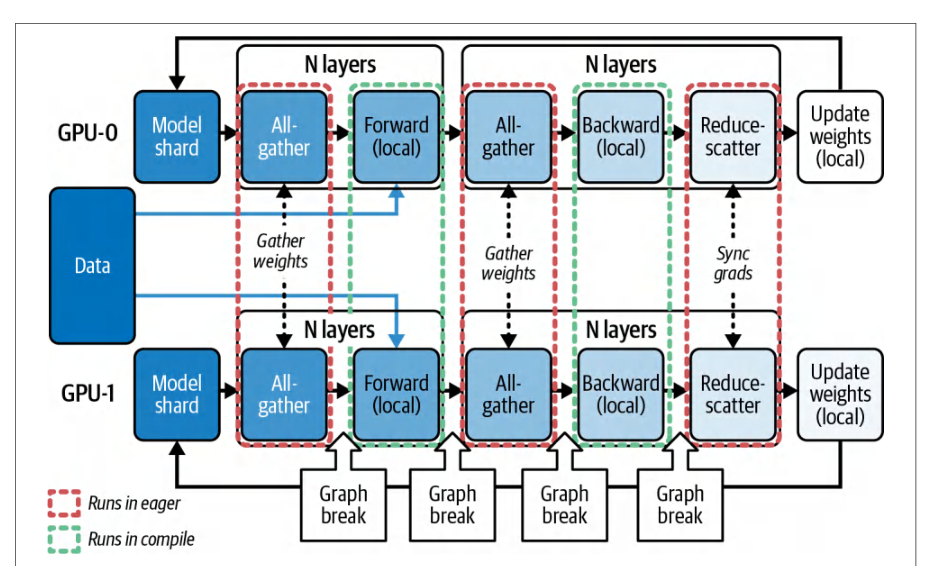
Complex graphs that involve collective communications (e.g., all-gather, reduce-scatter, etc.) often require graph breaks. Figure 14-5 shows the graph breaks in PyTorch’s FSDP strategy due to collective communication.涉及集合通信(例如全收集、归约散射等)的复杂图往往需要图断点。图 14-5 展示了 PyTorch 的 FSDP 策略中因集合通信而产生的图断点。
PyTorch provides torch._dynamo.explain() to help analyze and debug graph breaks. When invoking this debugging function with your model and example inputs, it will run the model within TorchDynamo and return a report of how many graphs were generated, where the breaks occurred, and why they happened, as shown here, followed by the detailed graph-break analysis and explanation:PyTorch 提供 torch._dynamo.explain() 来帮助分析和调试图断点。用你的模型和示例输入调用这个调试函数时,它会在 TorchDynamo 中运行该模型,并返回一份报告,说明生成了多少个图、断点发生在哪里以及为何发生,如下所示,随后是详细的图断点分析与解释:
import torch._dynamo as dynamo
def toy_example(a, b):
    x = a / (torch.abs(a) + 1)
    print("woo")         # 模型中的 print 语句
    if b.sum() < 0:      # 依赖数据的动态控制流
        b = -b
    return x * b
explanation = dynamo.explain(toy_example)(torch.randn(10), torch.randn(10))
print(explanation)
Graph Count: 3
Graph Break Count: 2
Op Count: 5
Break Reasons:
  Break Reason 1:
    Reason: builtin: print [...ConstantVariable] False
    User Stack:
import torch._dynamo as dynamo
def toy_example(a, b):
    x = a / (torch.abs(a) + 1)
    print("woo")         # a print statement in the model
    if b.sum() < 0:      # dynamic control flow depending on data
        b = -b
    return x * b
explanation = dynamo.explain(toy_example)(torch.randn(10), torch.randn(10))
print(explanation)
Graph Count: 3
Graph Break Count: 2
Op Count: 5
Break Reasons:
  Break Reason 1:
    Reason: builtin: print [...ConstantVariable] False
    User Stack:
      <frame at toy_example: line 3, in toy_example>
  Break Reason 2:
    Reason: generic_jump TensorVariable()
    User Stack:
      <frame at toy_example: line 5, in toy_example>
Ops per Graph:
  ...
Here, the explanation shows that TorchDynamo splits the code into three graph segments across two graph breaks. Note the “User Stack” portions of the output that point to the specific line of code where the issue happens. This is very useful for pinpointing the code causing the graph break.这里,解释输出显示 TorchDynamo 将代码拆分为三个图段、跨越两处图断点(graph break)。注意输出中的“User Stack”部分,它指向问题发生的具体代码行。这对于精确定位引发图断点的代码非常有用。
The first break is caused by the print("woo") near line 3. Because print() has a “side effect” of writing text to stdio, it isn’t capturable. As such, Dynamo breaks the graph into two graphs: before and after the print().第一处断点由第 3 行附近的 print("woo") 引起。由于 print() 具有向 stdio 写入文本的“副作用”,因此无法被捕获。于是 Dynamo 将图拆分为两个图:print() 之前和之后。
The second graph break is caused by the dynamic control flow logic if b.sum() < 0: near line 5, which Dynamo couldn’t handle in a single graph because of the data-dependent dynamic control flow logic used in this specific scenario—and mentioned as a limitation in a previous section.第二处图断点由第 5 行附近的动态控制流逻辑 if b.sum() < 0: 引起;由于该特定场景中使用了数据相关的动态控制流逻辑,Dynamo 无法在单个图中处理它——这一点在前面的小节中已作为一项限制提到。
Using dynamo.explain() on your model—with representative inputs—is one of the first things to do if you’re not getting the performance you expect from the PyTorch compiler. It gives you a quick overview of how many graphs were made—and why it couldn’t make just one large graph.如果你没有获得预期的 PyTorch 编译器性能,那么用具有代表性的输入对模型运行 dynamo.explain() 是最先要做的事情之一。它能让你快速了解生成了多少个图,以及为什么无法只生成一个大图。
Once you understand the causes, you can refactor the code to address the graph breaks one by one. In the preceding example, you can remove the print() or wrap it in a guard such as if not torch._dynamo.is_compiling() to avoid executing during tracing, as shown here:一旦理解了原因,就可以重构代码,逐一解决这些图断点。在前面的示例中,你可以删除 print(),或用 if not torch._dynamo.is_compiling() 这样的守卫将其包裹起来,以避免在追踪期间执行,如下所示:
import torch
def model(a, b):
    x = a / (torch.abs(a) + 1)
    # 在编译/跟踪期间避免使用
    if not torch._dynamo.is_compiling():
        print("do not print during tracing/compiling")
    if b.sum() < 0:
        b = -b
    return x * b
explanation = dynamo.explain(model)(torch.randn(10),
  torch.randn(10))
print(explanation)
import torch
def model(a, b):
    x = a / (torch.abs(a) + 1)
    # avoid during compiling/tracing
    if not torch._dynamo.is_compiling():
        print("do not print during tracing/compiling")
    if b.sum() < 0:
        b = -b
    return x * b
explanation = dynamo.explain(model)(torch.randn(10),
  torch.randn(10))
print(explanation)
As mentioned earlier, if your model truly needs data-dependent branches, you can wrap them in torch.cond(). This will capture both the “true” and “false” branches as graph subroutines, as shown here:如前所述,如果你的模型确实需要数据相关的分支,可以将它们包裹在 torch.cond() 中。这样会把“真”分支和“假”分支都捕获为图子例程,如下所示:
import torch
def model_cond(a: torch.Tensor, b: torch.Tensor) -> torch.Tensor:
    # 像之前一样计算 x
    x = a / (torch.abs(a) + 1)
    # 将编译期检查保留为
    #   Python 层守卫
    # 避免在跟踪/编译期间产生副作用
    if not torch._dynamo.is_compiling():
        print("do not print during tracing/compiling")
    # 处理 b 上依赖数据的符号翻转
    b = torch.cond(
        b.sum() < 0,  # 谓词(0 维 bool 张量)
        lambda b: -b, # true_fn:翻转符号
        lambda b: b,  # false_fn:保持不变
        (b,)          # 操作数元组
    )
    return x * b
# 像之前一样生成并打印 Dynamo 解释
explanation = dynamo.explain(model_cond)(torch.randn(10), torch.randn(10))
print(explanation)
import torch
def model_cond(a: torch.Tensor, b: torch.Tensor) -> torch.Tensor:
    # Compute x as before
    x = a / (torch.abs(a) + 1)
    # Retain the compile-time check as a
    #   Python-level guard
    # Avoid side-effects during tracing/compilation
    if not torch._dynamo.is_compiling():
        print("do not print during tracing/compiling")
    # Handle the data-dependent sign flip on b
    b = torch.cond(
        b.sum() < 0,  # predicate (0-dim bool tensor)
        lambda b: -b, # true_fn: flip sign
        lambda b: b,  # false_fn: leave unchanged
        (b,)          # operands tuple
    )
    return x * b
# Generate and print the Dynamo explanation just like before
explanation = dynamo.explain(model_cond)(torch.randn(10), torch.randn(10))
print(explanation)
Here, the predicate b.sum() < 0 must be either a Python bool or a one-element torch.bool tensor. The true_fn and false_fn are callables taking the same operands (here, just (b,)) and returning tensors of the same shape and dtype.这里,谓词 b.sum() < 0 必须是 Python bool 或单元素 torch.bool 张量。true_fn 和 false_fn 是可调用对象,接收相同的操作数(这里只是 (b,)),并返回形状和 dtype 相同的张量。
This code keeps the Dynamo compile-time check (dynamo.is_compiling()) as a Python if since it’s not data-dependent at runtime and we want to avoid side-effects (e.g., print) during tracing.这段代码将 Dynamo 的编译期检查(dynamo.is_compiling())保留为 Python if,因为它在运行时与数据无关,而且我们希望避免追踪期间的副作用(例如 print)。
Note that torch.cond() currently only accepts a tensor predicate, requires both branches to have the same inputs and return a single tensor of identical shape and dtype, and does not allow in-place mutations or arbitrary side-effects.注意,torch.cond() 目前只接受张量谓词,要求两个分支具有相同的输入并返回形状和 dtype 完全相同的单个张量,且不允许原地修改或任意副作用。
In contrast, you can use a pure-tensor masking approach with torch.where(), as described earlier. This will impose no such restrictions and avoids graph breaks, making it the simpler, more reliable choice when you don’t need the full expressivity of torch.cond(). This code is shown here:相比之下,你可以像前面所述那样,使用 torch.where() 采用纯张量的掩码方式。这种方式没有上述限制,并且能避免图断点,因此当你不需要 torch.cond() 的完整表达能力时,它是更简单、更可靠的选择。代码如下所示:
import torch
import torch._dynamo as dynamo
def model_where(a: torch.Tensor, b: torch.Tensor) -> torch.Tensor:
    # 像之前一样计算 x
    x = a / (torch.abs(a) + 1)
    # 保留编译期守卫,以避免跟踪期间产生副作用
    if not torch._dynamo.is_compiling():
    print("do not print during tracing/compiling")
    # 使用 torch.where 表达依赖数据的分支
    b = torch.where(
        b.sum() < 0,  # 谓词:0 维 bool 张量
        -b,           # true 分支:翻转符号
        b             # false 分支:保持不变
    )
    return x * b
# 像之前一样显示 Dynamo 解释
explanation = dynamo.explain(model_where)(torch.randn(10), torch.randn(10))
print(explanation)
def model_where(a: torch.Tensor, b: torch.Tensor) -> torch.Tensor:
    # Compute x as before
    x = a / (torch.abs(a) + 1)
    # Preserve compile-time guard to avoid side-effects during tracing
    if not torch._dynamo.is_compiling():
    print("do not print during tracing/compiling")
    # Data-dependent branch expressed using torch.where
    b = torch.where(
        b.sum() < 0,  # predicate: a 0-dim bool tensor
        -b,           # true branch: flip sign
        b             # false branch: unchanged
    )
    return x * b
# Display the Dynamo explanation just as before
explanation = dynamo.explain(model_where)(torch.randn(10), torch.randn(10))
print(explanation)
Here, torch.where(condition, input, other) returns a tensor selecting elements from input where condition is True and from other where condition is False. Because b.sum() < 0 produces a 0-dimensional Boolean tensor, it can be broadcast across all elements of b. This allows a single, vectorized sign flip instead of an elementwise Python if.这里,torch.where(condition, input, other) 返回一个张量:在 condition 为 True 的位置从 input 中选取元素,在 condition 为 False 的位置从 other 中选取元素。由于 b.sum() < 0 产生一个 0 维布尔张量,它可以广播到 b 的所有元素上。这样就能以单次向量化的符号翻转,替代逐元素的 Python if。
It’s also helpful to use torch.compiler.set_stance("fail_on_recompile") to force an error and refuse to run if the code is not cleanly capturable into a full graph. This is useful during development since it lets you catch graph breaks upfront at compile time instead of silently falling back to slower PyTorch eager execution.使用 torch.compiler.set_stance("fail_on_recompile") 也很有帮助:如果代码无法干净地捕获为完整图,它会强制报错并拒绝运行。这在开发期间很有用,因为它让你在编译期就提前发现图断点,而不是静默回退到更慢的 PyTorch 即时执行(eager execution)。
尽量减少图重编译
Minimize Graph Recompilations
Besides graph breaks, you should also monitor the number of recompilations. Torch-Dynamo might be compiling the graph many times if its guards keep invalidating input tensor shapes, etc. If a tensor’s shape changes at runtime, the guard fails and triggers a recompile. If you see more recompiles than expected, investigate which guard (shape, dtype, etc.) is causing it—and address the issue.除了图中断(graph break)之外,你还应监控重编译的次数。如果 Torch-Dynamo 的守卫(guard)不断使输入张量形状等失效,它可能会多次编译同一张图。如果张量形状在运行时发生变化,守卫就会失败并触发重编译。如果你看到的重编译次数超出预期,请排查是哪个守卫(形状、dtype 等)导致的,并解决该问题。
Typically, you’ll notice recompilations happening because iterations will continue to be slow—even after the initial warm-up/compile iterations. Fortunately, you can have PyTorch log each guard evaluation and any trigger recompilation using TORCH_LOGS="graph_breaks,recompiles,guards".通常,你会因为迭代持续变慢而注意到重编译正在发生——即使在最初的预热/编译迭代之后也是如此。幸运的是,你可以使用 TORCH_LOGS="graph_breaks,recompiles,guards" 让 PyTorch 记录每次守卫求值以及任何触发的重编译。
If you observe frequent guard failures, it often means a Python-side constant, such as a random number seed, timestamp, or loop-varying value, is changing on every iteration—and continuously invalidating the guard and triggering a recompile. In this case, you’ll need to ensure those values are either made static or handled with the dynamic-shape APIs presented earlier (e.g., torch._dynamo.mark_dynamic). This will help avoid needless and excessive recompiles.如果你观察到守卫频繁失败,这通常意味着某个 Python 侧常量——例如随机数种子、时间戳或随循环变化的值——在每次迭代中都在改变,从而不断使守卫失效并触发重编译。在这种情况下,你需要确保这些值要么被设为静态,要么用前面介绍的动态形状 API(例如 torch._dynamo.mark_dynamic)来处理。这有助于避免不必要且过度的重编译。
There are a few common mechanisms to minimize graph recompilations depending on the situation. First, for the constant scenario just mentioned, you can pass the constant into the code block as a tensor to prevent the compiler from guarding on the value and repeatedly failing.根据具体情况,有几种常见机制可以尽量减少图重编译。首先,对于刚才提到的常量场景,你可以把该常量作为张量传入代码块,以防止编译器对该值进行守卫并反复失败。
Next, as mentioned earlier, you can mark dynamic dimensions that you know will change using torch._dynamo.mark_dynamic(tensor, dim) to preempt a recompile. Another option is to use torch.compiler.set_stance("eager_on_recompile") to avoid repeated recompiles by falling back to eager mode after N number of recompiles. This effectively caps the limit of recompilations.其次,如前所述,你可以用 torch._dynamo.mark_dynamic(tensor, dim) 标记你已知会变化的动态维度,从而预先避免重编译。另一个选择是使用 torch.compiler.set_stance("eager_on_recompile"),在 N 次重编译之后回退到 eager 模式,以避免反复重编译。这实际上为重编译次数设定了上限。
Another option is to explicitly mark that part of the graph as safe using torch._dynamo.allow_in_graph. Let’s dive into this technique a bit more in the next section.另一个选择是用 torch._dynamo.allow_in_graph 显式将该部分图标记为安全。我们将在下一节进一步深入探讨这一技术。
使用 allow_in_graph 将函数和代码块标记为安全
Mark Functions and Code Blocks as Safe with allow_in_graph
When TorchDynamo doesn’t know how to handle a function or code block because it’s using unsupported operations, for example, you can decorate the function or wrap the code with torch._dynamo.allow_in_graph—as either a Python decorator or context manager—to tell Dynamo that it has no side effects. When you do this, Dynamo will then include the code in the trace using a more lenient analysis and acceptance policy. allow_in_graph bypasses some Dynamo safety checks. As such, prefer fixing the root cause of graph breaks first.例如,当 TorchDynamo 因为某个函数或代码块使用了不支持的操作而不知道如何处理它时,你可以用 torch._dynamo.allow_in_graph 装饰该函数或包裹该代码块——既可以作为 Python 装饰器,也可以作为上下文管理器——以此告诉 Dynamo 它没有副作用。这样做之后,Dynamo 会以更宽松的分析与接受策略将这段代码纳入跟踪。allow_in_graph 会绕过 Dynamo 的一些安全检查。因此,请优先修复图中断的根本原因。
This is an advanced feature and should be used carefully. You are essentially promising that the function is pure, always returns the same output tensor for the same input tensor, depends only on its tensor inputs, and has no side effects. If used incorrectly, you may silently get the wrong results. However, when used correctly, it can be a performance lifesaver if a specific function or code block is causing a graph break even though it’s safe to be traced.这是一项高级特性,应谨慎使用。你实际上是在承诺:该函数是纯函数,对相同输入张量总是返回相同的输出张量,只依赖其张量输入,并且没有副作用。如果使用不当,你可能会在毫无察觉的情况下得到错误结果。不过,如果使用正确,当某个特定函数或代码块虽然可以安全地被跟踪、却导致了图中断时,它可能成为性能上的救星。
In general, you should use allow_in_graph sparingly. It’s a tool for power users to override Dynamo’s conservative nature—but only when you’re absolutely sure that the function does not have side effects or hidden state that could impact the code’s correctness.一般来说,你应尽量少用 allow_in_graph。它是供高级用户用来覆盖 Dynamo 保守本性的工具——但仅当你完全确定该函数没有副作用、也没有可能影响代码正确性的隐藏状态时才使用。
处理图中断的技巧
Tips for Handling Graph Breaks
Graph breaks limit the compiler’s ability to perform large optimizations such as fusing many kernels into a smaller number of efficient kernels. This forces PyTorch to fall back to slower eager execution for certain parts of the graph.图中断限制了编译器执行大规模优化的能力,例如将许多内核融合为数量更少的高效内核。这会迫使 PyTorch 对图的某些部分回退到较慢的 eager 执行。
It’s critical to understand what triggers graph breaks—and how to prevent them. Here are some common causes of graph breaks and tips on how to minimize them:理解是什么触发了图中断,以及如何避免它们,这一点至关重要。以下是图中断的一些常见原因以及尽量减少它们的一些技巧:
- Avoid in-place operations and unexpected mutations避免原地操作与意外的修改
- TorchDynamo can handle some mutations using a mechanism called functionali-zation, which converts in-place operations to out-of-place for tracing. But certain in-place operations might still cause a graph break. If you see a break reason about mutation, such as “mutation on data” or “modifying a global,” try to rewrite that part to avoid in-place operations. Often, you can simply rewrite in-place
x.relu_()to out-of-placex = x.relu()to avoid a graph break if being in-place was causing the issue.TorchDynamo 可以通过一种称为*函数化*(functionalization)的机制处理部分修改,该机制在跟踪时把原地操作转换为非原地操作。但某些原地操作仍可能导致图断裂(graph break)。如果你看到与修改相关的断裂原因,例如“mutation on data”或“modifying a global”,请尝试重写该部分以避免原地操作。通常,如果问题正是由原地操作引起的,你只需把原地写法x.relu_()改写为非原地写法x = x.relu(),即可避免图断裂。
- Prefer PyTorch data structures, collections, and tensor operations over equivalent* *Python implementations优先使用 PyTorch 数据结构、容器与张量操作,而非等效的 Python 实现
- Appending to a Python list of tensors inside a function will confuse TorchDynamo since it doesn’t trace growing lists very well. Try to preallocate tensors or use tensor operations like
torch.stack()instead of building Python (non-PyTorch) lists dynamically. Calls to many Python libraries, including I/O operations,print,logging, andmath.*functions will most likely cause a graph break. It’s recommended to remove these from the performance-critical code paths.在函数内向 Python 张量列表追加元素会让 TorchDynamo 困惑,因为它无法很好地跟踪不断增长的列表。请尽量预分配张量,或使用torch.stack()之类的张量操作,而不是动态构建 Python(非 PyTorch)列表。调用许多 Python 库——包括 I/O 操作、print、logging以及math.*函数——极有可能导致图断裂。建议将这些调用从性能关键路径中移除。
- Avoid data-dependent control flow, if possible尽可能避免数据相关的控制流
- If you have
if tensor.sum() > 0:style logic, TorchDynamo cannot easily trace through this because the condition is unknown at compile time. It would need to choose one branch or the other based on the first run, guard on that condition, and enforce this guard for subsequent invocations. Since this is incorrect, Dynamo will create a graph break.如果你有if tensor.sum() > 0:这类逻辑,TorchDynamo 很难对其进行跟踪,因为该条件在编译期是未知的。它需要根据首次运行选择其中一个分支,对该条件设置守卫(guard),并在后续调用中强制执行该守卫。由于这样做并不正确,Dynamo 会创建图断裂。
PyTorch supports a high-level operation called torch.cond() to capture certain dynamic flows in graphs. This can encapsulate if/else statements such that both branches are compiled. However, it requires the condition to be a tensor and typically works best for things like parameter-dependent switches rather than arbitrary Python logic.PyTorch 支持一个名为 torch.cond() 的高层操作,用于在图中捕获某些动态流程。它可以将 if/else 语句封装起来,使两个分支都被编译。但它要求条件是一个张量,并且通常最适合参数相关的开关之类的情形,而非任意 Python 逻辑。
Apart from this, most data-dependent control flow still breaks graphs. Continue to prefer tensor operations (torch.where(), masks, etc.) when possible. If neither torch.cond() nor refactoring is feasible, you may have to accept the graph break and its performance impact.除此之外,大多数数据相关的控制流仍会导致图断裂。请尽可能继续优先使用张量操作(torch.where()、掩码等)。如果 torch.cond() 与重构都不可行,你可能不得不接受图断裂及其性能影响。
- Understand performance characteristics of overlapping and synchronizing subgraphs* *with PyTorch DDP理解与 PyTorch DDP 配合 时重叠与同步子图的性能特征
- PyTorch’s DDP works with TorchDynamo by explicitly breaking graphs at synchronization points, including the all-reduce buckets. You might see breaks in the explain output related to
allreduceortorch.distributedops. This is expected, as PyTorch may compile each gradient bucket’s reduction separately so that it can remove overlap communication with backward computation.PyTorch 的 DDP 通过与 TorchDynamo 配合工作,在同步点(包括 all-reduce 桶)显式地断开图。你可能会在 explain 输出中看到与allreduce或torch.distributed操作相关的断裂。这是预期行为,因为 PyTorch 可能会分别编译每个梯度桶的归约,以便将通信与反向计算重叠。
You can’t avoid graph breaks at DDP communication boundaries if you want to preserve compute-communication overlap. PyTorch’s compiler and DDP intentionally insert breaks at each all-reduce bucket so that gradient synchronization happens between subgraphs. This lets one bucket’s communication overlap with the backward computation of the next bucket.如果希望保留计算—通信重叠,就无法避免 DDP 通信边界处的图断裂。PyTorch 编译器和 DDP 会有意地在每个 all-reduce 桶处插入断裂,使梯度同步发生在子图之间。这样,一个桶的通信就能与下一个桶的反向计算重叠。
While this does prevent a single monolithic graph, it preserves performance. TorchDynamo + DDP runs with similar performance to eager-mode DDP. And it can even outperform eager DDP at scale. So, although you can’t eliminate these communication graph breaks, they are necessary to achieve correct and efficient distributed training with the proper overlap.虽然这确实阻止了形成单一的整体图,但它保住了性能。TorchDynamo + DDP 的运行性能与 eager 模式 DDP 相近,在大规模下甚至可以超过 eager DDP。因此,尽管无法消除这些通信图断裂,但它们是实现正确且高效、具有恰当重叠的分布式训练所必需的。
- Wrap graph submodules with PyTorch FSDP使用 PyTorch FSDP 封装图子模块
- PyTorch supports FSDP in compiled mode by using
use_original_params=True. A best practice is to wrap submodules, like each transformer block, into their own FSDP submodule. Dynamo will then create explicit graph breaks at each FSDP submodule boundary. This allows each shard’s communication to overlap with computation, similar to the bucketization strategy described for DDP.PyTorch 通过use_original_params=True在编译模式下支持 FSDP。最佳实践是将子模块(例如每个 transformer 块)包装成各自的 FSDP 子模块。这样 Dynamo 便会在每个 FSDP 子模块边界处创建显式的图断裂(graph break)。这使得每个分片的通信能够与计算重叠,类似于为 DDP 描述的桶化(bucketization)策略。
Compiled FSDP fuses forward and backward passes and reuses buffers across model shards using AOT Autograd and Inductor’s memory planner. As such, only the active parameter slices and minimal intermediate memory buffers are resident on each GPU. This reduces peak memory usage compared to DDP or eager mode.编译后的 FSDP 会融合前向与反向传播,并借助 AOT Autograd 和 Inductor 的内存规划器在各模型分片之间复用缓冲区。因此,每块 GPU 上仅驻留活跃的参数切片和最少量的中间内存缓冲区。与 DDP 或 eager 模式相比,这降低了峰值显存占用。
The memory savings comes from avoiding redundant gradient storage, reusing intermediate allocations, and overlapping communication with computation across shards. And these allow larger models to fit into each GPU. If you don’t wrap submodules individually, FSDP falls back to treating all parameters as one big bucket. This still works, but it limits memory benefits and overlap potential. As such, combining torch.compile with per-module FSDP wrappers is recommended for maximum speed and memory efficiency—especially on large-scale training jobs.内存节省来自避免冗余的梯度存储、复用中间分配,以及跨分片地将通信与计算重叠。这些使得更大的模型能够装入每块 GPU。如果你不单独包装子模块,FSDP 会退化为将所有参数视为一个大桶。这仍然可行,但会限制内存收益和重叠潜力。因此,建议将 torch.compile 与按模块的 FSDP 包装结合使用,以获得最大速度和显存效率——尤其是在大规模训练任务中。
- Monitor performance tradeoffs when using custom and third-party CUDA C++ and* *Triton operations使用自定义及第三方 CUDA C++ 和* *Triton 算子时,需监控性能权衡
- If you rely on a custom or third-party CUDA extension that PyTorch doesn’t know about, Dynamo will create a graph break because it can’t reason about what that operation does—or whether it’s safe. If it’s performance-critical, consider rewriting the custom operation in Python using Triton.如果你依赖 PyTorch 不了解的自定义或第三方 CUDA 扩展,Dynamo 会产生图断裂,因为它无法推断该操作的作用——也无法判断它是否安全。如果它对性能至关重要,考虑用 Triton 以 Python 重写该自定义算子。
PyTorch supports torch.library.triton_op() API that lets you integrate Triton kernels as custom operations into PyTorch seamlessly. This lets the compiler peek inside the Triton code to perform optimizations. Before diving into Triton, let’s quickly summarize how to debug various compiler phases, graph breaks, and compiler performance.PyTorch 支持 torch.library.triton_op() API,可让你将 Triton 内核作为自定义算子无缝集成到 PyTorch 中。这使编译器能够窥视 Triton 代码内部以执行优化。在深入 Triton 之前,让我们快速总结如何调试各个编译器阶段、图断裂以及编译器性能。
| TORCH_LOGS valueTORCH_LOGS 取值 | Description描述 |
|---|---|
| graph_breaksgraph_breaks | Logs graph break events记录图断裂事件 |
| dynamodynamo | Verbose logging from TorchDynamoTorchDynamo 的详细日志输出 |
| aot_graphsaot_graphs | Verbose logging from AOT AutogradAOT Autograd 的详细日志输出 |
| inductorinductor | Verbose logging from TorchInductorTorchInductor 的详细日志输出 |
| graph_outputsgraph_outputs | Shows the compiled FX graphs显示编译后的 FX 图 |
| graph_codegraph_code | Dumps the Python code for each FX graph that TorchDynamo produces导出 TorchDynamo 生成的每个 FX 图的 Python 代码 |
| dynamicdynamic | Traces decisions around dynamic shapes and when dimensions are marked as dynamic跟踪与动态形状相关的决策,以及维度何时被标记为动态 |
| perf_hintsperf_hints | Shows you the missed performance-optimization opportunities显示错过的性能优化机会 |
| output_codeoutput_code | Prints the generated code for each compiled graph打印每个已编译图的生成代码 |
| recompiles重编译 | Logs recompilation triggers记录重编译触发条件 |
| guards守卫(guards) | Logs guards and guard evaluations记录守卫及守卫求值 |
调试编译器阶段、图断裂(graph break)与性能
Debugging Compiler Phases, Graph Breaks, and Performance
You can log and debug different types of compiler events at runtime by setting various environment variables such as TORCH_LOGS, TORCH_COMPILE_DEBUG, and TORCH DYNAMO_REPRO_*. These include graph breaks, recompiles, guards, and other compiler decisions. An example of setting TORCH_LOGS is shown next (see Table 14-1 for common values):你可以在运行时通过设置 TORCH_LOGS、TORCH_COMPILE_DEBUG 和 TORCH DYNAMO_REPRO_* 等各种环境变量,来记录和调试不同类型的编译器事件。这些事件包括图断裂、重新编译、守卫(guard)以及其他编译器决策。下面给出设置 TORCH_LOGS 的示例(常见取值见表 14-1):
# "graph_breaks"、"dynamo"、"aot_graphs"、"inductor"、
# "graph_outputs"、"graph_code"、"dynamic"、"perf_hints"、
# "output_code"、"recompiles"、"guards" 等
TORCH_LOGS="graph_breaks" python train.py
# "graph_breaks", "dynamo", "aot_graphs", "inductor",
# "graph_outputs", "graph_code", "dynamic", "perf_hints",
# "output_code", "recompiles", "guards", etc.
TORCH_LOGS="graph_breaks" python train.py
This will cause PyTorch to print out whenever a graph break occurs. To summarize the different logging options, you can set TORCH_LOGS to the following to debug torch.compile, including the different phases (TorchDynamo, AOT Autograd, and TorchInductor), graphs, graph breaks, generated code, performance, recompiles, and guards—as well as compiler decisions and performance, as shown in Table 14-1.这样,只要发生图断裂,PyTorch 就会打印输出。为概括不同的日志选项,你可以将 TORCH_LOGS 设置为下列取值,以调试 torch.compile,涵盖各个阶段(TorchDynamo、AOT Autograd 和 TorchInductor)、图、图断裂、生成代码、性能、重编译和守卫,以及编译器决策与性能,如表 14-1 所示。
These settings can be useful if you suspect an issue in how the subgraphs were segmented—and which shapes were compiled. With these settings, you will get a lot of internal debugging information without changing your code.如果你怀疑子图的分段方式——以及哪些形状被编译——存在问题,这些设置会很有用。借助这些设置,你无需修改代码就能获得大量内部调试信息。
Under the hood, setting TORCH_LOGS is analogous to using the torch._logging .set_logs() API. However, setting TORCH_LOGS is sometimes easier to configure exter-nally as an environment variable.在底层,设置 TORCH_LOGS 等价于使用 torch._logging 的 .set_logs() API。不过,作为环境变量,设置 TORCH_LOGS 有时更便于在外部进行配置。
And remember that you can also set TORCH_COMPILE_DEBUG=1 to enable TorchInductor’s debug mode. This will log the FX Graph, the TorchInductor IR, the generated Triton code, and an HTML report with visualizations if Graphviz is installed.另外请记住,你还可以设置 TORCH_COMPILE_DEBUG=1 来启用 TorchInductor 的调试模式。该模式会记录 FX Graph、TorchInductor IR、生成的 Triton 代码,以及在已安装 Graphviz 时生成的可视化 HTML 报告。
You can also set TORCHDYNAMO_REPRO_AFTER and TORCHDYNAMO_REPRO_LEVEL to force TorchDynamo to dump its graph after each stage. It will also perform a runtime comparison against a noncompiled, eager-mode version of the code.你还可以设置 TORCHDYNAMO_REPRO_AFTER 和 TORCHDYNAMO_REPRO_LEVEL,强制 TorchDynamo 在每个阶段之后转储其图。它还会与未经编译的 eager 模式代码版本进行运行时对比。
It’s also possible to trace through compilations logs using a tool called tlparse. Trace logs are useful for debugging compilation events (e.g., recompilations) as well as generating bug reports.还可以使用名为 tlparse 的工具来跟踪编译日志。跟踪日志既有助于调试编译事件(例如重编译),也有助于生成缺陷报告。
To enable trace logs, specify the trace-log directory using the TORCH_TRACE environment variable. Then run tlparse on the trace-log directory to produce a tree representation of stack frames as shown here:要启用跟踪日志,请使用 TORCH_TRACE 环境变量指定 trace-log 目录。然后对该 trace-log 目录运行 tlparse,生成如下所示的栈帧树状表示:
- /workspace/networks/layers/transformer.py:634 in forward
  .../torch/nn/modules/module.py in _wrapped_call_impl
 .../torch/nn/modules/module.py in _call_impl
  - [2/2] [2/3] ../torch/_dynamo/convert_frame.py in __call__
  - /workspace/networks/layers/transformer.py:753 in forward
    - [8/2] [8/3] .../torch/_dynamo/convert_frame.py in __call__
...
In addition, you can use the Perfetto UI to display a trace timeline visualization. And since tracing incurs minimal overhead, it’s even possible to enable TORCH_TRACE in production.此外,你还可以使用 Perfetto UI 显示跟踪时间线可视化。由于跟踪带来的开销极小,甚至可以在生产环境中启用 TORCH_TRACE。
Let’s now dive deeper into OpenAI’s Triton language and compiler used by TorchInductor. We’ll write some basic and advanced Triton kernels and then register them with PyTorch.现在让我们深入探讨 TorchInductor 所使用的 OpenAI Triton 语言与编译器。我们将编写一些基础和高级 Triton 内核,然后将其注册到 PyTorch 中。
使用 OpenAI Triton 编写自定义内核
Writing Custom Kernels with OpenAI Triton
Up until now, we’ve only briefly mentioned OpenAI’s open source Triton language and compiler. Now it’s time to dive deeper since TorchInductor uses Triton as its backend code-generation implementation—and because Triton is growing in popularity with backing from large companies like OpenAI.到目前为止,我们只是简要提及了 OpenAI 开源的 Triton 语言与编译器。现在该深入探讨了,因为 TorchInductor 使用 Triton 作为其后端代码生成实现——也因为 Triton 在 OpenAI 等大型公司的支持下日益流行。
As mentioned, Inductor uses Triton to generate optimized GPU kernels under the hood. By examining, understanding, and customizing these kernels, you can further improve performance beyond what TorchInductor could produce. Learning Triton is critical to performance optimizations in a PyTorch and NVIDIA GPU environment.如前所述,Inductor 在底层使用 Triton 生成优化的 GPU 内核。通过检查、理解并自定义这些内核,你可以进一步提升性能,超越 TorchInductor 所能生成的水平。在 PyTorch 与 NVIDIA GPU 环境中进行性能优化,学习 Triton 至关重要。
At a high level, OpenAI Triton is an open source, Python-native domain-specific language (DSL) for writing GPU kernels in familiar Python. Triton also includes a JIT compiler that converts Triton code into NVIDIA PTX code directly. In other words, Triton lets you create high-performance custom GPU operations in Python—without writing CUDA C++ by hand. Triton remains tightly integrated with PyTorch, making it the go-to choice for custom GPU kernels in this ecosystem.从高层来看,OpenAI Triton 是一种开源、Python 原生的领域特定语言(DSL),用于以熟悉的 Python 编写 GPU 内核。Triton 还包含一个 JIT 编译器,可将 Triton 代码直接转换为 NVIDIA PTX 代码。换言之,Triton 让你能用 Python 创建高性能的自定义 GPU 算子——无需手写 CUDA C++。Triton 与 PyTorch 保持紧密集成,使其成为该生态系统中自定义 GPU 内核的首选。
Writing a GPU kernel in Triton is much more familiar and simpler than CUDA C++. This is especially true for researchers who prefer to stay in Python, iterate quickly, and not worry about complex C++ templates or detailed memory management. They simply don’t need to use C++ in an era when GPU-performance-focused compilers like PyTorch and Triton exist.用 Triton 编写 GPU 内核比 CUDA C++ 更熟悉、更简单。对于偏好留在 Python 中、快速迭代且不必操心复杂 C++ 模板或繁琐内存管理的研究人员来说尤其如此。在 PyTorch 和 Triton 这类专注于 GPU 性能的编译器已经存在的时代,他们根本不需要使用 C++。
While PyTorch’s torch.compile automates a lot of kernel generation, custom Triton kernels can squeeze out the last drops of performance—especially for operations outside of TorchInductor’s current scope like complex sparse patterns and novel layer types. It’s sometimes possible to beat the performance of TorchInductor’s generated code—especially if you have domain-specific knowledge. However, this is very advanced and will require ongoing maintenance and potential rewrites for new hardware support.尽管 PyTorch 的 torch.compile 自动化了大量内核生成工作,自定义 Triton 内核仍能榨取出最后一点性能——尤其是对于 TorchInductor 当前范围之外的算子,如复杂的稀疏模式和新颖的层类型。有时确实可以超越 TorchInductor 生成代码的性能——尤其是在你具备领域特定知识的情况下。然而,这属于非常高级的做法,需要持续维护,并且可能为了支持新硬件而重写。
Let’s now start with a quick Triton programming primer. Then we’ll dive into some interesting Triton topics, including accessing shared-memory, registering a Triton kernel with PyTorch, autotuning kernel-launch parameters, and profiling. Then we’ll progress to cover advanced Triton topics such as warp specialization and software pipelining (e.g., double buffering).现在我们先从一个简短的 Triton 编程入门开始。然后我们会深入一些有趣的 Triton 主题,包括访问共享内存、将 Triton 内核注册到 PyTorch、自动调优内核启动参数以及性能剖析。接着我们会进一步介绍高级 Triton 主题,例如线程束专用化和软件流水线(如双缓冲)。
Triton 编程模型
Triton Programming Model
Triton uses a single-program, multiple-data (SPMD) model, as opposed to CUDA’s SIMT model. This is significant because Triton intentionally abstracts away the low-level details of CUDA instructions and threads.Triton 采用单程序多数据(SPMD)模型,而非 CUDA 的 SIMT 模型。这一点很重要,因为 Triton 有意抽象掉了 CUDA 指令与线程的底层细节。
Triton kernels (aka programs) operate at a higher level by running instances of the program on separate thread blocks (aka cooperative thread arrays, or CTAs) as the fundamental unit of compute. This is in contrast to CUDA kernels, which run on individual threads in a thread block.Triton 内核(又称*程序*)在更高层次上运行:它以独立的线程块(又称*协作线程数组*,即 CTA)作为基本计算单元来运行程序的实例。这与 CUDA 内核形成对比——后者运行在线程块中的单个线程上。
You write a Triton kernel with the Triton Python DSL. Then the Triton JIT compiler compiles the kernel into GPU code that runs many parallel instances of this kernel. Each program instance maps to a CUDA thread block.你使用 Triton Python DSL 编写 Triton 内核。随后 Triton JIT 编译器将该内核编译为 GPU 代码,运行该内核的大量并行实例。每个程序实例映射到一个 CUDA 线程块。
Triton kernels (aka programs) are defined by decorating a Python function with @triton.jit. Within the kernel, you use special primitives from the triton.lan guage module, commonly aliased as tl, to work with memory pointers, perform vectorized loads/stores, and compute per-program indices using tl.program_id and block offset arithmetic.Triton 内核(又称*程序*)通过用 @triton.jit 装饰 Python 函数来定义。在内核内部,你使用 triton.lan guage 模块(通常别名为 tl)中的特殊原语来处理内存指针、执行向量化加载/存储,并使用 tl.program_id 和块偏移算术计算每个程序的索引。
Triton’s SPMD model means you typically work with vectorized operations such as adding two tl.arange vectors. The Triton compiler maps vectorized SPMD code across the threads in a CUDA block. There is no guaranteed one-element-to-one-thread mapping.Triton 的 SPMD 模型意味着你通常以向量化操作工作,例如将两个 tl.arange 向量相加。Triton 编译器将向量化的 SPMD 代码映射到 CUDA 块中的各线程上。并不保证元素与线程一一对应。
You don’t explicitly need to manage individual threads or warps with Triton since its compiler does this for you. Here is a simple Triton kernel that adds two vectors of equal size, n_elements, in this case:使用 Triton 时你无需显式管理单个线程或线程束,因为其编译器会替你完成。下面是一个简单的 Triton 内核,在此例中将两个大小均为 n_elements 的向量相加:
import triton
import triton.language as tl
BLOCK_SIZE = 1024
@triton.jit
def vector_add_kernel(x_ptr,y_ptr,out_ptr,n_elements,BLOCK_SIZE: tl.constexpr):
    pid = tl.program_id(axis=0)              # 每个线程块的唯一程序 ID
    block_start = pid * BLOCK_SIZE
    # 每个程序处理 BLOCK_SIZE 个元素
    offsets = block_start + tl.arange(0, BLOCK_SIZE)
    # 创建掩码以防止越界访问
    # (若 n 不能被 BLOCK_SIZE 整除)
    mask = offsets < n_elements
    x = tl.load(x_ptr + offsets, mask=mask)        # 掩码加载
    y = tl.load(y_ptr + offsets, mask=mask)
    result = x + y
    tl.store(out_ptr + offsets, result, mask=mask) # 掩码存储
import triton
import triton.language as tl
BLOCK_SIZE = 1024
@triton.jit
def vector_add_kernel(x_ptr,y_ptr,out_ptr,n_elements,BLOCK_SIZE: tl.constexpr):
    pid = tl.program_id(axis=0)              # unique program ID for each block
    block_start = pid * BLOCK_SIZE
    # each program handles BLOCK_SIZE elements
    offsets = block_start + tl.arange(0, BLOCK_SIZE)
    # Create a mask to guard against out-of-bounds
    # (if n is not divisible by BLOCK_SIZE)
    mask = offsets < n_elements
    x = tl.load(x_ptr + offsets, mask=mask)        # masked load
    y = tl.load(y_ptr + offsets, mask=mask)
    result = x + y
    tl.store(out_ptr + offsets, result, mask=mask) # masked store
Here, you see that Triton abstracts away threads and warps. Note that BLOCK_SIZE is a compile-time constant that defines how many elements each program instance processes. The number of threads per CUDA block is controlled by the kernel’s configuration using num_warps and is not equal to BLOCK_SIZE.在这里可以看到,Triton 抽象掉了线程和线程束。注意 BLOCK_SIZE 是编译期常量,定义了每个程序实例处理多少个元素。每个 CUDA 块的线程数由内核配置通过 num_warps 控制,并不等于 BLOCK_SIZE。
Specifically, in the preceding code, tl.arange(0, BLOCK_SIZE) returns a vector of indices of size BLOCK_SIZE ([0, 1, ..., BLOCK_SIZE-1]). We add pid * BLOCK_SIZE, or block_start, to the vector of indices in order to derive the actual indices, x_ptr + offsets and y_ptr + offsets, into each vector for this instance of the kernel running on a thread block.具体来说,在前面的代码中,tl.arange(0, BLOCK_SIZE) 返回一个大小为 BLOCK_SIZE 的索引向量([0, 1, ..., BLOCK_SIZE-1])。我们将 pid * BLOCK_SIZE(即 block_start)加到该索引向量上,从而为运行在线程块上的这个内核实例推导出每个向量中的实际索引 x_ptr + offsets 和 y_ptr + offsets。
Assuming we launch enough Triton kernel instances to cover the total number of elements, n_elements, in each of the vectors, this kernel will add together every element of the two vectors, x_ptr and y_ptr, and store the result in out_ptr. In essence, Triton lets you write kernel logic in a tensorized manner.假设我们启动足够多的 Triton 内核实例以覆盖每个向量中的元素总数 n_elements,该内核就会把两个向量 x_ptr 和 y_ptr 的每个元素相加,并将结果存入 out_ptr。本质上,Triton 让你以张量化的方式编写内核逻辑。
Here, for example, we operate on a whole block of indices (offsets) at once. The Triton compiler takes care of splitting this work among actual GPU threads and makes sure that memory accesses (tl.load and tl.store) are coalesced when possible.例如,这里我们一次性对整个索引块(offsets)进行操作。Triton 编译器负责将这项工作拆分给实际的 GPU 线程,并确保显存访问(tl.load 和 tl.store)在可能时进行合并访问。
To launch instances of this Triton kernel, pass a grid function that computes the number of program instances from meta['BLOCK_SIZE']:要启动该 Triton 内核的实例,请传入一个网格函数,它根据 meta['BLOCK_SIZE'] 计算程序实例数:
import triton
def grid(meta):
    return (triton.cdiv(n_elements, meta['BLOCK_SIZE']),)
vector_add_kernel[grid](x_ptr, y_ptr, out_ptr, n_elements, BLOCK_SIZE=1024)
Here, the code uses a mask to avoid out-of-bounds memory access when n_elements isn’t a multiple of BLOCK_SIZE. This is similar to earlier chapters on CUDA in which we used if (idx < N) within our kernel to avoid out-of-bounds index errors.这里,代码使用掩码来避免当 n_elements 不是 BLOCK_SIZE 的整数倍时发生越界显存访问。这类似于前面关于 CUDA 的章节中,我们在内核里使用 if (idx < N) 来避免越界索引错误。
Under the hood, Triton converts this program to NVIDIA PTX such that each program uses a single CUDA thread block. Each program maps to a CUDA thread block. tl.arange produces per-lane indices within the program, and the compiler maps this vectorized index space across the thread in the block. You can also manage multidimensional indices for matrix operations in a straightforward way. Triton will automatically handle vectorizing your arithmetic and memory operations for you.在底层,Triton 将该程序转换为 NVIDIA PTX,使每个程序使用单个 CUDA 线程块。每个程序映射到一个 CUDA 线程块。tl.arange 在程序内产生逐 lane 的索引,编译器将该向量化索引空间映射到块中的线程上。你还可以用直观的方式管理矩阵运算的多维索引。Triton 会自动为你处理算术与内存操作的向量化。
In short, Triton gives you the productivity of Python with the performance of optimized CUDA C++ kernels. It also lets you drop down into low-level optimizations to manipulate and utilize the full memory hierarchy (e.g., shared-memory tiling, etc.), as we demonstrate in the next section.简而言之,Triton 兼具 Python 的生产力与经过优化的 CUDA C++ 内核的性能。它还允许你下沉到低层优化,以操作并利用完整的存储层次结构(例如共享内存分块等),我们将在下一节中演示这一点。
在 Triton 中访问共享内存
Accessing Shared Memory in Triton
Efficient Triton kernels take advantage of the L2 cache and software-managed shared memory on each SM. When using shared memory, each thread block loads a tile from both matrix A and B into shared memory. This is in contrast to each thread repeatedly loading the same values from global memory.高效的 Triton 内核会利用 L2 缓存以及每个 SM 上由软件管理的共享内存。使用共享内存时,每个线程块将矩阵 A 和矩阵 B 的一个分块加载到共享内存中。这与每个线程反复从全局内存加载相同数值的做法形成对比。
The kernel then reuses those tiles for multiple computations. This better utilizes the on-chip memory caches and reduces the amount of data traveling between global HBM and the registers.随后内核在多次计算中复用这些分块。这能更好地利用片上存储缓存,并减少在全局 HBM 与寄存器之间传输的数据量。
Triton does not expose an explicit shared-memory allocator. Instead, it stages tiles in on-chip shared memory using tensor descriptors (tl.make_tensor_descriptor(...)) and an asynchronous pipeline using the intended shapes and strides. This way, you can issue loads and stores through those descriptors inside a pipelined tl.range(..., num_stages=...). This loop lowers to cp.async, TMA, and barriers.Triton 并不暴露显式的共享内存分配器。取而代之的是,它使用张量描述符(tl.make_tensor_descriptor(...))以及按预期形状和步长构建的异步流水线,将分块暂存到片上共享内存中。这样,你就可以在流水化的 tl.range(..., num_stages=...) 中通过这些描述符发起加载和存储。该循环会下沉为 cp.async、TMA 和屏障。
向 PyTorch 注册自定义内核
Registering Custom Kernels with PyTorch
After writing a Triton kernel, you can register it as a custom operation in PyTorch using torch.library.triton_op. This makes the Triton kernel visible to torch.com pile without treating it as an opaque, black-box operation that could fall back to eager execution mode. This way, the compiler knows about the Triton kernel, includes it during graph capture, and optimizes it along with the rest of the graph. This allows additional optimizations such as fusion.编写完 Triton 内核后,你可以使用 torch.library.triton_op 将其注册为 PyTorch 中的自定义算子。这使该 Triton 内核对 torch.com pile 可见,而不会被视为可能回退到即时执行模式的不透明黑盒算子。这样,编译器就能感知该 Triton 内核,在图捕获阶段将其纳入,并与其他图部分一同优化。这还带来了融合等额外优化。
Registering the Triton kernel helps avoid graph breaks when using custom Triton kernels/programs with the PyTorch compiler. Here is an example of registering and calling the Triton kernel vector_add_kernel from PyTorch:注册 Triton 内核有助于在使用 PyTorch 编译器时避免自定义 Triton 内核/程序导致的图中断。下面是从 PyTorch 中注册并调用 Triton 内核 vector_add_kernel 的示例:
import torch
import triton
import triton.language as tl
from torch.library import triton_op, wrap_triton
from torch import Tensor
# Triton 计算内核
@triton.jit
def vector_add_kernel(
    x_ptr, y_ptr, out_ptr, n_elements,
    BLOCK_SIZE: tl.constexpr
):
import torch
import triton
import triton.language as tl
from torch.library import triton_op, wrap_triton
from torch import Tensor
# Triton compute kernel
@triton.jit
def vector_add_kernel(
    x_ptr, y_ptr, out_ptr, n_elements,
    BLOCK_SIZE: tl.constexpr
):
    pid = tl.program_id(0)
    start = pid * BLOCK_SIZE
    offsets = start + tl.arange(0, BLOCK_SIZE)
    mask = offsets < n_elements
    x = tl.load(x_ptr + offsets, mask=mask)
    y = tl.load(y_ptr + offsets, mask=mask)
    tl.store(out_ptr + offsets, x + y, mask=mask)
# 注册为由 Triton 支持的 PyTorch 算子
@triton_op("my_triton_lib::vector_add", mutates_args=())
def vector_add(x: Tensor, y: Tensor) -> Tensor:
    assert x.device.type == "cuda" and y.device.type == "cuda"
    n = x.numel()
    out = torch.empty_like(x)
    # 计算网格大小
    def grid_fn(meta):
        return (triton.cdiv(n, meta["BLOCK_SIZE"]),)
    # 封装并启动 Triton 内核
    wrap_triton(vector_add_kernel)[grid_fn](x, y, out, n, BLOCK_SIZE=1024)
    return out
# 用法
a = torch.randn(10_000, device="cuda")
b = torch.randn(10_000, device="cuda")
c = torch.ops.my_triton_lib.vector_add(a, b)
    pid = tl.program_id(0)
    start = pid * BLOCK_SIZE
    offsets = start + tl.arange(0, BLOCK_SIZE)
    mask = offsets < n_elements
    x = tl.load(x_ptr + offsets, mask=mask)
    y = tl.load(y_ptr + offsets, mask=mask)
    tl.store(out_ptr + offsets, x + y, mask=mask)
# Register as a Triton-backed PyTorch op
@triton_op("my_triton_lib::vector_add", mutates_args=())
def vector_add(x: Tensor, y: Tensor) -> Tensor:
    assert x.device.type == "cuda" and y.device.type == "cuda"
    n = x.numel()
    out = torch.empty_like(x)
    # Compute grid size
    def grid_fn(meta):
        return (triton.cdiv(n, meta["BLOCK_SIZE"]),)
    # Wrap and launch the Triton kernel
    wrap_triton(vector_add_kernel)[grid_fn](x, y, out, n, BLOCK_SIZE=1024)
    return out
# Usage
a = torch.randn(10_000, device="cuda")
b = torch.randn(10_000, device="cuda")
c = torch.ops.my_triton_lib.vector_add(a, b)
Here, triton_op("my_triton_lib::vector_add", mutates_args=()) registers the operator name and mutation metadata (empty) with PyTorch. Then wrap_triton (vector_add_kernel) wraps the raw Triton kernel into a callable that the compiler can inline and optimize within the torch.compile graph. The compiler will then fuse, reorder, and inline this kernel within the rest of the torch.compile graph.这里,triton_op("my_triton_lib::vector_add", mutates_args=()) 向 PyTorch 注册算子名称和可变参数元数据(为空)。随后 wrap_triton (vector_add_kernel) 将原始 Triton 内核包装为可调用对象,使编译器能够在 torch.compile 图中内联并优化它。之后编译器会在 torch.compile 图的其余部分中融合、重排并内联该内核。
Registering forward-only operations is straightforward. However, to leverage PyTorch’s automatic differentiation for full training support, you typically need to implement and register a custom backward computation. Otherwise, you need to compose it from existing differentiable primitives.注册仅前向的算子很简单。然而,要利用 PyTorch 的自动微分来获得完整的训练支持,通常需要实现并注册自定义的反向计算。否则,就需要用已有的可微原语组合出该反向计算。
For training support, register an autograd formula using vector_add.register_auto grad(backward, setup_context=setup_context). If you prefer, you can wrap the logic in a torch.autograd.Function and register both the forward and backward arguments. However, register_autograd is the recommended path for torch.com pile composability.为支持训练,可使用 vector_add.register_auto grad(backward, setup_context=setup_context) 注册自动微分公式。如果你愿意,也可以将逻辑包装在 torch.autograd.Function 中,并同时注册 forward 和 backward 参数。不过,对于 torch.com pile 的可组合性而言,register_autograd 是推荐路径。
调优内核启动参数
Tuning Kernel-Launch Parameters
Triton programs typically use 4 warps, or 128 threads, per block for many kernels. However, with modern GPU hardware’s larger shared memory and register file sizes per SM, you can typically push num_warps higher to 8 or 16 warps per block. For instance, you can increase num_warps to 8 when BLOCK_SIZE >= 2048 and to 16 when BLOCK_SIZE >= 4096.对于许多内核,Triton 程序通常每个线程块使用 4 个线程束,即 128 个线程。然而,现代 GPU 硬件每个 SM 拥有更大的共享内存和寄存器文件,通常可以把 num_warps 提高到每块 8 或 16 个线程束。例如,当 BLOCK_SIZE >= 2048 时可将 num_warps 增至 8,当 BLOCK_SIZE >= 4096 时增至 16。
The number of warps is dependent on whether your kernel can make use of the parallelism without causing excessive contention. The optimal setting depends on the kernel’s arithmetic intensity and memory access pattern.线程束数量取决于你的内核能否在不引发过度争用的情况下利用这种并行性。最优设置取决于内核的算术强度和显存访问模式。
Consider launching a kernel as follows: my_kernel[grid](..., num_warps=8). In this case, we are specifying 8 warps (256 threads) per Triton kernel. This configuration is typically effective for compute-heavy kernels. However, memory-bound kernels might still top out around 4 warps due to memory throughput limits.考虑按如下方式启动内核:my_kernel[grid](..., num_warps=8)。在这个例子中,我们为每个 Triton 内核指定了 8 个线程束(256 个线程)。这种配置通常对计算密集型内核有效。不过,受显存吞吐量限制,显存密集型内核可能仍然在 4 个线程束左右就达到上限。
For memory-bound kernels, using more warps per thread block can help hide memory latency by doing more in parallel. But too many warps per thread block can cause contention or cache thrashing.对于显存密集型内核,每个线程块使用更多线程束可以通过并行执行更多工作来帮助隐藏内存时延。但每个线程块的线程束过多会导致争用或缓存抖动。
New GPU generations are gaining more SMs and wider memory buses. This lets us increase the number of warps per block from the default 4 warps to 8 or 16 warps. This helps to increase occupancy, cover more memory-access latency, and saturate the available memory and compute.新一代 GPU 拥有更多 SM 和更宽的内存总线。这让我们可以把每个线程块的线程束数量从默认的 4 个提升到 8 个或 16 个。这有助于提高占用率、覆盖更多显存访问时延,并让可用的内存和计算资源达到饱和。
Manually exploring combinations of BLOCK_SIZE and num_warps for each kernel can be tedious. As such, it’s usually best to use Triton’s built-in autotuner. This will benchmark and automatically pick the optimal BLOCK_SIZE, num_warps, tile size, and other parameters for you. Let’s explore the autotuner in the next section.为每个内核手动探索 BLOCK_SIZE 与 num_warps 的各种组合可能很繁琐。因此,通常最好使用 Triton 内置的自动调优器。它会进行基准测试,并自动为你挑选最优的 BLOCK_SIZE、num_warps、分块大小以及其他参数。我们将在下一节探讨自动调优器。
自动调优 Triton 内核
Autotuning Triton Kernels
GPU kernel performance is highly sensitive to compile-time parameters such as tile dimensions, warp counts, loop unrolling stages, and the use of on-chip resources like registers and shared memory. Triton’s built-in autotuner automates the search for these optimal settings by letting you decorate a triton.jit kernel with @triton .autotune. You can pass in a list of triton.Config objects that describe the different candidate combinations of BLOCK_SIZE, num_warps, num_stages, tile size, and other kernel meta-parameters.GPU 内核性能对编译期参数高度敏感,例如分块维度、线程束数量、循环展开阶段数,以及对寄存器和共享内存等片上资源的使用。Triton 内置的自动调优器通过让你用 @triton .autotune 装饰 triton.jit 内核,自动完成这些最优设置的搜索。你可以传入一组 triton.Config 对象,用来描述 BLOCK_SIZE、num_warps、num_stages、分块大小以及其他内核元参数的不同候选组合。
During the first kernel invocation, the Triton JIT-compiles and benchmarks each configuration combination. Be sure to use a representative input workload on this initial invocation, as Triton will cache the fastest configuration for that input using a key derived from its characteristics, such as input size/shape.在内核首次调用期间,Triton 会对每种配置组合进行 JIT 编译和基准测试。请务必在这次初始调用中使用具有代表性的输入工作负载,因为 Triton 会使用由输入特征(例如输入大小/形状)派生出的键,为该输入缓存最快的配置。
All subsequent calls that have these same input characteristics will automatically reuse the cached (fastest) configuration. This way, you only pay the autotuning cost once for each input size/shape—and immediately start benefiting from the optimal configuration in later kernel invocations.之后所有具有相同输入特征的调用都会自动复用缓存的(最快的)配置。这样一来,你只需为每种输入大小/形状支付一次自动调优成本,并在后续内核调用中立即受益于最优配置。
If Triton detects a new input shape, it will perform another autotune process by iter-ating through the triton.Config objects using the new input characteristics. It will again choose the best configuration for this input and cache it for subsequent kernel invocations.如果 Triton 检测到新的输入形状,它会使用新的输入特征再次遍历 triton.Config 对象,执行一轮自动调优。它会再次为该输入选出最佳配置,并将其缓存以供后续内核调用使用。
To avoid suboptimal tuning results, it’s recommended that you warm up the autotuner with realistic and representative inputs that closely match your production workload. This way, Triton populates the cache with an optimal configuration that closely reflects your production inputs.为避免得到次优的调优结果,建议使用与生产工作负载高度吻合的真实且有代表性的输入来预热自动调优器。这样,Triton 就会用能够紧密反映生产输入的配置填充缓存。
When choosing possible kernel configurations, it’s worth remembering that larger tiles and more warps will increase arithmetic intensity at the expense of consuming additional registers and shared memory per thread block. In other words, by increasing the compute-to-memory ratio, you limit occupancy since fewer thread blocks can execute on each SM due to the increased resource needs.在选择可能的内核配置时,值得记住的是:更大的分块和更多的线程束会提高算术强度,但代价是每个线程块消耗额外的寄存器和共享内存。换言之,提高计算与内存之比会限制占用率,因为资源需求增加后,每个 SM 上能执行的线程块变少了。
Conversely, using smaller tiles and fewer warps will reduce per-thread work and data reuse but allow more blocks and warps to be active on each SM concurrently. This improves occupancy at the expense of lower arithmetic intensity.反之,使用更小的分块(tile)和更少的线程束会减少每线程的工作量与数据复用,但允许更多线程块和线程束在每个 SM 上并发活跃。这会以更低的算术强度为代价提升占用率。
In short, the optimal trade-off depends on both your input-matrix dimensions and your GPU’s specific resource limits. Manually tuning is time-consuming and error-prone. Triton’s autotuner handles this complexity automatically using a data-driven approach on realistic workloads to determine the optimal configuration that a manual search might miss. Using higher num_warps (e.g., 8–16) and multistage pipelining will often saturate tcgen05.* paths on Blackwell. It’s recommended to use autotuning as much as possible.简而言之,最优权衡同时取决于输入矩阵的维度和 GPU 的具体资源限制。手动调优耗时且易错。Triton 的自动调优器(autotuner)在真实负载上以数据驱动的方式自动处理这一复杂性,从而确定手动搜索可能遗漏的最优配置。使用更高的 num_warps(例如 8–16)和多级流水线,通常能使 Blackwell 上的 tcgen05.* 路径达到饱和。建议尽可能使用自动调优。
高级 Triton 内核实现
Advanced Triton Kernel Implementations
To solidify these concepts, next are some self-contained Triton kernel examples for warp specialization and asynchronous double buffering of data transfers/computations. These illustrate how you can implement Triton to transform high-level Python code into highly optimized GPU kernels.为巩固这些概念,下面给出一些自包含的 Triton 内核示例,涵盖线程束专用化以及数据传输与计算的异步双缓冲。这些示例展示了如何用 Triton 将高层 Python 代码转换为高度优化的 GPU 内核。
使用 Triton 实现线程束专用化
Warp Specialization with Triton
TorchInductor can target Triton’s warp specialization support for many of its generated GPU kernels. It will try to split each thread block’s warps into “producer” (memory) and “consumer” (compute) roles by emitting tl.range() loops with warp_specialize=True, similar to the example shown here:TorchInductor 可以为其生成的许多 GPU 内核使用 Triton 的线程束专用化支持。它会通过发出带有 warp_specialize=True 的 tl.range() 循环,尝试将每个线程块中的线程束划分为“生产者”(内存)和“消费者”(计算)两种角色,类似此处所示的示例:
// 现代 GPU 支持 warp_specialize=True
// 与 num_stages > 1 配合使用
// 以启用生产者/消费者线程束划分
// 并重叠
for k in tl.range(0, K_tiles, _warn_unused=False, warp_specialize=True):
    # 循环体
    ...
// warp_specialize=True is supported on modern GPUs
// Use it together with num_stages > 1
// to enable producer/consumer warp partitioning
// and overlap
for k in tl.range(0, K_tiles, _warn_unused=False, warp_specialize=True):
    # loop body
    ...
The memory warp prefetches the next tile while another warp computes the current tile. This will overlap memory latency with computation to produce higher throughput. Warp specialization works hand-in-hand with descriptor-based TMA copies. You can also use this in your own custom Triton kernels by passing warp_special ize=True to tl.range(), as shown in the code.负责内存的线程束预取下一个分块,同时另一个线程束计算当前分块。这使内存时延与计算重叠,从而获得更高的吞吐量。线程束专用化与基于描述符的 TMA 拷贝协同工作。你也可以在自己的自定义 Triton 内核中,通过向 tl.range() 传入 warp_special ize=True 来使用它,如代码所示。
You can also drive warp specialization through Triton autotune configs by setting num_consumer_groups>0 (e.g., 2) and num_buffers_warp_spec (e.g., 3) in triton .Config as shown in the following code snippet. This will keep the producers and consumers busy with work. If provided, TorchInductor will use these values under the hood:你也可以通过 Triton 自动调优配置来驱动线程束专用化:如下方代码片段所示,在 triton .Config 中设置 num_consumer_groups>0(例如 2)和 num_buffers_warp_spec(例如 3)。这会让生产者和消费者始终保持有活可干。如果提供了这些值,TorchInductor 将在底层使用它们:
triton.Config(
    { 'BLOCK_M': 128, 'BLOCK_N': 128, 'BLOCK_K': 64,
      'num_warps': 8, 'num_stages': 2,
      'num_consumer_groups': 2, '
      num_buffers_warp_spec': 3 }
)
This specialization approach is especially effective for long-running loops that iterate over a large K dimension in a GEMM. This dedicated approach keeps both the memory subsystem and the ALUs busy at all times and maximizes hardware utilization.这种专用化方法对于在 GEMM 中遍历较大 K 维度的长时间运行循环尤为有效。这种专用化方式使内存子系统和 ALU 始终处于忙碌状态,从而最大化硬件利用率。
分块与持久化 GEMM 内核(Triton)
Tiled and Persistent GEMM Kernel (Triton)
This Triton kernel computes a matrix multiplication (C = A * B) efficiently since each kernel launch does all the work by looping over the K dimension internally, instead of launching multiple kernels for each K chunk. This way, we pay the launch overhead only once, and warps stay busy until every tile is done. The following example tiles over K inside one launch but does not reuse the same thread block across multiple output tiles:这个 Triton 内核能高效地计算矩阵乘法(C = A * B),因为每次内核启动都在内部遍历 K 维度完成全部工作,而不是为每个 K 分块启动多个内核。这样一来,启动开销只需付出一次,线程束会一直忙碌到所有分块处理完毕。下面的示例在一次启动内对 K 进行分块,但不会在多个输出分块之间复用同一个线程块:
@triton.jit
def tiled_gemm_kernel(
    A_ptr, B_ptr, C_ptr,
    M, N, K,
    stride_am, stride_ak,
    stride_bk, stride_bn,
    stride_cm, stride_cn,
    BLOCK_M: tl.constexpr, BLOCK_N: tl.constexpr, BLOCK_K: tl.constexpr,
):
    """
    Tiled GEMM with Triton tensor descriptors + autotuning.

    This is the BASIC PRODUCTION example showing:
    1. Tensor descriptors (maps to TMA on Blackwell)
    2. Autotuning across block sizes
    3. Standard 2D grid decomposition
    """
    pid_m = tl.program_id(0)
    pid_n = tl.program_id(1)
    m0 = pid_m * BLOCK_M
    n0 = pid_n * BLOCK_N
    offs_m = m0 + tl.arange(0, BLOCK_M)
    offs_n = n0 + tl.arange(0, BLOCK_N)
    offs_k = tl.arange(0, BLOCK_K)
    # 在 Blackwell 上,描述符的 .load/.store 映射到 TMA
    # tl.dot 会下沉为 UMMA(tcgen05),累加器位于 TMEM 中。
    A_desc = tl.make_tensor_descriptor(
        A_ptr,
        shape=[M, K],
        strides=[stride_am, stride_ak],
        block_shape=[BLOCK_M, BLOCK_K],
    )
    B_desc = tl.make_tensor_descriptor(
        B_ptr,
        shape=[K, N],
        strides=[stride_bk, stride_bn],
        block_shape=[BLOCK_K, BLOCK_N],
    )
@triton.jit
def tiled_gemm_kernel(
    A_ptr, B_ptr, C_ptr,
    M, N, K,
    stride_am, stride_ak,
    stride_bk, stride_bn,
    stride_cm, stride_cn,
    BLOCK_M: tl.constexpr, BLOCK_N: tl.constexpr, BLOCK_K: tl.constexpr,
):
    """
    Tiled GEMM with Triton tensor descriptors + autotuning.

    This is the BASIC PRODUCTION example showing:
    1. Tensor descriptors (maps to TMA on Blackwell)
    2. Autotuning across block sizes
    3. Standard 2D grid decomposition
    """
    pid_m = tl.program_id(0)
    pid_n = tl.program_id(1)
    m0 = pid_m * BLOCK_M
    n0 = pid_n * BLOCK_N
    offs_m = m0 + tl.arange(0, BLOCK_M)
    offs_n = n0 + tl.arange(0, BLOCK_N)
    offs_k = tl.arange(0, BLOCK_K)
    # On Blackwell, descriptor .load/.store map to TMA
    # tl.dot lowers to UMMA (tcgen05) with accumulators in TMEM.
    A_desc = tl.make_tensor_descriptor(
        A_ptr,
        shape=[M, K],
        strides=[stride_am, stride_ak],
        block_shape=[BLOCK_M, BLOCK_K],
    )
    B_desc = tl.make_tensor_descriptor(
        B_ptr,
        shape=[K, N],
        strides=[stride_bk, stride_bn],
        block_shape=[BLOCK_K, BLOCK_N],
    )
    acc = tl.zeros((BLOCK_M, BLOCK_N), dtype=tl.float32)
    K_tiles = (K + BLOCK_K - 1) // BLOCK_K
    if K_tiles == 0:
        c_ptrs = C_ptr + (offs_m[:, None] * stride_cm
                          + offs_n[None, :] * stride_cn)
        c_mask = (offs_m[:, None] < M) & (offs_n[None, :] < N)
        tl.store(c_ptrs, acc, mask=c_mask)
        return
    k0 = 0
    if (m0 + BLOCK_M <= M) and (k0 + BLOCK_K <= K):
        a_cur = A_desc.load([m0, k0])
    else:
        col_ids = k0 + offs_k
        row_offsets = offs_m[:, None] + tl.zeros((BLOCK_M, BLOCK_K),
                                                  dtype=offs_m.dtype)
        col_offsets = col_ids[None, :] + tl.zeros((BLOCK_M, BLOCK_K),
                                                   dtype=col_ids.dtype)
        a_cur = tl.load(
            A_desc,
            offsets=(row_offsets, col_offsets),
            boundary_check=(0, 1),
            padding_option="zero",
        )
    if (n0 + BLOCK_N <= N) and (k0 + BLOCK_K <= K):
        b_cur = B_desc.load([k0, n0])
    else:
        row_ids = k0 + offs_k
        row_offsets = row_ids[:, None] + tl.zeros((BLOCK_K, BLOCK_N),
                                                   dtype=row_ids.dtype)
        col_offsets = offs_n[None, :] + tl.zeros((BLOCK_K, BLOCK_N),
                                                  dtype=offs_n.dtype)
        b_cur = tl.load(
            B_desc,
            offsets=(row_offsets, col_offsets),
            boundary_check=(0, 1),
            padding_option="zero",
        )
    for kt in tl.range(0, K_tiles, num_stages=2):
        k0 = kt * BLOCK_K
        acc += tl.dot(a_cur, b_cur)
        next_k = k0 + BLOCK_K
        if next_k < K:
            if (m0 + BLOCK_M <= M) and (next_k + BLOCK_K <= K):
                a_cur = A_desc.load([m0, next_k])
            else:
                col_ids = next_k + offs_k
                row_offsets = offs_m[:, None] + tl.zeros((BLOCK_M, BLOCK_K),
                                                          dtype=offs_m.dtype)
                col_offsets = col_ids[None, :] + tl.zeros((BLOCK_M, BLOCK_K),
                                                           dtype=col_ids.dtype)
                a_cur = tl.load(
                    A_desc,
                    offsets=(row_offsets, col_offsets),
                    boundary_check=(0, 1),
                    padding_option="zero",
                )
            if (n0 + BLOCK_N <= N) and (next_k + BLOCK_K <= K):
                b_cur = B_desc.load([next_k, n0])
            else:
                row_ids = next_k + offs_k
                row_offsets = row_ids[:, None] + tl.zeros((BLOCK_K, BLOCK_N),
                                                           dtype=row_ids.dtype)
                col_offsets = offs_n[None, :] + tl.zeros((BLOCK_K, BLOCK_N),
                                                          dtype=offs_n.dtype)
                b_cur = tl.load(
                    B_desc,
                    offsets=(row_offsets, col_offsets),
                    boundary_check=(0, 1),
                    padding_option="zero",
                )
    # 带掩码地存储结果
    c_ptrs = C_ptr + (offs_m[:, None] * stride_cm + offs_n[None, :] * stride_cn)
    c_mask = (offs_m[:, None] < M) & (offs_n[None, :] < N)
    tl.store(c_ptrs, acc, mask=c_mask)

def persistent_matmul(A: torch.Tensor, B: torch.Tensor) -> torch.Tensor:
    M, K = A.shape
    K2, N = B.shape
    assert K == K2
    C = torch.empty((M, N), device=A.device, dtype=torch.float32)
    MT = triton.cdiv(M, 128)
    NT = triton.cdiv(N, 128)
    grid = lambda META: (min(65536, MT * NT),)  # 约束启动开销
    matmul_kernel_persistent[grid](
        A, B, C, M, N, K,
        A.stride(0), A.stride(1),
        B.stride(0), B.stride(1),
        C.stride(0), C.stride(1),
    )
    return C
                                                          dtype=offs_m.dtype)
                col_offsets = col_ids[None, :] + tl.zeros((BLOCK_M, BLOCK_K),
                                                           dtype=col_ids.dtype)
                a_cur = tl.load(
                    A_desc,
                    offsets=(row_offsets, col_offsets),
                    boundary_check=(0, 1),
                    padding_option="zero",
                )
            if (n0 + BLOCK_N <= N) and (next_k + BLOCK_K <= K):
                b_cur = B_desc.load([next_k, n0])
            else:
                row_ids = next_k + offs_k
                row_offsets = row_ids[:, None] + tl.zeros((BLOCK_K, BLOCK_N),
                                                           dtype=row_ids.dtype)
                col_offsets = offs_n[None, :] + tl.zeros((BLOCK_K, BLOCK_N),
                                                          dtype=offs_n.dtype)
                b_cur = tl.load(
                    B_desc,
                    offsets=(row_offsets, col_offsets),
                    boundary_check=(0, 1),
                    padding_option="zero",
                )
    # Store results with masking
    c_ptrs = C_ptr + (offs_m[:, None] * stride_cm + offs_n[None, :] * stride_cn)
    c_mask = (offs_m[:, None] < M) & (offs_n[None, :] < N)
    tl.store(c_ptrs, acc, mask=c_mask)

def persistent_matmul(A: torch.Tensor, B: torch.Tensor) -> torch.Tensor:
    M, K = A.shape
    K2, N = B.shape
    assert K == K2
    C = torch.empty((M, N), device=A.device, dtype=torch.float32)
    MT = triton.cdiv(M, 128)
    NT = triton.cdiv(N, 128)
    grid = lambda META: (min(65536, MT * NT),)  # bound launch overhead
    matmul_kernel_persistent[grid](
        A, B, C, M, N, K,
        A.stride(0), A.stride(1),
        B.stride(0), B.stride(1),
        C.stride(0), C.stride(1),
    )
    return C
Here, the kernel launches a 2-D grid over the M×N tiles and performs the full K-loop inside a single kernel launch. This reduces launch overhead and can increase utilization when K is large, but comes at the cost of holding resources longer in a single kernel. Each program (thread block) loads tiles of A and B into shared memory and computes a partial dot product of the tiles with tl.dot. Triton accumulates the results in FP32. And, on Blackwell, Triton lowers the tl.dot to tcgen05 and UMMA to engage the Tensor Cores. The Tensor Cores then accumulate results in specialized TMEM rather than general registers.这里,内核在 M×N 的分块上启动一个二维网格,并在单次内核启动内执行完整的 K 循环。这降低了启动开销,并在 K 较大时提升利用率,但代价是在单个内核中更长时间地占用资源。每个程序(线程块)将 A 和 B 的分块加载到共享内存,并用 tl.dot 计算这些分块的部分点积。Triton 以 FP32 累加结果。并且在 Blackwell 上,Triton 会将 tl.dot 下沉为 tcgen05 和 UMMA,以启用张量核心。随后张量核心在专用的 TMEM 而非通用寄存器中累加结果。
Triton will unroll/vectorize these loops and computations for efficiency. In addition, when dtypes and tile shapes are supported (e.g., FP16/BF16, or TF32 for FP32), Triton lowers tl.dot to Tensor Core instructions. Here is a simple Python wrapper that launches this Triton kernel:Triton 会为提升效率而展开/向量化这些循环与计算。此外,当 dtypes 与分块(tile)形状受支持时(例如 FP16/BF16,或对 FP32 使用 TF32),Triton 会将 tl.dot 降级为张量核心指令。下面是一个启动该 Triton 内核的简单 Python 封装:
def tiled_matmul(A: torch.Tensor, B: torch.Tensor) -> torch.Tensor:
    """
    Tiled matrix multiplication using autotuned Triton kernel.

    The kernel will automatically select the best block size configuration
    for the given matrix dimensions (M, N, K).
    """
    M, K = A.shape
    K2, N = B.shape
    assert K == K2, f"Inner dimensions must match: {K} != {K2}"
    C = torch.empty((M, N), device=A.device, dtype=torch.float32)
    # 网格大小基于自动调优配置中的最大块大小计算
    # Triton 的自动调优器会在运行时选择最优块大小
    MAX_BLOCK_M = 128  # 来自最大配置
    MAX_BLOCK_N = 128
    grid = (triton.cdiv(M, MAX_BLOCK_M), triton.cdiv(N, MAX_BLOCK_N))
    # 以自动调优方式启动——Triton 将选择最佳配置
    tiled_gemm_kernel[grid](
        A, B, C, M, N, K,
        A.stride(0), A.stride(1),
        B.stride(0), B.stride(1),
        C.stride(0), C.stride(1),
    )
    return C
def tiled_matmul(A: torch.Tensor, B: torch.Tensor) -> torch.Tensor:
    """
    Tiled matrix multiplication using autotuned Triton kernel.

    The kernel will automatically select the best block size configuration
    for the given matrix dimensions (M, N, K).
    """
    M, K = A.shape
    K2, N = B.shape
    assert K == K2, f"Inner dimensions must match: {K} != {K2}"
    C = torch.empty((M, N), device=A.device, dtype=torch.float32)
    # Grid is computed based on max block size from autotuning configs
    # Triton's autotuner will pick the optimal block size at runtime
    MAX_BLOCK_M = 128  # From largest config
    MAX_BLOCK_N = 128
    grid = (triton.cdiv(M, MAX_BLOCK_M), triton.cdiv(N, MAX_BLOCK_N))
    # Launch with autotuning - Triton will select best config
    tiled_gemm_kernel[grid](
        A, B, C, M, N, K,
        A.stride(0), A.stride(1),
        B.stride(0), B.stride(1),
        C.stride(0), C.stride(1),
    )
    return C
Here, we see that by doing the entire K-loop inside one kernel launch, we avoid launching multiple kernels per output tile. On modern GPUs, this approach can increase utilization when K is large—at the cost of holding resources for longer in a single kernel.在这里可以看到,通过在一次内核启动中完成整个 K 循环,我们避免了为每个输出分块启动多个内核。在现代 GPU 上,当 K 较大时,这种方法可以提升利用率——代价是在单个内核中更长时间地占用资源。
You can combine this tiled approach with a persistent kernel. This would reuse the same thread block across multiple output tiles. The persistent kernel would use a 1-D grid and stride the tile index by tl.num_programs(0) as shown in this code block:你可以将这种分块方法与持久化内核结合使用。这样会在多个输出分块之间复用同一个线程块。持久化内核将使用一维网格,并按 tl.num_programs(0) 对分块索引进行跨步,如下面的代码块所示:
@triton.jit
def matmul_kernel_persistent(
    A_ptr, B_ptr, C_ptr,
    M, N, K,
    stride_am, stride_ak,
    stride_bk, stride_bn,
    stride_cm, stride_cn,
    # 编译期常量
    BLOCK_M: tl.constexpr, BLOCK_N: tl.constexpr, BLOCK_K: tl.constexpr,
    NUM_STAGES: tl.constexpr,
):
    """
    Persistent thread GEMM with Triton tensor descriptors + autotuning.
    Key Blackwell Optimizations:
      1) Tensor descriptors -> TMA hardware acceleration
      2) Autotuning across multiple block-size configurations
      3) Persistent threads to amortize launch overhead
      4) TMEM accumulation (accumulators live in ~256 KB/SM TMEM on Blackwell)
    This is the PRODUCTION-READY version combining these best practices.
    """
    # 一维持久化启动:每个程序处理多个分块
    pid   = tl.program_id(0)
    nprog = tl.num_programs(0)
    MT = tl.cdiv(M, BLOCK_M)
    NT = tl.cdiv(N, BLOCK_N)
    TILE_COUNT = MT * NT
    # --- 张量描述符(在 NVIDIA 上映射到 TMA)。描述符规则:
    #     前导步长必须是 16 BYTES 的倍数;
    #     最后一维连续。
    A_desc = tl.make_tensor_descriptor(
        A_ptr, shape=[M, K], strides=[stride_am, stride_ak],
        block_shape=[BLOCK_M, BLOCK_K],
    )
    B_desc = tl.make_tensor_descriptor(
        B_ptr, shape=[K, N], strides=[stride_bk, stride_bn],
        block_shape=[BLOCK_K, BLOCK_N],
    )
    # 持久化步长,遍历本程序处理的所有输出分块(tile)。
    tile_idx = pid
    while tile_idx < TILE_COUNT:
        pid_m = tile_idx // NT
@triton.jit
def matmul_kernel_persistent(
    A_ptr, B_ptr, C_ptr,
    M, N, K,
    stride_am, stride_ak,
    stride_bk, stride_bn,
    stride_cm, stride_cn,
    # compile-time constants
    BLOCK_M: tl.constexpr, BLOCK_N: tl.constexpr, BLOCK_K: tl.constexpr,
    NUM_STAGES: tl.constexpr,
):
    """
    Persistent thread GEMM with Triton tensor descriptors + autotuning.
    Key Blackwell Optimizations:
      1) Tensor descriptors -> TMA hardware acceleration
      2) Autotuning across multiple block-size configurations
      3) Persistent threads to amortize launch overhead
      4) TMEM accumulation (accumulators live in ~256 KB/SM TMEM on Blackwell)
    This is the PRODUCTION-READY version combining these best practices.
    """
    # 1-D persistent launch: each program processes multiple tiles
    pid   = tl.program_id(0)
    nprog = tl.num_programs(0)
    MT = tl.cdiv(M, BLOCK_M)
    NT = tl.cdiv(N, BLOCK_N)
    TILE_COUNT = MT * NT
    # --- Tensor descriptors (map to TMA on NVIDIA). Descriptor rules:
    #     leading strides must be multiples of 16 BYTES;
    #     last dimension contiguous.
    A_desc = tl.make_tensor_descriptor(
        A_ptr, shape=[M, K], strides=[stride_am, stride_ak],
        block_shape=[BLOCK_M, BLOCK_K],
    )
    B_desc = tl.make_tensor_descriptor(
        B_ptr, shape=[K, N], strides=[stride_bk, stride_bn],
        block_shape=[BLOCK_K, BLOCK_N],
    )
    # Persistent stride over all output tiles handled by this program.
    tile_idx = pid
    while tile_idx < TILE_COUNT:
        pid_m = tile_idx // NT
        pid_n = tile_idx %  NT
        m0 = pid_m * BLOCK_M
        n0 = pid_n * BLOCK_N
        offs_m = m0 + tl.arange(0, BLOCK_M)
        offs_n = n0 + tl.arange(0, BLOCK_N)
        offs_k = tl.arange(0, BLOCK_K)
        # FP32 累加器(在 Blackwell 上,累加器位于 TMEM 中,
        # 而非寄存器)
        acc = tl.zeros((BLOCK_M, BLOCK_N), dtype=tl.float32)
        # ---- K 循环(使用描述符实现的双缓冲、两元素环形 -> TMA)----
        K_tiles = (K + BLOCK_K - 1) // BLOCK_K
        if K_tiles == 0:
            # 当 K == 0 时带掩码地存储零
            c_ptrs = C_ptr + (offs_m[:, None] * stride_cm + offs_n[None, :]
                              * stride_cn)
            c_mask = (offs_m[:, None] < M) & (offs_n[None, :] < N)
            tl.store(c_ptrs, acc, mask=c_mask)
            tile_idx += nprog
            continue
        # 预取首批 CURRENT 分块
        k0 = 0
        if (m0 + BLOCK_M <= M) and (k0 + BLOCK_K <= K):
            a_cur = A_desc.load([m0, k0])
        else:
            row_offsets = offs_m[:, None] + tl.zeros((BLOCK_M, BLOCK_K),
                                                      dtype=offs_m.dtype)
            col_offsets = (k0 + offs_k)[None, :] + tl.zeros((BLOCK_M, BLOCK_K),
                                                             dtype=offs_k.dtype)
            a_cur = tl.load(A_desc, offsets=(row_offsets, col_offsets),
                            boundary_check=(0, 1), padding_option="zero")
        if (n0 + BLOCK_N <= N) and (k0 + BLOCK_K <= K):
            b_cur = B_desc.load([k0, n0])
        else:
            row_offsets = (k0 + offs_k)[:, None] + tl.zeros((BLOCK_K, BLOCK_N),
                                                             dtype=offs_k.dtype)
            col_offsets = offs_n[None, :] + tl.zeros((BLOCK_K, BLOCK_N),
                                                      dtype=offs_n.dtype)
            b_cur = tl.load(B_desc, offsets=(row_offsets, col_offsets),
                            boundary_check=(0, 1), padding_option="zero")

        # 流水线:预取 NEXT -> 计算 CURRENT -> 交换
        for kt in tl.range(0, K_tiles, num_stages=NUM_STAGES,
                           warp_specialize=True):
            next_k = (kt + 1) * BLOCK_K
            if kt + 1 < K_tiles:
        pid_n = tile_idx %  NT
        m0 = pid_m * BLOCK_M
        n0 = pid_n * BLOCK_N
        offs_m = m0 + tl.arange(0, BLOCK_M)
        offs_n = n0 + tl.arange(0, BLOCK_N)
        offs_k = tl.arange(0, BLOCK_K)
        # FP32 accumulator (on Blackwell, accumulators live in TMEM,
        # not registers)
        acc = tl.zeros((BLOCK_M, BLOCK_N), dtype=tl.float32)
        # ---- K loop (double-buffered ring-of-two using descriptors -> TMA) ----
        K_tiles = (K + BLOCK_K - 1) // BLOCK_K
        if K_tiles == 0:
            # Masked store of zeros when K == 0
            c_ptrs = C_ptr + (offs_m[:, None] * stride_cm + offs_n[None, :]
                              * stride_cn)
            c_mask = (offs_m[:, None] < M) & (offs_n[None, :] < N)
            tl.store(c_ptrs, acc, mask=c_mask)
            tile_idx += nprog
            continue
        # Prefetch first CURRENT tiles
        k0 = 0
        if (m0 + BLOCK_M <= M) and (k0 + BLOCK_K <= K):
            a_cur = A_desc.load([m0, k0])
        else:
            row_offsets = offs_m[:, None] + tl.zeros((BLOCK_M, BLOCK_K),
                                                      dtype=offs_m.dtype)
            col_offsets = (k0 + offs_k)[None, :] + tl.zeros((BLOCK_M, BLOCK_K),
                                                             dtype=offs_k.dtype)
            a_cur = tl.load(A_desc, offsets=(row_offsets, col_offsets),
                            boundary_check=(0, 1), padding_option="zero")
        if (n0 + BLOCK_N <= N) and (k0 + BLOCK_K <= K):
            b_cur = B_desc.load([k0, n0])
        else:
            row_offsets = (k0 + offs_k)[:, None] + tl.zeros((BLOCK_K, BLOCK_N),
                                                             dtype=offs_k.dtype)
            col_offsets = offs_n[None, :] + tl.zeros((BLOCK_K, BLOCK_N),
                                                      dtype=offs_n.dtype)
            b_cur = tl.load(B_desc, offsets=(row_offsets, col_offsets),
                            boundary_check=(0, 1), padding_option="zero")

        # Pipeline: prefetch-NEXT -> compute-CURRENT -> swap
        for kt in tl.range(0, K_tiles, num_stages=NUM_STAGES,
                           warp_specialize=True):
            next_k = (kt + 1) * BLOCK_K
            if kt + 1 < K_tiles:
                if (m0 + BLOCK_M <= M) and (next_k + BLOCK_K <= K):
                    a_next = A_desc.load([m0, next_k])
                else:
                    row_offsets = offs_m[:, None] + tl.zeros((BLOCK_M, BLOCK_K),
                                                              dtype=offs_m.dtype)
                    col_offsets = (next_k + offs_k)[None, :]
                                   + tl.zeros((BLOCK_M, BLOCK_K),
                                   dtype=offs_k.dtype)
                    a_next = tl.load(A_desc, offsets=(row_offsets, col_offsets),
                                     boundary_check=(0, 1),
                                     padding_option="zero")
                if (n0 + BLOCK_N <= N) and (next_k + BLOCK_K <= K):
                    b_next = B_desc.load([next_k, n0])
                else:
                    row_offsets = (next_k + offs_k)[:, None]
                                   + tl.zeros((BLOCK_K, BLOCK_N),
                                   dtype=offs_k.dtype)
                    col_offsets = offs_n[None, :] + tl.zeros((BLOCK_K, BLOCK_N),
                                                              dtype=offs_n.dtype)
                    b_next = tl.load(B_desc, offsets=(row_offsets, col_offsets),
                                     boundary_check=(0, 1),
                                     padding_option="zero")
            # 在 CURRENT 分块上计算(Blackwell 上使用 UMMA;累加器位于 TMEM)
            acc += tl.dot(a_cur, b_cur)
            # 换入已预取的 NEXT 分块
            if kt + 1 < K_tiles:
                a_cur = a_next
                b_cur = b_next
        # ---- 带掩码地存储 C --------------------------------------------
        c_ptrs = C_ptr + (offs_m[:, None] * stride_cm
                          + offs_n[None, :] * stride_cn)
        c_mask = (offs_m[:, None] < M) & (offs_n[None, :] < N)
        tl.store(c_ptrs, acc, mask=c_mask)
        # 推进到由本程序处理的下一个分块(持久化步进)
        tile_idx += nprog
                if (m0 + BLOCK_M <= M) and (next_k + BLOCK_K <= K):
                    a_next = A_desc.load([m0, next_k])
                else:
                    row_offsets = offs_m[:, None] + tl.zeros((BLOCK_M, BLOCK_K),
                                                              dtype=offs_m.dtype)
                    col_offsets = (next_k + offs_k)[None, :]
                                   + tl.zeros((BLOCK_M, BLOCK_K),
                                   dtype=offs_k.dtype)
                    a_next = tl.load(A_desc, offsets=(row_offsets, col_offsets),
                                     boundary_check=(0, 1),
                                     padding_option="zero")
                if (n0 + BLOCK_N <= N) and (next_k + BLOCK_K <= K):
                    b_next = B_desc.load([next_k, n0])
                else:
                    row_offsets = (next_k + offs_k)[:, None]
                                   + tl.zeros((BLOCK_K, BLOCK_N),
                                   dtype=offs_k.dtype)
                    col_offsets = offs_n[None, :] + tl.zeros((BLOCK_K, BLOCK_N),
                                                              dtype=offs_n.dtype)
                    b_next = tl.load(B_desc, offsets=(row_offsets, col_offsets),
                                     boundary_check=(0, 1),
                                     padding_option="zero")
            # Compute on CURRENT tiles (UMMA on Blackwell; accumulators in TMEM)
            acc += tl.dot(a_cur, b_cur)
            # Swap in the prefetched NEXT tiles
            if kt + 1 < K_tiles:
                a_cur = a_next
                b_cur = b_next
        # ---- Store C with masking --------------------------------------------
        c_ptrs = C_ptr + (offs_m[:, None] * stride_cm
                          + offs_n[None, :] * stride_cn)
        c_mask = (offs_m[:, None] < M) & (offs_n[None, :] < N)
        tl.store(c_ptrs, acc, mask=c_mask)
        # Advance to the next tile handled by this program (persistent stepping)
        tile_idx += nprog
This persistent approach aligns well with modern GPUs, which have relatively large register files, shared memory, and L2 cache. These can accommodate larger tile sizes (BLOCK_K). This means more of the K-loop can be unrolled per iteration.这种持久化方法与现代 GPU 十分契合,后者拥有相对较大的寄存器堆、共享内存和 L2 缓存。这些资源可以容纳更大的分块尺寸(BLOCK_K)。这意味着每次迭代可以展开更多的 K 循环。
A persistent kernel like this will usually outperform a sequence of smaller matmul kernels—especially when K is very large (e.g., > 1,024). The trade-off is that one SM is occupied longer. But if the kernel can fully utilize the SM, this is often ideal.这样的持久化内核通常优于一系列较小的 matmul 内核——尤其是当 K 非常大时(例如 > 1,024)。代价是单个 SM 被占用更长时间。但如果该内核能够充分利用 SM,这往往是最理想的情况。
In the preceding code, you can experiment with increasing BLOCK_K on modern GPUs since they have increased on-chip memory and can handle more data per tile.在前面的代码中,你可以尝试在现代 GPU 上增大 BLOCK_K,因为它们拥有更大的片上内存,每个分块可以处理更多数据。
However, beyond a certain point, register pressure may increase and lead to register spilling. As such, it’s always important to profile and find the right balance for your workload and hardware.然而,超过某个临界点后,寄存器压力可能上升并导致寄存器溢出。因此,始终需要通过性能剖析找到适合你的工作负载与硬件的恰当平衡。
使用 Triton 的软件流水与双缓冲
Software Pipelining and Double Buffering with Triton
This example shows how to implement double buffering with Triton. Double buffering, a two-stage form of software pipelining, overlaps memory loads and computations in a single loop.本示例展示如何用 Triton 实现双缓冲。双缓冲是软件流水的两阶段形式,它在单个循环中重叠内存加载与计算。
On modern NVIDIA GPUs, asynchronous global-to-shared copies allow multiple in-flight stages of prefetch to overlap memory transfers with compute. This makes double buffering (and triple buffering, etc.) a valuable and important performance optimization technique.在现代 NVIDIA GPU 上,全局到共享内存的异步拷贝允许多个在途的预取阶段将内存传输与计算重叠。这使得双缓冲(以及三缓冲等)成为一项有价值且重要的性能优化技术。
Triton implements pipelining through a num_stages meta-parameter used by Triton loop iterators. This parameter is passed to the tl.range() loop iterators. When you pass num_stages>1, the iterators automatically pipeline the loop by issuing asynchronous copy operations for up to num_stages iterations in flight.Triton 通过 Triton 循环迭代器所使用的 num_stages 元参数来实现流水。该参数被传递给 tl.range() 循环迭代器。当你传入 num_stages>1 时,迭代器会自动对该循环进行流水化,最多发出 num_stages 个在途迭代的异步拷贝操作。
This will overlap memory loads with computations across those staged iterations. This process continues until all tiles are processed. Here is an implementation of tile-based double buffering (num_stages=2) in Triton:这将在这些分阶段迭代之间重叠内存加载与计算。该过程持续进行,直到所有分块处理完毕。下面是用 Triton 实现基于分块的双缓冲(num_stages=2):
@triton.jit
def pipelined_matmul(
    A_ptr, B_ptr, C_ptr,
    M, N, K,
    stride_am, stride_ak,
    stride_bk, stride_bn,
    stride_cm, stride_cn,
    # 编译期常量:
    BLOCK_M: tl.constexpr, BLOCK_N: tl.constexpr, BLOCK_K: tl.constexpr,
    NUM_STAGES: tl.constexpr,
):
    # 用于 MxN 分块的程序(CTA)ID
    pid_m = tl.program_id(0)
    pid_n = tl.program_id(1)
    m0 = pid_m * BLOCK_M
    n0 = pid_n * BLOCK_N
    offs_m = m0 + tl.arange(0, BLOCK_M)
    offs_n = n0 + tl.arange(0, BLOCK_N)
    offs_k = tl.arange(0, BLOCK_K)
    # ---------------- 描述符创建(在 Blackwell 上映射为 TMA)----------
    # NVIDIA GPU 上描述符/TMA 的要求:
    #  - 前导步长是 16 BYTES 的倍数
    #  - 最后一维连续
@triton.jit
def pipelined_matmul(
    A_ptr, B_ptr, C_ptr,
    M, N, K,
    stride_am, stride_ak,
    stride_bk, stride_bn,
    stride_cm, stride_cn,
    # compile-time constants:
    BLOCK_M: tl.constexpr, BLOCK_N: tl.constexpr, BLOCK_K: tl.constexpr,
    NUM_STAGES: tl.constexpr,
):
    # Program (CTA) ids for the MxN tiling
    pid_m = tl.program_id(0)
    pid_n = tl.program_id(1)
    m0 = pid_m * BLOCK_M
    n0 = pid_n * BLOCK_N
    offs_m = m0 + tl.arange(0, BLOCK_M)
    offs_n = n0 + tl.arange(0, BLOCK_N)
    offs_k = tl.arange(0, BLOCK_K)
    # ---------------- Descriptor creation (maps to TMA on Blackwell) ----------
    # Requirements for descriptor/TMA on NVIDIA GPUs:
    #  - leading strides are multiples of 16 BYTES
    #  - last dimension contiguous
    #  - block_shape 与你打算搬运的分块相匹配
    A_desc = tl.make_tensor_descriptor(
        A_ptr,
        shape=[M, K],
        strides=[stride_am, stride_ak],
        block_shape=[BLOCK_M, BLOCK_K],
    )
    B_desc = tl.make_tensor_descriptor(
        B_ptr,
        shape=[K, N],
        strides=[stride_bk, stride_bn],
        block_shape=[BLOCK_K, BLOCK_N],
    )
    # 累加器为 FP32;在 Blackwell 上它位于 TMEM 中,而非寄存器中。
    acc = tl.zeros((BLOCK_M, BLOCK_N), dtype=tl.float32)
    # K 分块的数量
    K_tiles = (K + BLOCK_K - 1) // BLOCK_K
    if K_tiles == 0:
        # 无需处理,存储零(已掩码)
        c_ptrs = C_ptr + (offs_m[:, None]
                          * stride_cm + offs_n[None, :] * stride_cn)
        c_mask = (offs_m[:, None] < M) & (offs_n[None, :] < N)
        tl.store(c_ptrs, acc, mask=c_mask)
        return
    # --------- 预取第一批“当前”分块(若完全在界内则走快速路径)
    k0 = 0
    if (m0 + BLOCK_M <= M) and (k0 + BLOCK_K <= K):
        a_cur = A_desc.load([m0, k0])
    else:
        # 边界:计算行/列偏移,并使用带边界检查的加载
        row_offsets = offs_m[:, None] + tl.zeros((BLOCK_M, BLOCK_K),
                                                  dtype=offs_m.dtype)
        col_offsets = (k0 + offs_k)[None, :] + tl.zeros((BLOCK_M, BLOCK_K),
                                                         dtype=offs_k.dtype)
        a_cur = tl.load(A_desc, offsets=(row_offsets, col_offsets),
                        boundary_check=(0, 1), padding_option="zero")
    if (n0 + BLOCK_N <= N) and (k0 + BLOCK_K <= K):
        b_cur = B_desc.load([k0, n0])
    else:
        row_offsets = (k0 + offs_k)[:, None] + tl.zeros((BLOCK_K, BLOCK_N),
                                                         dtype=offs_k.dtype)
        col_offsets = offs_n[None, :] + tl.zeros((BLOCK_K, BLOCK_N),
                                                  dtype=offs_n.dtype)
        b_cur = tl.load(B_desc, offsets=(row_offsets, col_offsets),
                        boundary_check=(0, 1), padding_option="zero")
    # ------------- 带软件流水线与 TMA 预取的 K 循环 -----------
    # 将预取放在循环体中尽可能早的位置;保持独立的“当前”
    #  - block_shape matches the tile you intend to move
    A_desc = tl.make_tensor_descriptor(
        A_ptr,
        shape=[M, K],
        strides=[stride_am, stride_ak],
        block_shape=[BLOCK_M, BLOCK_K],
    )
    B_desc = tl.make_tensor_descriptor(
        B_ptr,
        shape=[K, N],
        strides=[stride_bk, stride_bn],
        block_shape=[BLOCK_K, BLOCK_N],
    )
    # Accumulator in FP32; on Blackwell this resides in TMEM, not registers.
    acc = tl.zeros((BLOCK_M, BLOCK_N), dtype=tl.float32)
    # Number of K tiles
    K_tiles = (K + BLOCK_K - 1) // BLOCK_K
    if K_tiles == 0:
        # Nothing to do, store zeros (masked)
        c_ptrs = C_ptr + (offs_m[:, None]
                          * stride_cm + offs_n[None, :] * stride_cn)
        c_mask = (offs_m[:, None] < M) & (offs_n[None, :] < N)
        tl.store(c_ptrs, acc, mask=c_mask)
        return
    # --------- Prefetch the first "current" tiles (fast path if fully in-bounds)
    k0 = 0
    if (m0 + BLOCK_M <= M) and (k0 + BLOCK_K <= K):
        a_cur = A_desc.load([m0, k0])
    else:
        # Boundary: compute row/col offsets and use boundary-checked load
        row_offsets = offs_m[:, None] + tl.zeros((BLOCK_M, BLOCK_K),
                                                  dtype=offs_m.dtype)
        col_offsets = (k0 + offs_k)[None, :] + tl.zeros((BLOCK_M, BLOCK_K),
                                                         dtype=offs_k.dtype)
        a_cur = tl.load(A_desc, offsets=(row_offsets, col_offsets),
                        boundary_check=(0, 1), padding_option="zero")
    if (n0 + BLOCK_N <= N) and (k0 + BLOCK_K <= K):
        b_cur = B_desc.load([k0, n0])
    else:
        row_offsets = (k0 + offs_k)[:, None] + tl.zeros((BLOCK_K, BLOCK_N),
                                                         dtype=offs_k.dtype)
        col_offsets = offs_n[None, :] + tl.zeros((BLOCK_K, BLOCK_N),
                                                  dtype=offs_n.dtype)
        b_cur = tl.load(B_desc, offsets=(row_offsets, col_offsets),
                        boundary_check=(0, 1), padding_option="zero")
    # ------------- K loop with software pipelining and TMA prefetch -----------
    # Put prefetch as early as possible in loop body; keep separate "current"
    # 分块,使下一次迭代的加载能够与以下内容的点积重叠:
    # 当前分块的点积重叠。使用 warp_specialize 划分生产者/消费者线程束。
    for kt in tl.range(0, K_tiles, num_stages=NUM_STAGES, warp_specialize=True):
        next_k = (kt + 1) * BLOCK_K
        # 尽早预取 NEXT 分块(TMA),前提是存在下一个分块
        if kt + 1 < K_tiles:
            if (m0 + BLOCK_M <= M) and (next_k + BLOCK_K <= K):
                a_next = A_desc.load([m0, next_k])
            else:
                row_offsets = offs_m[:, None] + tl.zeros((BLOCK_M, BLOCK_K),
                                                          dtype=offs_m.dtype)
                col_offsets = (next_k + offs_k)[None, :]
                              + tl.zeros((BLOCK_M, BLOCK_K), dtype=offs_k.dtype)
                a_next = tl.load(A_desc, offsets=(row_offsets, col_offsets),
                                 boundary_check=(0, 1), padding_option="zero")
            if (n0 + BLOCK_N <= N) and (next_k + BLOCK_K <= K):
                b_next = B_desc.load([next_k, n0])
            else:
                row_offsets = (next_k + offs_k)[:, None]
                               + tl.zeros((BLOCK_K, BLOCK_N), dtype=offs_k.dtype)
                col_offsets = offs_n[None, :] + tl.zeros((BLOCK_K, BLOCK_N),
                                                          dtype=offs_n.dtype)
                b_next = tl.load(B_desc, offsets=(row_offsets, col_offsets),
                                 boundary_check=(0, 1), padding_option="zero")
        # 在 CURRENT 分块上计算(UMMA;Blackwell 上累加器位于 TMEM)
        acc += tl.dot(a_cur, b_cur)
        # 换入已预取的 NEXT 分块
        if kt + 1 < K_tiles:
            a_cur = a_next
            b_cur = b_next
    # ------------------------------- 存储 C ----------------------------------
    c_ptrs = C_ptr + (offs_m[:, None] * stride_cm + offs_n[None, :] * stride_cn)
    c_mask = (offs_m[:, None] < M) & (offs_n[None, :] < N)
    tl.store(c_ptrs, acc, mask=c_mask)
    # tile so loads for the next iteration can overlap with the dot-product of
    # current tile. Use warp_specialize to partition producer/consumer warps.
    for kt in tl.range(0, K_tiles, num_stages=NUM_STAGES, warp_specialize=True):
        next_k = (kt + 1) * BLOCK_K
        # Prefetch NEXT tiles early (TMA), if there is a next tile
        if kt + 1 < K_tiles:
            if (m0 + BLOCK_M <= M) and (next_k + BLOCK_K <= K):
                a_next = A_desc.load([m0, next_k])
            else:
                row_offsets = offs_m[:, None] + tl.zeros((BLOCK_M, BLOCK_K),
                                                          dtype=offs_m.dtype)
                col_offsets = (next_k + offs_k)[None, :]
                              + tl.zeros((BLOCK_M, BLOCK_K), dtype=offs_k.dtype)
                a_next = tl.load(A_desc, offsets=(row_offsets, col_offsets),
                                 boundary_check=(0, 1), padding_option="zero")
            if (n0 + BLOCK_N <= N) and (next_k + BLOCK_K <= K):
                b_next = B_desc.load([next_k, n0])
            else:
                row_offsets = (next_k + offs_k)[:, None]
                               + tl.zeros((BLOCK_K, BLOCK_N), dtype=offs_k.dtype)
                col_offsets = offs_n[None, :] + tl.zeros((BLOCK_K, BLOCK_N),
                                                          dtype=offs_n.dtype)
                b_next = tl.load(B_desc, offsets=(row_offsets, col_offsets),
                                 boundary_check=(0, 1), padding_option="zero")
        # Compute on the CURRENT tiles (UMMA; accumulators in TMEM on Blackwell)
        acc += tl.dot(a_cur, b_cur)
        # Swap in prefetched NEXT tiles
        if kt + 1 < K_tiles:
            a_cur = a_next
            b_cur = b_next
    # ------------------------------- Store C ----------------------------------
    c_ptrs = C_ptr + (offs_m[:, None] * stride_cm + offs_n[None, :] * stride_cn)
    c_mask = (offs_m[:, None] < M) & (offs_n[None, :] < N)
    tl.store(c_ptrs, acc, mask=c_mask)
Triton’s compiler sees num_stages, generates asynchronous loads/stores with TMA and TMEM using Triton tensor descriptors, and automatically manages the synchronization. The use of TMA tensor descriptors and TMEM reduces register pressure and simplifies expressing multidimensional transfers. The preceding loop performs prefetch-next → compute-current → swap. This preserves overlap with num_stages>1 and avoids silent overlap collapse when you overwrite the current tile too early. Specifically, while one tile is being loaded into shared memory, the previous tile’s computation is being performed.Triton 编译器会识别 num_stages,使用 Triton 张量描述符通过 TMA 和 TMEM 生成异步加载/存储,并自动管理同步。使用 TMA 张量描述符和 TMEM 可降低寄存器压力,并简化多维传输的表达。前面的循环执行“预取下一个 → 计算当前 → 交换”。这在 num_stages>1 时保持了重叠,并避免因过早覆写当前分块而导致重叠悄然失效。具体而言,当一个分块正被加载到共享内存时,前一个分块的计算正在进行。
You can also use warp specialization, in which Triton partitions producer and consumer warps to overlap global-to-shared copies with compute. This is automatically enabled when heuristics select it.你还可以使用线程束专用化,其中 Triton 将线程束划分为生产者与消费者,以重叠全局到共享内存的拷贝与计算。当启发式规则选择启用时,该机制会自动开启。
It’s important to keep the pipeline’s overlap intact. When you set num_stages > 1, make sure the tile you are currently computing stays live across loop iterations. You don’t want to overwrite or drop its reference until the math that consumes it is finished.保持流水线的重叠不被破坏非常重要。当你设置 num_stages > 1 时,要确保当前正在计算的分块(tile)在循环迭代之间保持存活。在消费它的数学运算完成之前,你不希望覆盖它或丢弃它的引用。
Consider a 2-stage ring buffer in which you compute the current buffer while asynchronously fetching the next buffer. You then swap the current and next buffers. In this scenario, you need to wait and consume the “current” buffer before releasing it. At the same time, you need to use commit/wait to guard the “next” buffer (tile) until the swap.考虑一个 2 级环形缓冲区,其中你在异步获取 next 缓冲区的同时计算 current 缓冲区。随后你交换 current 与 next 缓冲区。在此场景下,你需要在释放 "current" 缓冲区之前等待并消费它。同时,你需要使用 commit/wait 来保护 "next" 缓冲区(分块),直到交换完成。
If the current tile doesn’t survive across iterations (e.g., you overwrite its buffer or let the reference die), the compiler is free to reorder, sink, or hoist the “next” iteration’s copies past the “current” uses. This will cause your load/compute overlap to quietly disappear.如果当前分块无法跨迭代存活(例如,你覆盖了它的缓冲区或让引用失效),编译器就可以自由地把"下一次"迭代的拷贝重排、下沉或上提到越过"当前"使用点的位置。这将导致你的加载/计算重叠悄然消失。
And If you manage shared-memory block pointers/TMA yourself, make sure to use the explicit handshake: enqueue async copies → tl.commit() → (later) tl.wait() → consume the tile → advance pointers. If you call tl.wait() right before you read the tile—and only release/swap after consumption—you will preserve true overlap.而如果你自己管理共享内存块指针/TMA,务必使用显式握手:入队异步拷贝 → tl.commit() →(稍后)tl.wait() → 消费该分块 → 推进指针。如果你在读取分块之前才调用 tl.wait()——并且只在消费之后才释放/交换——你就能保持真正的重叠。
In short, software pipelining improves memory bandwidth utilization and hides latency. And if memory bandwidth isn’t the bottleneck, you can increase num_stages to 3 (e.g., triple buffering) to prefetch two tiles in flight and further improve performance at the cost of more shared memory usage for the additional buffers. However, on hardware with tighter shared-memory budgets—or for compute-heavy kernels— the extra stages might lead to a diminishing return, lower occupancy, and reduced overall performance.简而言之,软件流水线化提升了显存带宽利用率并隐藏了时延。如果显存带宽不是瓶颈,你可以把 num_stages 增加到 3(例如三缓冲),以同时预取两个在途分块,并进一步提升性能,代价是为额外缓冲区使用更多共享内存。然而,在共享内存预算更紧张的硬件上——或对于计算密集型内核——额外的级数可能带来收益递减、降低占用率,并导致整体性能下降。
使用 Triton Proton 剖析器进行性能剖析
Profiling with Triton Proton Profiler
To deeply profile Triton kernel performance, use Triton’s Proton profiler. This is a separate profiling package that integrates with Triton and emits NVTX ranges visible in Nsight Systems timelines. These NVTX ranges instrument code regions, collect timings, and track key metrics. The NVTX markers then appear in Nsight Systems timelines. Use these NVTX regions to jump from Proton summaries into Nsight Compute for more focused kernel-level analysis.要深入剖析 Triton 内核性能,请使用 Triton 的 Proton 剖析器。这是一个独立的剖析包,与 Triton 集成,并发出可在 Nsight Systems 时间线中看到的 NVTX 区间。这些 NVTX 区间用于插桩代码区域、收集计时并跟踪关键指标。随后 NVTX 标记会出现在 Nsight Systems 时间线中。利用这些 NVTX 区间,你可以从 Proton 汇总跳转到 Nsight Compute,进行更有针对性的内核级分析。
In practice, you wrap critical sections of Triton code using the with pro ton.scope("name", metadata) Python context manager. Before running the workload, you activate the profiler with proton.start("matmul", hook="triton").在实践中,你使用 with pro ton.scope("name", metadata) Python 上下文管理器来包裹 Triton 代码的关键区段。在运行工作负载之前,你用 proton.start("matmul", hook="triton") 激活剖析器。
metadata in Proton is any user-provided dictionary of annotations or metrics, such as total FLOPS, memory byte counts, thread block indices, warp-level indices, or the number of recorded slots. These get recorded alongside timing data for richer performance analysis.Proton 中的 metadata 是任意由用户提供的注解或指标字典,例如总 FLOPS、内存字节数、线程块索引、线程束级索引或记录的槽位数。这些会与计时数据一起被记录下来,用于更丰富的性能分析。
After execution, you finalize and fetch the profiling data. The output can be printed as a hierarchical table of timings. Here is an excerpt of a Proton profiling result that compares different matmul kernels for multiplying 8,192 × 8,192 matrices:执行之后,你完成收尾并获取剖析数据。输出可以打印为分层的计时表格。下面是一段 Proton 剖析结果摘录,比较了用于相乘 8,192 × 8,192 矩阵的不同 matmul 内核:
168.314 ms    16331.291  ROOT
├─ 174.920 ms   3928.623  cublas [M=8192,N=8192,K=512]
├─ 165.349 ms   4156.033  matmul_kernel [M=8192,N=8192,K=512]
├─ 159.352 ms   4312.421  matmul_kernel_persistent [M=8192,N=8192,K=512]
└─ 174.671 ms   3934.214  torch [M=8192,N=8192,K=512]
In this profile report, we see the Triton persistent kernel outperforms cuBLAS, 159.352 ms versus 174.920 ms. Proton makes it easy to quantify such differences. It also computes derived metrics like effective TFLOPS and memory bandwidth. If you supply additional metadata such as the total FLOPS count, Proton will show you if you’re nearing the theoretical hardware TFLOPS limit for the precision you are using (e.g., BF16/FP16, FP8, FP4, etc.). For many matrix shapes and precisions, cuBLASLt or CUTLASS paths in PyTorch will match or exceed a custom Triton kernel.在这份性能剖析报告中,我们看到 Triton 持久化内核的性能优于 cuBLAS,分别为 159.352 ms 和 174.920 ms。Proton 让此类差异的量化变得简单。它还会计算有效 TFLOPS 和显存带宽等派生指标。如果你提供额外的 metadata(例如总 FLOPS 计数),Proton 会显示你是否正在接近所用精度(如 BF16/FP16、FP8、FP4 等)的理论硬件 TFLOPS 上限。对于许多矩阵形状和精度,PyTorch 中的 cuBLASLt 或 CUTLASS 路径会达到甚至超过自定义 Triton 内核。
NVIDIA’s Nsight Systems and Nsight Compute tools support Triton kernels as well. For instance, Nsight Systems shows kernel-launch names and any NVTX ranges emitted by PyTorch or Proton. These can be used to correlate Proton scopes with Nsight timelines. This way, you can use Proton’s output to pinpoint interesting kernels in Nsight Systems and then dive deeper into Nsight Compute for low-level analysis. You would use Nsight Compute to analyze register usage, achieved occupancy, etc. Using these tools together provides a more complete system performance analysis.NVIDIA 的 Nsight Systems 和 Nsight Compute 工具同样支持 Triton 内核。例如,Nsight Systems 会显示内核启动名称以及 PyTorch 或 Proton 发出的任何 NVTX 范围。这些信息可用于将 Proton 的作用域与 Nsight 时间线关联起来。这样,你就可以利用 Proton 的输出在 Nsight Systems 中定位感兴趣的内核,然后深入 Nsight Compute 进行底层分析。你可以使用 Nsight Compute 分析寄存器用量、实际达到的占用率等。将这些工具结合使用,可以获得更完整的系统性能分析。
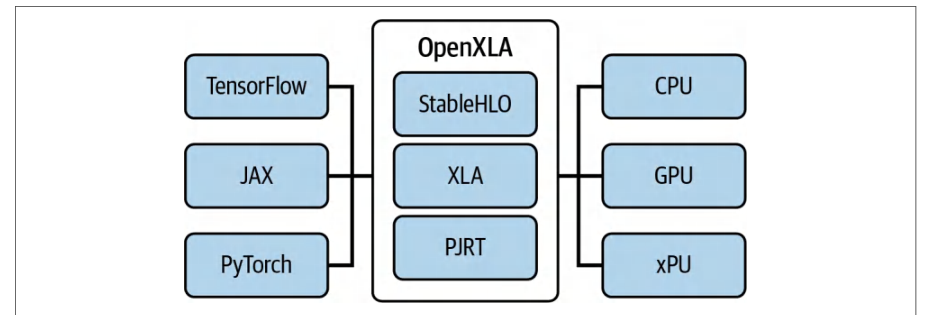
PyTorch XLA 后端
PyTorch XLA Backend
While TorchInductor is the PyTorch default backend for GPUs and CPUs, PyTorch XLA is a separate backend-compilation option that targets Google Cloud TPUs and other accelerators. PyTorch XLA allows PyTorch models to run on these accelerators by mapping PyTorch operations into XLA’s graph IR and executing them using the target hardware’s runtime, as shown in Figure 14-6.虽然 TorchInductor 是 PyTorch 面向 GPU 和 CPU 的默认后端,但 PyTorch XLA 是一个独立的后端编译选项,面向 Google Cloud TPU 和其他加速器。PyTorch XLA 将 PyTorch 算子映射到 XLA 的图 IR 中,并使用目标硬件的运行时执行它们,从而使 PyTorch 模型能够在这些加速器上运行,如图 14-6 所示。
To activate the XLA backend, you can use torch.compile(..., backend="open xla"), which activates PyTorch XLA based on OpenXLA. This backend string is supported by the PyTorch XLA project and activates OpenXLA-based compilation. Similar to TorchDynamo and TorchInductor, XLA captures the graph of computations. However, it compiles whole programs ahead of time because XLA is designed to generate static graphs.要启用 XLA 后端,你可以使用 torch.compile(..., backend="open xla"),它会激活基于 OpenXLA 的 PyTorch XLA。该后端字符串由 PyTorch XLA 项目支持,会激活基于 OpenXLA 的编译。与 TorchDynamo 和 TorchInductor 类似,XLA 会捕获计算图。不过,由于 XLA 旨在生成静态图,它会提前编译整个程序。
XLA is optimized for static shapes or bounded dynamic shapes. As such, when using XLA, dynamic shape support is a bit more limited. New shapes trigger whole-program recompilation, which is expensive for latency-sensitive inference. However, OpenXLA caches executables per shape signature, which can improve performance.XLA 针对静态形状或有界动态形状进行了优化。因此,使用 XLA 时,动态形状支持相对有限。新的形状会触发整个程序的重新编译,这对时延敏感的推理而言代价高昂。不过,OpenXLA 会按形状签名缓存可执行文件,从而提升性能。
The XLA compiler will cache each compiled graph per unique input shape and signature. As such, performance will improve after a few warm-up steps similar to Torch-Inductor. The major difference is that XLA will not incrementally compile mid-run. The graph is built statically ahead of time. And if a new shape is encountered, it will trigger a new whole-graph compilation, which is very expensive and impacts latency-sensitive workloads like inference.XLA 编译器会按唯一的输入形状和签名缓存每个已编译的图。因此,与 TorchInductor 类似,经过几步预热后性能会提升。主要区别在于,XLA 不会在运行过程中增量编译。图是提前静态构建的。如果遇到新形状,就会触发一次新的全图编译,这非常昂贵,并会影响推理等时延敏感的工作负载。
In short, if you’re running on a hardware device not currently supported by the TorchInductor backend, you can potentially use the XLA backend if the device supports XLA. Many of the same principles apply, such as minimizing graph breaks. You can also use some distributed strategies with XLA, such as data and model parallelism. While XLA isn’t commonly used with NVIDIA GPUs, it’s a powerful backend for non-NVIDIA hardware (e.g., Google TPUs using OpenXLA or other accelerators that support XLA IR). XLA benefits from many similar compilation techniques discussed in this chapter.简而言之,如果你运行的硬件设备目前不受 TorchInductor 后端支持,只要该设备支持 XLA,你就可以考虑使用 XLA 后端。许多相同的原则同样适用,例如尽量减少图断裂。你还可以在 XLA 上使用一些分布式策略,例如数据并行和模型并行。虽然 XLA 在 NVIDIA GPU 上并不常用,但对于非 NVIDIA 硬件(例如使用 OpenXLA 的 Google TPU,或其他支持 XLA IR 的加速器)而言,它是一个强大的后端。XLA 受益于本章讨论的许多类似编译技术。
关键要点
Key Takeaways
We covered quite a lot in this chapter, and we dove super deep into the PyTorch compiler stack and OpenAI’s Triton language and compiler. The following are some key takeaways:本章涵盖了大量内容,我们深入探讨了 PyTorch 编译器栈以及 OpenAI 的 Triton 语言与编译器。以下是一些关键要点:
- Leverage *
torch.compile* for easy speedups利用 *torch.compile* 轻松获得加速 - Choose the compilation
modebased on your needs (e.g.,"default"for quicker startup,"max-autotune"for maximum performance). Always perform a few warm-up iterations to get past the initial compile. For short-running jobs or small models, the compile overhead might outweigh the speedup, so use it when you have enough work to amortize the one-time cost.根据需求选择编译mode(例如"default"用于更快启动,"max-autotune"用于最大性能)。始终执行若干次预热迭代,以越过首次编译。对于短时运行的任务或小模型,编译开销可能超过所获得的加速,因此只有在工作量足以摊薄一次性开销时才使用它。
- Set performance flags early尽早设置性能标志
- Following are the flags you should enable for fast FP32 matmuls and SDPA variants including Flash Attention. Always validate accuracy for your model and keep these enabled for the best performance:以下是为快速 FP32 矩阵乘法以及包括 Flash Attention 在内的 SDPA 变体应当启用的标志。务必针对你的模型验证精度,并保持启用这些标志以获得最佳性能:
import torch
 # 映射到 TF32/BF16 快速路径
torch.set_float32_matmul_precision("high")
torch.backends.cuda.matmul.allow_tf32 = True
# 影响卷积(convs)
torch.backends.cudnn.allow_tf32 = True
torch.backends.cuda.enable_flash_sdp(True)
torch.backends.cuda.enable_mem_efficient_sdp(True)
import torch
 # maps to TF32/BF16 fast paths
torch.set_float32_matmul_precision("high")
torch.backends.cuda.matmul.allow_tf32 = True
# affects convs
torch.backends.cudnn.allow_tf32 = True
torch.backends.cuda.enable_flash_sdp(True)
torch.backends.cuda.enable_mem_efficient_sdp(True)
- Minimize graph breaks尽量减少图断裂
- Inspect graph breaks using
torch._dynamo.explainorTORCH_ LOGS= "graph_breaks". Remove or refactor code that causes breaks (e.g., prints, data-dependent使用torch._dynamo.explain或TORCH_ LOGS= "graph_breaks"检查图断裂(graph break)。移除或重构导致断裂的代码(例如打印语句、依赖数据的
Python control flow, unsupported ops) to maximize the contiguous regions that can be compiled. Fewer, larger graphs generally mean better performance. If needed, use the new torch.cond API for conditional logic or move noncritical Python-side processing out of the model’s forward function. The goal is to present the compiler a long, purely tensor-in and tensor-out code path.Python 控制流、不受支持的操作),以最大化可被编译的连续区域。更少、更大的图通常意味着更好的性能。如有需要,对条件逻辑使用新的 torch.cond API,或将非关键的 Python 侧处理移出模型的 forward 函数。目标是向编译器呈现一条长的、纯张量输入与张量输出的代码路径。
- Use dynamic shapes carefully谨慎使用动态形状
- While not necessary, setting
torch.compile(dynamic=True)upfront forces the compiler to consider all dimensions as dynamic. This way, one compiled model can handle a wide range of input shapes—reducing the need for padding. The compiler will do this dynamically, but settingdynamic=Trueforces the compiler to do this upfront. You can also mark only specific dimensions dynamic withmark_dynamic()instead of all dimensions. This way, you localize the flexibility to where it’s actually needed. This is great for variable sequence lengths, but make sure to measure the trade-offs. Enabling dynamic-shape support can disable CUDA Graphs and insert additional guards. If your shapes don’t vary too widely, a hybrid approach can work best. Specifically, you can bucket inputs by size—up to limit the number of distinct shapes and then enable dynamic shapes for the remaining variability. This hybrid approach avoids excessive recompilations while still reducing padding waste.虽然并非必需,但预先设置torch.compile(dynamic=True)会强制编译器将所有维度视为动态。这样,一个已编译的模型就能处理范围广泛的输入形状——减少对填充的需求。编译器会动态地完成这件事,但设置dynamic=True会强制编译器预先完成。你也可以用mark_dynamic()只将特定维度标记为动态,而不是所有维度。这样就把灵活性局限在真正需要的地方。这对可变序列长度非常有用,但务必测量其中的权衡。启用动态形状支持可能会禁用 CUDA 图并插入额外的守卫。如果你的形状变化范围不太大,混合方法效果最好。具体来说,可以按大小对输入分桶——以限制不同形状的数量,然后对剩余的变动性启用动态形状。这种混合方法避免了过多的重编译,同时仍减少填充浪费。
- Profile for recompilation guards剖析重编译守卫
- Use
TORCH_LOGS="graph_breaks,guards,recompiles"to find which guard is triggering if you see multiple compilations. Common culprits are Python random values, changing tensor ranks, or varying device/dtype. Make those aspects static or mark them as safe withallow_in_graphif appropriate.如果看到多次编译,使用TORCH_LOGS="graph_breaks,guards,recompiles"找出是哪个守卫被触发。常见元凶是 Python 随机值、张量秩变化,或设备/dtype 变化。将这些方面设为静态,或在合适时用allow_in_graph将其标记为安全。
- Avoid recompilations if possible尽可能避免重编译
- In a well-tuned training loop, you should see zero recompilations after the initial few iterations. If you do see continued recompiling, investigate immediately, as it usually means something is changing on every iteration. This includes debug print statements with an incrementing counter, etc. Use the
set_stance()API and guard-logging to catch these. Also make sure that you’re not unintentionally mixing devices by sending a CPU tensor on one iteration and then a GPU on the next. This will trigger a recompile.在调优良好的训练循环中,最初几次迭代之后应当看到零次重编译。如果确实看到持续重编译,应立即排查,因为这通常意味着每次迭代都有东西在变化。这包括带有递增计数器的调试打印语句等。使用set_stance()API 和守卫日志来捕获这些情况。还要确保没有无意中混用设备,比如一次迭代发送 CPU 张量、下一次发送 GPU 张量。这会触发重编译。
- Tune and monitor memory usage调优并监控显存使用
- Compiled mode might use more memory for larger fused kernels and guard buffers. Monitor GPU memory. If you hit memory issues, consider using a smaller
BLOCK_SIZEin Triton kernels or disabling certain fusions. Also ensure you free any large intermediate results promptly, as they might hang around longer in a compiled graph’s lifecycle. If you see out-of-memory errors during compilation, you might need to split your model or use lowermax_autotunesettings. PyTorch supports automatic checkpointing for large graphs to reduce memory pressure,编译模式可能因更大的融合内核和守卫缓冲区而使用更多显存。监控 GPU 显存。如果遇到显存问题,考虑在 Triton 内核中使用更小的BLOCK_SIZE或禁用某些融合。还要确保及时释放任何大型中间结果,因为它们在编译图的整个生命周期中可能驻留更久。如果在编译期间看到显存不足错误,可能需要拆分模型或使用更低的max_autotune设置。PyTorch 支持对大型图进行自动检查点以降低显存压力。
but it’s not foolproof. You can also try compiling submodules (e.g., each layer or block) separately instead of compiling the entire model at once to limit memory usage during kernel generation.但这并非万无一失。你也可以尝试分别编译各个子模块(例如每一层或每一个块),而不是一次性编译整个模型,以限制内核生成期间的显存占用。
- Combine the PyTorch compiler with distributed training wisely将 PyTorch 编译器与分布式训练合理结合
- When using DDP or FSDP, be aware of intentional graph breaks at communication points. They are expected and optimized by overlapping communication with computation. Wrap submodules in FSDP to get shard-wise compilation and memory savings. Keep an eye on any all-reduce-related warnings in
dynamo.explain. PyTorch’s design tries to minimize performance degradation due to graph breaks. When using FSDP withtorch.compile, you may see graph breaks for gradient prereduction and postreduction steps. These are expected and handled. Focus on the main forward and backward passes within each shard being compiled.在使用 DDP 或 FSDP 时,要注意通信点上刻意设置的图断点(graph break)。这些断点是预期之内的,并通过将通信与计算重叠来加以优化。在 FSDP 中包裹子模块,以获得按分片编译和内存节省。留意dynamo.explain中任何与全归约相关的警告。PyTorch 的设计力求将图断点导致的性能下降降到最低。当把 FSDP 与torch.compile一起使用时,你可能会看到梯度预归约(prereduction)和后归约(postreduction)步骤出现图断点。这些是预期之内的,且已被处理。应关注每个分片内被编译的主前向和反向传播过程。
- Use *
TORCH_LOGS="perf_hints"* to catch missed optimizations使用 *TORCH_LOGS="perf_hints"* 捕获被遗漏的优化 - This will tell you, for example, if CUDA Graphs weren’t used due to input mutation—or if an operation fell back to eager mode. These hints can guide you to potential improvements by telling you to avoid certain patterns or wait for future support. Often, a hint will directly suggest the workaround. For instance, the “input is mutated” hint implies that you should avoid in-place operations on the input before compiling.例如,它会告诉你是否因为输入被修改而未能使用 CUDA 图——或者某个操作是否回退到了 eager 模式。这些提示会通过告知你避免某些模式或等待未来支持,来引导你实现潜在的改进。通常,提示会直接给出变通方案。例如,“input is mutated”提示意味着你应当避免在编译前对输入执行原地操作。
- Debug with small inputs first先用小输入进行调试
- When developing custom kernels or testing compiled mode, use small tensor sizes to quickly catch correctness issues. Once it’s working, scale up. Use PyTorch’s
torch._dynamo.config.verboseor evenTORCH_LOGS="output_code"to inspect generated code for small cases. Be aware that performance measured on tiny inputs may not reflect behavior on real sizes. But, for debugging correctness and seeing what kernels are generated, this is a useful technique.在开发自定义内核或测试编译模式时,使用较小的张量尺寸可以快速发现正确性问题。一旦运行正常,再扩大规模。可以使用 PyTorch 的torch._dynamo.config.verbose,甚至TORCH_LOGS="output_code",来检查小规模用例生成的代码。要注意,在极小输入上测得的性能可能无法反映真实尺寸下的行为。不过,对于调试正确性以及查看生成了哪些内核而言,这是一种有用的技巧。
- Write custom kernels only for the true bottlenecks只为真正的瓶颈编写自定义内核
- Before embarking on Triton kernel development, profile your model with and without compiling to identify hotspots. Often, TorchInductor already fuses many things. Focus your efforts on areas where Inductor falls short—maybe a custom op or an atypical fusion. Do not prematurely optimize everything. Use the compiler for most—and hand-tune the rest. For example, if TorchInductor fails to fuse a particular sequence of operations that is performance-critical, such as a multistep custom activation, this might justify a separate Triton kernel. Just weigh the maintenance cost since each custom kernel is code, and you may need to update this code when you change hardware—or if PyTorch eventually adds native support. Often, filing an issue or feature request for TorchInductor to support a pattern is worthwhile if it benefits many other users.在着手 Triton 内核开发之前,先分别在编译与不编译的情况下对模型做性能剖析,以找出热点。通常,TorchInductor 已经融合了许多内容。应把精力集中在 Inductor 表现不足的地方——也许是某个自定义算子,或某种非典型的融合。不要过早地优化一切。让编译器处理大部分工作,其余部分再手工调优。例如,如果 TorchInductor 无法融合某段对性能至关重要的操作序列,比如多步自定义激活函数,这可能就值得单独写一个 Triton 内核。只是要权衡维护成本,因为每个自定义内核都是代码,当更换硬件时——或者 PyTorch 最终加入原生支持时——你可能需要更新这些代码。通常,如果某个模式能让许多其他用户受益,那么为 TorchInductor 提交 issue 或功能请求是值得的。
- Follow Triton best practices遵循 Triton 最佳实践
- When writing Triton code, ensure memory accesses are coalesced, avoid bank conflicts in shared memory (pad if needed),
mask tl.load()andtl.store()at boundaries, choose block and tile sizes that align with warp sizes (multiples of 32 threads), select tile sizes that fit into the L1/shared carve-out, and tunenum_warpsandnum_stagessettings with@triton.autotune([... triton.Config(num_warps=..., num_stages=...) ...], key=[...]).. Use Triton’s autotuner to find the best configuration if performance is critical. Start withnum_warps∈{4,8}andnum_stages∈{2,3,4}. Remember to check the Triton documentation and examples since many common patterns like FlashAttention have already been implemented and optimized by the community. At a minimum, these existing examples are a good starting point for your own implementation.编写 Triton 代码时,要确保显存访问采用合并访问,避免共享内存中的存储体冲突(必要时进行填充),在边界处mask tl.load()和tl.store(),选择与线程束大小对齐(32 个线程的倍数)的块大小与瓦片大小,选择能放入 L1/共享内存划分区的瓦片大小,并通过@triton.autotune([... triton.Config(num_warps=..., num_stages=...) ...], key=[...]).来调优num_warps和num_stages设置。如果性能至关重要,就使用 Triton 的自动调优器来寻找最佳配置。从num_warps∈{4,8}和num_stages∈{2,3,4}开始。记得查阅 Triton 文档和示例,因为像 FlashAttention 这样的许多常见模式已经由社区实现并优化。至少,这些现有示例是你自己实现的一个良好起点。
- Cache hint caution缓存提示需谨慎
- Some forms of PTX loads (e.g., DeepSeek-style non-coherent + L1 no-allocate + 256B L2 prefetch) are undocumented and potentially undefined on certain hardware. This may break across driver versions and hardware generations. Prefer Triton’s
eviction_policy= (e.g., evict_last)andcache_modifier= knobsto improve portability. Remember to profile when migrating to different CUDA drivers and GPU generations. Avoid introducing conflicting cache hints, as these are extremely difficult to debug.某些形式的 PTX 加载(例如 DeepSeek 风格的非一致性加载 + L1 不分配 + 256B L2 预取)未见于文档,且在特定硬件上可能是未定义行为。这类做法可能在不同驱动版本和硬件代际之间失效。优先使用 Triton 的eviction_policy= (e.g., evict_last)和cache_modifier= knobs来提升可移植性。迁移到不同的 CUDA 驱动和 GPU 代际时,记得进行性能剖析。避免引入相互冲突的缓存提示,因为这类问题极难调试。
- Keep an eye on new PyTorch releases关注 PyTorch 新版本发布
- PyTorch is rapidly evolving its compiler. Each version brings expanded operator support, better performance, and fewer graph breaks. Upgrading can often give free speedups or fix issues. The same goes for Triton. Staying up-to-date ensures you benefit from the latest work. This is especially important for rapidly evolving GPU hardware.PyTorch 正在快速演进其编译器。每个版本都会带来更广的算子支持、更好的性能和更少的图断裂(graph break)。升级往往能免费获得加速或修复问题。Triton 也是如此。保持版本更新可确保你受益于最新工作成果。对于快速演进的 GPU 硬件,这一点尤为重要。
结语
Conclusion
As complexity increases and the PyTorch ecosystem continues to expand, it’s important that you embrace performance profiling and iterative optimizations. You should use Nsight Systems, Nsight Compute, PyTorch profiler, or Triton profiler together to verify that you’re getting the GPU utilization and performance that you expect. If not, adjust your performance strategy.随着复杂度上升以及 PyTorch 生态持续扩张,拥抱性能剖析与迭代优化十分重要。你应当结合使用 Nsight Systems、Nsight Compute、PyTorch profiler 或 Triton profiler,以验证自己是否获得了预期的 GPU 利用率和性能。若未达到预期,就调整你的性能策略。
And remember to maintain a holistic view during your iterative approach. When one bottleneck is removed, the next one will emerge. Iterative performance tuning can lead you from GPU kernel occupancy to CPU overhead to tuning the input pipeline. The compiler helps with a big piece of this puzzle, but you likely need to optimize data loading, I/O, and algorithmic choices to achieve optimal performance.并且要记住,在迭代过程中保持全局视角。当一个瓶颈被消除后,下一个瓶颈就会浮现。迭代式性能调优可能把你从 GPU 内核占用率引向 CPU 开销,再引向输入流水线的调优。编译器能帮助解决这个拼图中的很大一块,但要达到最优性能,你很可能还需要优化数据加载、I/O 以及算法选择。