动态自适应推理引擎优化
Chapter 19. Dynamic and Adaptive Inference Engine Optimizations
本章目录
- 自适应并行策略(TP 对比 PP 对比混合)
- 动态精度切换
- Transformer 自注意力与 MLP 路径的内核自动调优
- 动态共享内存分配与占用率感知的内核选择
- 投机式 KV 预取以加速 TTFT
- 实时 KV 缓存压缩与策略切换
- 用于在运行时调优 AI 系统的强化学习智能体
- 动态显存分配切换(slab、缓存与流序分配对比)
- 运行时内核性能改进与可热插拔实现
- 使用时间序列预测持续预热 CUDA 图与缓存
- 自适应批处理与分块预填充调度
- 多 GPU 下的拥塞感知与拓扑感知调度
- NVLink/NVSwitch 拓扑与带宽约束
- 实时链路遥测与监控
- 自适应进程-GPU 映射
- 使用 NCCL 优化集合通信
- 使用 GPUDirect RDMA 的多节点与多机架通信
- MoE 专家重平衡与重分组
- 动态拥塞感知调度
- 通过精细调优的调度协调 NVSwitch 传输
- 其他自适应与动态优化技术
- 动态提前退出网络
- 输入感知的层跳过(DASH)
- 推测式 MoE 专家路由与通信削减
- 使用 LazyLLM 的动态 token 剪枝
- 面向边缘的 MoE 内存预算
- 动态量化与激活范围调整
- 关键要点
- 结语
Ultralarge language model (LLM) inference on modern hardware requires dynamic runtime adaptation to achieve both high throughput and low latency under varying conditions. A static “one-size-fits-all” approach to model-serving optimizations is no longer sufficient.在现代硬件上进行超大规模语言模型(LLM)推理,需要动态的运行时自适应,才能在不同条件下同时实现高吞吐量与低时延。对模型服务优化而言,静态的“一刀切”方式已不再足够。
Instead, state-of-the-art model serving systems use adaptive strategies that adjust parallelism, numerical precision, CUDA-kernel scheduling, and memory usage on the fly. This chapter explores these advanced techniques, including dynamic parallelism switching, precision scaling, real-time cache management, and reinforcement learning (RL)-based tuning.取而代之的是,最先进的模型服务系统采用*自适应策略*,在运行过程中动态调整并行方式、数值精度、CUDA 内核调度与显存使用。本章将探讨这些先进技术,包括动态并行切换、精度缩放、实时缓存管理以及基于强化学习(RL)的调优。
This chapter provides best practices for ultrascale LLM inference, teaching you how to orchestrate an engine that monitors its own performance and adapts in real time to maximize efficiency.本章给出超大规模 LLM 推理的最佳实践,教你如何编排一个能够监控自身性能并实时自适应以最大化效率的引擎。
自适应并行策略(TP 对比 PP 对比混合)
Adaptive Parallelism Strategies (TP Versus PP Versus Hybrid)
Massive LLMs require model parallelism, such as tensor and pipeline—or a hybrid approach—to spread computation across multiple GPUs. Each approach has benefits and drawbacks. Table 19-1 summarizes the recommended parallelism strategies for specific inference traffic patterns.超大规模 LLM 需要模型并行,例如张量并行与流水线并行,或采用混合方式,将计算分散到多个 GPU 上。每种方式各有优劣。表 19-1 汇总了针对特定推理流量模式推荐的并行策略。
| Inference traffic p推理流量模式 | Recommended parallelism推荐并行方式 | Rationale理由 |
|---|---|---|
| Many short requests (< 256大量短请求(< 256 | Data parallel/replica数据并行/副本 | Minimizes inter-GPU communications; each GPU runs replicas最小化 GPU 间通信;每个 GPU 运行副本 |
| tokens, high RPS)token,高 RPS) | scaling扩展 | handling independent requests (assuming the model fits into a single GPU’s memory)处理独立请求(假设模型可放入单个 GPU 的内存) |
| Few long requests (≥ 8k tokens,少量长请求(≥ 8k 个 token, | Pipeline parallelism流水线并行 | Reduces per-request latency by splitting layers across GPUs通过跨 GPU 拆分层来降低每请求时延 |
| low concurrency)低并发) | (with microbatches)(配合微批) | |
| Mixed load (short + some long)混合负载(短请求 + 部分长请求) | Hybrid dynamic (autoswitching)混合动态(自动切换) | Runs small chats on single GPUs and pipelines long ones to meet latency SLAs在单个 GPU 上运行小型聊天,并将长聊天流水线化以满足时延 SLA |
| Extremely large model (> 1 GPU超大型模型(> 1 GPU | Tensor + pipeline hybrid张量并行 + 流水线并行混合 | Required to fit the model; balances compute and memory为容纳模型所必需;平衡计算与内存 |
| memory)内存) | across both dimensions跨两个维度 | |
| MoE model inference (sparseMoE 模型推理(稀疏 | Expert parallelism专家并行 | Distributes individual experts across GPUs; each request将各个专家分布到多个 GPU 上;每个请求 |
| expert selection)专家选择) | invokes only a subset of experts, reducing per-device memory and compute load仅调用一部分专家,从而降低单设备的显存与计算负载 |
The data parallel and replica scaling strategy will replicate the full model on each GPU and load-balance incoming requests across these replicas. This requires no inter-GPU synchronization for individual inferences since each GPU handles separate requests independently.数据并行与副本扩展策略会在每个 GPU 上复制完整模型,并在这些副本之间对传入请求做负载均衡。由于每个 GPU 独立处理各自的请求,单次推理无需 GPU 间同步。
This maximizes throughput for many small- or medium-sized inputs with minimal communication overhead. However, data parallelism is not an option if the model does not fit into a single GPU’s memory.对于大量小型或中型输入,该策略以极小的通信开销实现吞吐量最大化。然而,如果模型无法放入单个 GPU 的显存,数据并行便不可行。
Tensor parallelism (TP) is a form of model parallelism (as opposed to data parallelism) that splits model matrices (e.g., weights, layers, etc.) across GPUs to speed up matrix multiplies. However, it introduces extra all-reduce communications to keep the GPUs in sync.张量并行(TP)是模型并行(相对于数据并行)的一种形式,它将模型矩阵(例如权重、层等)切分到多个 GPU 上,以加速矩阵乘法。但它会引入额外的全归约通信来保持各 GPU 同步。
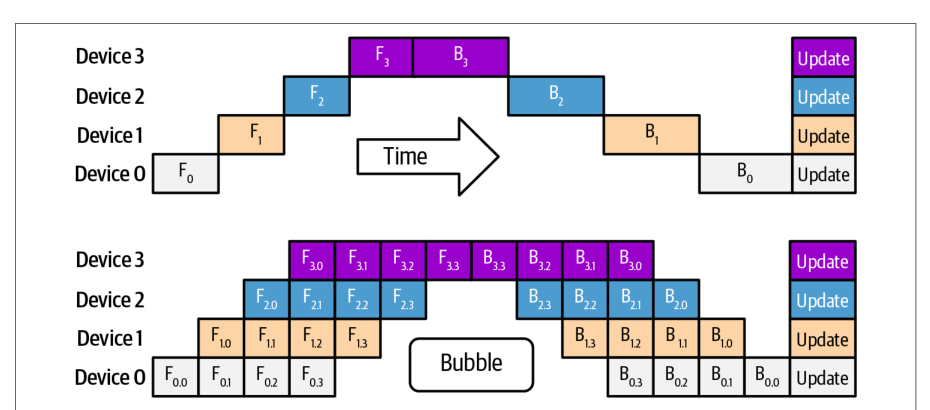
Pipeline parallelism (PP) is another form of model parallelism that splits the model as well. But instead of splitting individual model layers and matrices, it assigns whole layers to different GPUs to overcome memory limits—assuming the layers fit into a single GPU. PP incurs additional overhead in the form of sequential stage delays. These are called pipeline bubbles, as shown in Figure 19-1.流水线并行(PP)是另一种模型并行形式,同样对模型进行切分。但它并不切分单个模型层和矩阵,而是将整层分配给不同的 GPU,以突破显存限制——前提是该层能够放入单个 GPU。PP 会以顺序阶段延迟的形式带来额外开销,这些延迟被称为*流水线气泡*,如图 19-1 所示。
Expert parallelism, used in mixture-of-experts (MoE) model architectures, assigns each expert subnetwork its own GPU. A lightweight gating network then directs each input request or token to only the top-k active experts identified by the router. In this case, each GPU processes just the subset of experts that it hosts.专家并行用于混合专家(MoE)模型架构,它为每个专家子网络分配独立的 GPU。随后,一个轻量级门控网络将每个输入请求或 token 只导向路由器识别出的 top-k 活跃专家。此时,每个 GPU 仅处理其托管的专家子集。
By activating only a few experts per input, expert parallelism reduces per-device memory, inference time, and compute costs for models with a large number of experts, often called wide expert models. The conditional, router-based expert compute pattern scales efficiently as you add more experts. For instance, DeepSeek-R1 has 256 total experts, but only the top 9 experts (including 1 shared expert) are chosen by the router during inference.通过为每个输入仅激活少量专家,专家并行可降低拥有大量专家的模型(通常称为*宽*专家模型)的单设备显存占用、推理时间和计算成本。这种基于路由器的条件式专家计算模式在增加更多专家时能够高效扩展。例如,DeepSeek-R1 共有 256 个专家,但推理时路由器只选择 top 9 专家(包含 1 个共享专家)。
Traditionally, the parallelization strategy—including a hybrid strategy of multiple parallelism techniques combined—is chosen and fixed upfront when the model is loaded. However, to maximize performance under dynamic workloads, modern inference engines can choose different parallelism strategies at runtime based on the characteristics of the input.传统上,并行化策略——包括将多种并行技术组合而成的混合策略——在模型加载时即被选定并固定下来。然而,为了在动态负载下最大化性能,现代推理引擎可以在运行时根据输入特征选择不同的并行策略。
High-performance, adaptive inference systems use runtime metrics to choose TP, PP, or a hybrid approach on the fly. Key factors include batch size, sequence length, and memory utilization—as well as response latency and throughput requirements. For instance, very long prompts may be routed to a TP + PP instance since this spreads layers across GPUs to avoid out-of-memory (OOM) errors.高性能自适应推理系统利用运行时指标即时选择 TP、PP 或混合方案。关键因素包括批大小、序列长度和显存利用率,以及响应时延和吞吐量要求。例如,超长提示词可能被路由到 TP + PP 实例,因为该方案将层分散到多个 GPU 上,从而避免显存不足(OOM)错误。
Meanwhile, short latency-sensitive requests would route to a TP-only model instance to avoid pipeline-stage overhead. To support this, your serving engine maintains multiple presharded model instances, each optimized for different workload profiles, and dynamically dispatches incoming queries to the model instance whose parallelism strategy best satisfies the job’s SLOs.与此同时,对时延敏感的短请求会被路由到仅使用 TP 的模型实例,以避免流水线阶段的开销。为支持这一点,你的服务引擎会维护多个预先分片的模型实例,每个实例针对不同的工作负载特征进行优化,并将到来的查询动态分派到其并行策略最能满足该作业 SLO 的模型实例。
You can also use a different number of shards. This is shown in Figure 19-2, which uses two different numbers of TP shards in two different hybrid TP + PP parallelism configurations across eight GPUs.你也可以使用不同数量的分片。图 19-2 展示了这一点:在八块 GPU 上采用两种不同的混合 TP + PP 并行配置,分别使用两种不同数量的 TP 分片。
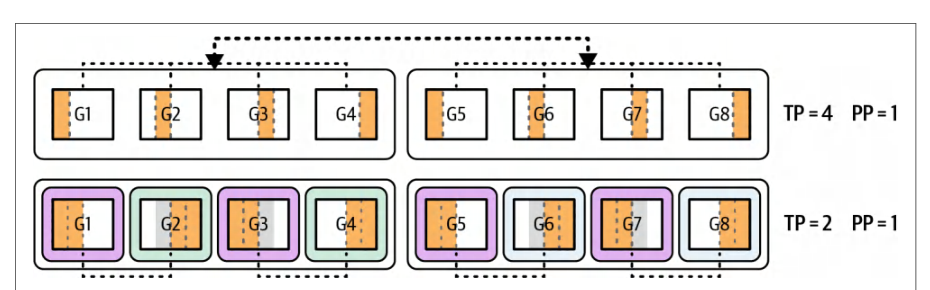
Using PP on the fly for long sequence inputs helps to avoid OOM errors caused by the large input sequence. Conversely, for short prompts and latency-sensitive queries, the system can instead route to a tensor-parallel model instance optimized for low latency. In this case, the request avoids the overhead of PP.针对长序列输入动态启用 PP 有助于避免因输入序列过大而导致的 OOM 错误。反之,对于短提示词和对时延敏感的查询,系统可以改为路由到针对低时延优化的张量并行模型实例。在这种情况下,该请求就避免了 PP 的开销。
Since each request can use a different parallelism strategy, the system needs to maintain multiple instances of the model for the inference scheduler/router to choose. One instance of the model would be optimized for low latency using TP, while another instance is optimized for high throughput and large input sequences using both TP and PP.由于每个请求可以使用不同的并行策略,系统需要维护多个模型实例供推理调度器/路由器选择。其中一个模型实例使用 TP 针对低时延进行优化,另一个实例则同时使用 TP 和 PP,针对高吞吐量和大输入序列进行优化。
Maintaining multiple instances of the model is required because resharding on the fly would wreak havoc on GPU caches. This would also put too much pressure on the memory and network subsystems—especially when resharding massive models.之所以需要维护多个模型实例,是因为动态重新分片会严重破坏 GPU 缓存。这还会给内存和网络子系统带来过大压力——尤其是在对超大模型重新分片时。
At runtime, each query is dispatched to the best-fitting model instance (sharding strategy) based on its length and the specified service-level agreements (SLAs). DeepSeek-R1, for instance, is a ~680 billion-parameter sparse mixture-of-experts model that activates only 37 billion parameters per token across the experts.在运行时,每个查询会根据其长度和指定的服务等级协议(SLA)被分派到最合适的模型实例(分片策略)。例如,DeepSeek-R1 是一个约 6800 亿参数的稀疏混合专家模型,每个 token 在各专家之间仅激活 370 亿参数。
To support different workload profiles, GPUs can be organized into logical worker pools, each presharded with a specific parallelism strategy—either tensor-parallel or hybrid tensor + pipeline parallel, for instance.为支持不同的工作负载特征,可以将 GPU 组织成逻辑工作池,每个池都按特定的并行策略预先分片——例如张量并行,或张量并行 + 流水线并行的混合并行。
Let’s consider an example. If we have an 8× GPU Blackwell B200 server totaling 1,440 GB of HBM memory (1,440 GB = 180 GB per GPU × 8 GPUs), we can serve DeepSeek-R1 with four-way TP across four GPUs—leaving the other four GPUs idle.让我们看一个例子。如果我们有一台 8× GPU 的 Blackwell B200 服务器,HBM 显存总计 1,440 GB(1,440 GB = 每块 GPU 180 GB × 8 块 GPU),我们可以在四块 GPU 上以四路 TP 服务 DeepSeek-R1——让其余四块 GPU 空闲。
If a single query arrives with an extremely long context (e.g., > 1 million tokens), the scheduler can spawn a two-stage pipeline such that stage 1 spans GPUs 0–3 and stage 2 spans GPUs 4–7. This effectively doubles the available GPU memory per stage to ~720 GB (180 GB per GPU × 4 GPUs) of total HBM (720 GB usable HBM). This helps avoid OOM errors when processing large inputs.如果单个查询携带极长的上下文(例如 > 100 万个 token)到达,调度器可以启动一个两阶段流水线,使阶段 1 跨越 GPU 0–3、阶段 2 跨越 GPU 4–7。这实际上将每个阶段可用的 GPU 显存翻倍至约 720 GB(180 GB 每块 GPU × 4 块 GPU)的总 HBM(720 GB 可用 HBM)。这有助于在处理大输入时避免 OOM 错误。
Conversely, when dozens of short, latency-sensitive prompts arrive concurrently, the system routes them to the tensor-parallel instance only. By avoiding pipeline bubbles, or idle periods that occur while filling and draining pipeline stages, this configuration delivers the lowest possible per-request latency across all available GPUs.反之,当数十个短的、对时延敏感的提示词并发到达时,系统仅将它们路由到张量并行实例。通过避免流水线气泡(即在填充和排空流水线阶段时出现的空闲期),该配置可在所有可用 GPU 上提供尽可能低的单请求时延。
To implement dynamic parallelism switching, you can implement a decision function that inspects runtime metrics like input sequence length, GPU memory usage, and current load. You would use these metrics to select the best-sharded model instance for each request, as shown here:要实现动态并行切换,你可以实现一个决策函数,检查输入序列长度、GPU 显存占用和当前负载等运行时指标。你将使用这些指标为每个请求选择分片最合适的模型实例,如下所示:
def choose_worker_pool(seq_len, gpu_mem_util, concurrent_reqs):
    # 对于长上下文或高显存压力,
    # 使用混合流水线并行 + 张量并行
    # (此处展示的是示例阈值)
    if seq_len > 4096 or gpu_mem_util > 0.8:
        return "tp_pp_hybrid"
    # 对于大量并发的小请求,坚持使用张量并行
    if concurrent_reqs > 4:
        return "tensor_parallel"
    # 对典型工作负载回退到张量并行
    return "tensor_parallel"
def choose_worker_pool(seq_len, gpu_mem_util, concurrent_reqs):
    # For long contexts or high memory pressure,
    # use hybrid pipeline + tensor parallelism
    # (example thresholds shown here)
    if seq_len > 4096 or gpu_mem_util > 0.8:
        return "tp_pp_hybrid"
    # For many simultaneous small requests, stick with tensor parallelism
    if concurrent_reqs > 4:
        return "tensor_parallel"
    # Fallback to tensor-parallel for typical workloads
    return "tensor_parallel"
You’d prelaunch multiple model replicas on your GPU cluster—some sharded for TP-only and others for TP + PP—and have a router send each query to the appropriate replica based on the inputs and the decision strategy. This approach ensures that large, memory-intensive jobs get full pipeline support, while short, latency-sensitive calls run on TP-only instances to avoid unnecessary pipeline overhead.你可以在 GPU 集群上预先启动多个模型副本——一些按仅 TP 分片,另一些按 TP + PP 分片——并让路由器根据输入和决策策略将每个查询发送到合适的副本。这种方法确保大型、显存密集型作业获得完整的流水线支持,而短的、对时延敏感的调用则运行在仅 TP 实例上,以避免不必要的流水线开销。
It’s recommended to use telemetry from the model and hardware to inform parallelism switching. You can monitor GPU memory utilization, compute utilization, and interconnect (e.g., NVLink/NVSwitch) traffic in real time to make the decision. If you notice idle GPUs because of long pipeline bubbles—and you have extra memory headroom—you can collapse your pipeline into fewer stages so each GPU does more work and stays busy. Conversely, if some stages are hitting memory limits or compute bottlenecks, you can expand into more pipeline stages—or raise your tensor-parallel degree. This will spread the computations and memory footprint across additional GPUs.建议利用来自模型和硬件的遥测数据来指导并行策略切换。你可以实时监控 GPU 显存利用率、计算利用率以及互连(如 NVLink/NVSwitch)流量,据此做出决策。如果你发现由于流水线气泡过长而导致部分 GPU 空闲——并且你还有额外的显存余量——就可以把流水线收缩为更少的阶段,让每块 GPU 承担更多工作并保持忙碌。反之,如果某些阶段触及显存上限或计算瓶颈,你可以扩展为更多流水线阶段——或提高张量并行度。这样就能把计算和显存占用分散到更多 GPU 上。
The key is to adjust the balance of tensor and pipeline splits dynamically to keep every GPU well utilized. At the same time, you need to stay within memory constraints and hit latency targets. This is something a static, one-size-fits-all configuration cannot achieve.关键在于动态调整张量切分与流水线切分的平衡,使每块 GPU 都得到充分利用。与此同时,你还必须满足显存约束并达成时延目标。这是静态的、一刀切的配置无法做到的。
动态精度切换
Dynamic Precision Changes
Modern GPUs like Blackwell introduce support for 8-bit and 4-bit floating point (FP8/FP4) Tensor Core math units. These lower precisions offer large speedups, memory savings, and minimal quality loss.Blackwell 等现代 GPU 引入了对 8 位和 4 位浮点(FP8/FP4)张量核心计算单元的支持。这些更低的精度带来大幅加速、显存节省,而质量损失极小。
Dynamic precision switching is an advanced technique in which the inference engine adjusts the numerical precision at runtime based on model confidence or resource pressure. The goal is to increase throughput without significant quality loss. In practice, this means the system might execute certain parts of the model in FP8 or FP4 for efficiency but fall back to higher precision (FP16/BF16) when needed for stability.动态精度切换是一项高级技术,推理引擎在运行时根据模型置信度或资源压力调整数值精度。其目标是在不造成显著质量损失的前提下提升吞吐量。在实践中,这意味着系统可能以 FP8 或 FP4 执行模型的某些部分以提高效率,但在需要稳定性时回退到更高精度(FP16/BF16)。
One trigger for precision adaptation is logit sharpness, or the model’s output confidence. For example, if the model’s probability distribution for the next token shows extreme peaks due to high confidence in a specific token, small numerical errors from low precision are unlikely to change the outcome.触发精度自适应的一个因素是*逻辑值尖锐度*(logit sharpness),即模型输出的置信度。例如,如果模型对下一个 token 的概率分布因对某个特定 token 高度自信而呈现极端峰值,那么低精度带来的微小数值误差不太可能改变结果。
If low precision can be tolerated for the next token generation, the engine will safely use FP4 for the next few steps to gain speed. Conversely, if the distribution is flatter due to high uncertainty, the engine should stick to FP8 or FP16 to preserve fidelity.如果下一个 token 的生成可以容忍低精度,引擎就会安全地在接下来的若干步使用 FP4 以获取速度。反之,如果分布因高度不确定性而较为平坦,引擎就应坚持使用 FP8 或 FP16 以保持保真度。
The inference engine quantifies uncertainty by computing the Shannon entropy of the softmax distribution over the vocabulary. Lower entropy indicates a sharper (more confident) prediction. A fixed entropy threshold, tuned on a held-out validation set, determines when to drop to FP4 and when to remain in FP8/FP16 for numerical stability. The goal is to balance latency gains versus accuracy loss.推理引擎通过计算词表上 softmax 分布的香农熵来量化不确定性。熵越低,表示预测越尖锐(越自信)。在留出验证集上调优得到的固定熵阈值,决定何时降到 FP4、何时保持 FP8/FP16 以确保数值稳定性。目标是在时延收益与精度损失之间取得平衡。
This leverages the fact that large LLMs often become more certain as they generate deterministic continuations, such as closing quotes or finishing a list. In these cases, lower precision is usually sufficient.这利用了这样一个事实:大型 LLM 在生成确定性延续内容(例如闭合引号或结束列表)时往往变得更加确定。在这些情况下,较低精度通常就足够了。
Another factor is memory pressure. If GPU memory usage is approaching its limit due to a very long context—or many parallel requests, the system can dynamically compress activations to a lower precision.另一个因素是显存压力。如果由于上下文极长——或并行请求众多——导致 GPU 显存使用接近上限,系统可以动态地把激活值压缩到更低精度。
One could store the attention key/value tensors in INT4 instead of INT8 when memory is scarce. This would reduce the memory footprint by 50%. However, make sure the quantization error from using INT4 does not compound across many decoding steps. It’s recommended to periodically reevaluate output quality.当显存紧张时,可以把注意力 key/value 张量以 INT4 而非 INT8 存储。这可将显存占用减少 50%。不过,要确保使用 INT4 带来的量化误差不会在许多解码步中累积放大。建议定期重新评估输出质量。
| Precision mode精度模式 | Memory usage (relative)显存占用(相对) | Compute throughput计算吞吐量 | Quality impact (accuracy delta)质量影响(精度变化量) |
|---|---|---|---|
| FP16 (baseline)FP16(基线) | 1.0× (100%)1.0× (100%) | 1.0× (baseline)1.0×(基线) | No impact (full fidelity)无影响(完全保真) |
| FP16 weights + FP8 activationsFP16 权重 + FP8 激活值 | ~0.5× (50%)~0.5× (50%) | ~1.5×~1.5× | Negligible (< 0.1%)可忽略(< 0.1%) |
| INT4 weights + FP8 activationsINT4 权重 + FP8 激活值 | ~0.25× (25%)~0.25× (25%) | ~1.8× (mixed compute and memory bound)约 1.8×(计算与内存混合受限) | ~0.5% drop in quality质量下降约 0.5% |
| INT4 weights + FP4 activationsINT4 权重 + FP4 激活值 | ~0.2× (20%)~0.2× (20%) | ~3.5×~3.5× | ~1% drop (requires careful tuning)下降约 1%(需要仔细调优) |
For instance, if an inference reaches a point where the KV cache is using 90% of memory, the engine might decide to quantize new cache entries from INT8 down to INT4—or even retroactively compress older entries—to free space. This can be done without stopping the model. In this case, the next attention layers simply read the INT4 cached values—with minor quantization error.例如,如果推理过程中 KV 缓存占用了 90% 的内存,引擎可能会决定将新的缓存条目从 INT8 量化到 INT4——甚至回溯压缩更早的条目——以释放空间。这一过程无需停止模型即可完成。此时,后续的注意力层只需读取 INT4 缓存值——仅带来轻微的量化误差。
Combining 4-bit weight quantization with 8-bit activations can reduce memory significantly. For instance, pure compute-limited kernels FP8 activations can achieve up to 2× throughput—especially on high-bandwidth modern GPUs. For mixed or memory-bound workloads, 1.5× is achievable. Using FP4 for activations can push memory savings even further. However, it may introduce slightly higher cumulative error that requires careful layer-wise tuning.将 4 位权重量化与 8 位激活相结合,可以显著降低显存占用。例如,对于纯计算受限的内核,FP8 激活可实现最高 2× 的吞吐量——尤其是在高带宽的现代 GPU 上。对于混合型或显存受限的工作负载,可实现 1.5×。对激活使用 FP4 可以进一步节省内存。然而,它可能引入略高的累积误差,需要仔细的逐层调优。
Modern GPUs provide native FP8 and FP4 Tensor Cores. However, PyTorch’s AMP support (torch.autocast) still only targets FP16 and BF16 as of this writing. It does not target FP8 or FP4. While FP8 dtypes exist in PyTorch (e.g., torch.float8_e4m3 and torch.float8_e5m2) alongside scaled math paths, AMP does not manage them. For inference and training, it’s recommended to use NVIDIA’s Transformer Engine (TE) and adopt its MXFP8 and NVFP4 when appropriate.现代 GPU 提供原生 FP8 和 FP4 张量核心。然而,截至本文撰写时,PyTorch 的 AMP 支持(torch.autocast)仍然只面向 FP16 和 BF16,并不面向 FP8 或 FP4。尽管 PyTorch 中已有 FP8 数据类型(例如 torch.float8_e4m3 和 torch.float8_e5m2)以及带缩放的数学路径,但 AMP 并不管理它们。对于推理和训练,建议使用 NVIDIA 的 Transformer Engine(TE),并在合适时采用其 MXFP8 和 NVFP4。
Table 19-2 summarizes some example precision configurations and their trade-offs. Here, you see that lower precision reduces memory and increases throughput. However, there is slight quality degradation.表 19-2 总结了一些示例精度配置及其权衡。可以看到,更低的精度降低了显存占用并提升了吞吐量,但会带来轻微的质量下降。
Here, we see that with FP8 activations, we get a memory reduction of ~50% from the baseline FP16 as expected by reducing the activation bit-width by 50%. Additionally, the quality loss measured here is negligible (< 0.1%) for FP8 activations. (Note: quality impact with reduced precision is model-dependent and kernel-dependent. You should validate with your own data and workloads.)这里可以看到,使用 FP8 激活时,由于激活位宽减少了 50%,显存占用相比基线 FP16 如预期般降低了约 50%。此外,此处测得的质量损失对于 FP8 激活而言可以忽略不计(< 0.1%)。(注意:降低精度带来的质量影响取决于模型和内核。你应当用自己的数据和工作负载进行验证。)
INT4 weight + FP8 activation workflows can produce about ~1.8× of the baseline throughput when memory is the main bottleneck. INT4 weights + FP4 activations can reduce memory down to 20% of the baseline. 4-bit targets. The speedup is around 3.5×, which is consistent with the theoretical peak 4× improvement over FP16.当内存是主要瓶颈时,INT4 权重 + FP8 激活的工作流可产生约为基线 1.8× 的吞吐量。INT4 权重 + FP4 激活可将内存降至基线的 20%。4 位目标。加速比约为 3.5×,这与相对 FP16 的理论峰值 4× 提升相符。
The goal of dynamic precision switching is to maximize performance while keeping output quality within acceptable bounds. Ideally, the kernel runs in the fastest possible precision (e.g., FP8 or FP4) and falls back to higher precision (e.g., FP16) only when necessary. In practice, libraries like NVIDIA’s Transformer Engine for PyTorch allow layer-wise control over precision at runtime.动态精度切换的目标是在将输出质量保持在可接受范围内的同时最大化性能。理想情况下,内核以尽可能最快的精度(例如 FP8 或 FP4)运行,仅在必要时回退到更高精度(例如 FP16)。在实践中,NVIDIA 面向 PyTorch 的 Transformer Engine 等库允许在运行时逐层控制精度。
Linear layers might default to FP8, but a runtime hook could increase a layer’s precision to FP16 or reduce it to FP4 depending on the layer’s role. For instance, FP4 could be applied to lightweight layers like output projections in which minor accuracy degradation is tolerable, while FP8 or FP16 might be used for early layers that process raw user inputs and benefit from higher precision.线性层可能默认使用 FP8,但运行时钩子可以根据该层的作用,将某一层的精度提升到 FP16 或降低到 FP4。例如,FP4 可应用于输出投影等轻量层,这些层中轻微的精度下降是可以容忍的;而 FP8 或 FP16 则可用于处理原始用户输入的早期层,这些层能从更高精度中获益。
Beyond per-layer mixed-precision control, you can use a more fine-grained optimization strategy, which adjusts the precision per token. This approach lets the inference system run in the fastest mode possible, FP8 for instance, when predictions are confident. It would then fall back to higher-precision modes like FP16 when it’s more uncertain.除了逐层的混合精度控制之外,你还可以使用更细粒度的优化策略,即按 token 调整精度。这种方法让推理系统在预测置信度高时以尽可能快的模式(例如 FP8)运行,而在更不确定时回退到 FP16 等更高精度的模式。
In practice, the model generates the current token using a default precision (e.g., FP16), then evaluates confidence based on runtime metrics, such as output entropy, maximum softmax probability, or logit variance.在实践中,模型先使用默认精度(例如 FP16)生成当前 token,然后基于运行时指标评估置信度,例如输出熵、最大 softmax 概率或 logit 方差。
If the model is highly confident in its prediction, the next token can be processed at a lower precision. If uncertainty is high, the system reverts to a more stable format to maintain output quality. Here is example code that demonstrates the concept:如果模型对其预测高度自信,则下一个 token 可以用更低的精度处理。如果不确定性很高,系统会回退到更稳定的格式以保持输出质量。以下示例代码演示了这一概念:
import contextlib
import torch
# ----------------------------
# 安全的 Transformer Engine(TE)FP8 自动转换导入
# ----------------------------
try:
    # 只有当模型确实使用了启用 TE 的层时,TE 才会生效
    # (例如 Linear、LayerNorm 包装层)。
    from transformer_engine.pytorch import fp8_autocast as _te_fp8_autocast
    # type: ignore
    _TE_AVAILABLE = True
except Exception:
    _TE_AVAILABLE = False
import contextlib
import torch
# ----------------------------
# Safe Transformer Engine (TE) FP8 autocast import
# ----------------------------
try:
    # TE is only effective if your model actually uses TE-enabled layers
    # (e.g., Linear, LayerNorm wrappers).
    from transformer_engine.pytorch import fp8_autocast as _te_fp8_autocast
    # type: ignore
    _TE_AVAILABLE = True
except Exception:
    _TE_AVAILABLE = False
    # 空操作占位实现,使代码在未安装 TE 时也能运行。它绝不会改变
    # 数值行为。
    class _NullCtx(contextlib.ContextDecorator):
        def __init__(self, **_): pass
        def __enter__(self): return self
        def __exit__(self, *exc): return False
    def _te_fp8_autocast(**_):
        return _NullCtx()
# ----------------------------
# 辅助函数:安全地为*当前这一步*选择精度上下文
# ----------------------------
def _precision_context_cuda(use_fp8: bool,
                            prefer_bfloat16: bool,
                            enable_fp8: bool):
    """
    Enter exactly one precision context. If FP8 isn't enabled or TE is
    missing/unused, fall back to AMP (BF16/FP16).
    """
    if use_fp8 and enable_fp8 and _TE_AVAILABLE:
        # 注意:fp8_autocast 仅影响启用 TE 的模块。非 TE 模块
        # 按其原生 dtype 运行。
        return _te_fp8_autocast(enabled=True)
    amp_dtype = torch.bfloat16 if prefer_bfloat16 else torch.float16
    return torch.autocast(device_type="cuda", dtype=amp_dtype)
def _precision_context(device: torch.device, use_fp8: bool,
                       prefer_bfloat16: bool, enable_fp8: bool):
    return _precision_context_cuda(use_fp8, prefer_bfloat16,
                                   enable_fp8) if device.type == "cuda"
                                   else contextlib.nullcontext()
# ----------------------------
# 主解码循环,带平滑的、滞回式精度切换
# ----------------------------
@torch.no_grad()
def decode_with_dynamic_precision(
    model,
    tokens: torch.Tensor,
    max_steps: int,
    *,
    device: torch.device = torch.device("cuda"),
    prefer_bfloat16: bool = True,      # B200:AMP 优先使用 BF16 而非 FP16
    enable_fp8: bool = True,           # 存在 TE 时允许使用 FP8
    enter_fp8_threshold: float = 6.0,  # 滞回上界
                                       # (logit 间隔平均值)
    exit_fp8_threshold: float = 3.0,   # 滞回下界(避免抖动)
    reeval_interval: int = 8,          # 每 N 步计算/检查置信度
                                       # 以避免每步同步
    topk_dim: int = -1,                # 最后一维存放词表 logits
    eos_id: int | None = None,
):
    """
    Autoregressive decode loop that *smoothly* switches between AMP (BF16/FP16)
    and FP8 (TE) without per-step host sync. Works even when TE is not
    installed; in that case, runs AMP only.
    # No-op stand-in so the code runs without TE installed. It never changes
    # numerical behavior.
    class _NullCtx(contextlib.ContextDecorator):
        def __init__(self, **_): pass
        def __enter__(self): return self
        def __exit__(self, *exc): return False
    def _te_fp8_autocast(**_):
        return _NullCtx()
# ----------------------------
# Helper: choose the precision context *for this step* safely
# ----------------------------
def _precision_context_cuda(use_fp8: bool,
                            prefer_bfloat16: bool,
                            enable_fp8: bool):
    """
    Enter exactly one precision context. If FP8 isn't enabled or TE is
    missing/unused, fall back to AMP (BF16/FP16).
    """
    if use_fp8 and enable_fp8 and _TE_AVAILABLE:
        # Note: fp8_autocast affects only TE-enabled modules. Non-TE modules
        # run at their native dtypes.
        return _te_fp8_autocast(enabled=True)
    amp_dtype = torch.bfloat16 if prefer_bfloat16 else torch.float16
    return torch.autocast(device_type="cuda", dtype=amp_dtype)
def _precision_context(device: torch.device, use_fp8: bool,
                       prefer_bfloat16: bool, enable_fp8: bool):
    return _precision_context_cuda(use_fp8, prefer_bfloat16,
                                   enable_fp8) if device.type == "cuda"
                                   else contextlib.nullcontext()
# ----------------------------
# Main decode loop with smoothed, hysteretic precision switching
# ----------------------------
@torch.no_grad()
def decode_with_dynamic_precision(
    model,
    tokens: torch.Tensor,
    max_steps: int,
    *,
    device: torch.device = torch.device("cuda"),
    prefer_bfloat16: bool = True,      # B200: prefer BF16 over FP16 for AMP
    enable_fp8: bool = True,           # Allow FP8 when TE present
    enter_fp8_threshold: float = 6.0,  # hysteresis upper bound
                                       # (logit margin average)
    exit_fp8_threshold: float = 3.0,   # hysteresis lower bound (avoid flapping)
    reeval_interval: int = 8,          # compute/inspect confidence every N steps
                                       # to avoid per-step sync
    topk_dim: int = -1,                # last dimension holds vocabulary logits
    eos_id: int | None = None,
):
    """
    Autoregressive decode loop that *smoothly* switches between AMP (BF16/FP16)
    and FP8 (TE) without per-step host sync. Works even when TE is not
    installed; in that case, runs AMP only.
    - Confidence signal: mean(top1 - top2) logits margin across the batch.
    - Smoothing: EMA + interval re-evaluation to minimize CPU-GPU sync pressure.
    - Hysteresis: separate enter/exit thresholds to avoid precision flapping.
    """
    assert exit_fp8_threshold <= enter_fp8_threshold,
        "Hysteresis requires exit <= enter threshold"
    model.eval()
    tokens = tokens.to(device, non_blocking=True)
    # 内部状态
    use_fp8: bool = False  # 以 AMP 启动。
                           # 当持续置信度允许时升级到 FP8
    ema_conf: torch.Tensor | None = None  # 保留在设备上;
                                          # 主机仅在间隔点查询
    alpha = 0.2  # 置信度的 EMA 平滑因子
  # 一个小型辅助函数,用于在设备端更新 EMA,无需主机同步
    def _update_confidence_ema(logits: torch.Tensor) -> torch.Tensor:
        # logits:[B, vocab] 或 [B, T, vocab]。若为 3D,则使用最后一个时间步。
        last = logits if logits.dim() == 2 else logits[:, -1, :]
        # 在设备端计算 top-2 margin
        top2 = torch.topk(last, k=2, dim=topk_dim).values  # [B, 2]
        margin = (top2[:, 0] - top2[:, 1]).mean()      # 设备上的标量张量
        nonlocal ema_conf
        ema_conf = (1 - alpha)
                   * (ema_conf if ema_conf is not None else margin)+alpha*margin
        return ema_conf  # 设备标量
    # 解码
    for step in range(max_steps):
        # 1) 精度上下文(有且仅有一个)。
        # 不允许嵌套上下文,迭代之间不得泄漏。
        with _precision_context(device, use_fp8, prefer_bfloat16, enable_fp8):
            # 前向传播(HF 风格或普通风格)
            try:
                logits = model(input_ids=tokens)
                if hasattr(logits, "logits"):
                    logits = logits.logits
            except TypeError:
                logits = model(tokens)
            # 2) 从*最后*一个位置选取下一个 token
            last_step_logits = logits if logits.dim() == 2 else logits[:, -1, :]
            next_token = torch.argmax(last_step_logits, dim=-1,
                                      keepdim=True)  # [B, 1]
            tokens = torch.cat([tokens, next_token], dim=1)
        # 3) 每一步都更新设备端 EMA 信号(此时尚未进行主机同步)
        conf_dev = _update_confidence_ema(logits)
        # 4) 定期在主机端重新评估精度选择
        # 以避免每步同步
        if (step + 1) % reeval_interval == 0:
            conf_value = float(conf_dev)  # 每 N 步恰好执行一次微小同步
            if not use_fp8 and enable_fp8 and _TE_AVAILABLE
               and (conf_value > enter_fp8_threshold):
    - Confidence signal: mean(top1 - top2) logits margin across the batch.
    - Smoothing: EMA + interval re-evaluation to minimize CPU-GPU sync pressure.
    - Hysteresis: separate enter/exit thresholds to avoid precision flapping.
    """
    assert exit_fp8_threshold <= enter_fp8_threshold,
        "Hysteresis requires exit <= enter threshold"
    model.eval()
    tokens = tokens.to(device, non_blocking=True)
    # Internal state
    use_fp8: bool = False  # start in AMP.
                           # Upgrade to FP8 when sustained confidence permits
    ema_conf: torch.Tensor | None = None  # stays on device;
                                          # host consults only at intervals
    alpha = 0.2  # EMA smoothing factor for confidence
  # A tiny helper to update on-device EMA without host sync
    def _update_confidence_ema(logits: torch.Tensor) -> torch.Tensor:
        # logits: [B, vocab] or [B, T, vocab]. Use the last time-step if 3D.
        last = logits if logits.dim() == 2 else logits[:, -1, :]
        # Compute top-2 margin on-device
        top2 = torch.topk(last, k=2, dim=topk_dim).values  # [B, 2]
        margin = (top2[:, 0] - top2[:, 1]).mean()      # scalar tensor on device
        nonlocal ema_conf
        ema_conf = (1 - alpha)
                   * (ema_conf if ema_conf is not None else margin)+alpha*margin
        return ema_conf  # device scalar
    # Decode
    for step in range(max_steps):
        # 1) Precision context (exactly one).
        # No nested contexts, no leakage across iterations.
        with _precision_context(device, use_fp8, prefer_bfloat16, enable_fp8):
            # Forward pass (HF-style or plain)
            try:
                logits = model(input_ids=tokens)
                if hasattr(logits, "logits"):
                    logits = logits.logits
            except TypeError:
                logits = model(tokens)
            # 2) Pick next token from the *last* position
            last_step_logits = logits if logits.dim() == 2 else logits[:, -1, :]
            next_token = torch.argmax(last_step_logits, dim=-1,
                                      keepdim=True)  # [B, 1]
            tokens = torch.cat([tokens, next_token], dim=1)
        # 3) Update on-device EMA signal every step (no host sync yet)
        conf_dev = _update_confidence_ema(logits)
        # 4) Periodically re-evaluate precision choice on host
        # to avoid per-step sync
        if (step + 1) % reeval_interval == 0:
            conf_value = float(conf_dev)  # exactly one tiny sync every N steps
            if not use_fp8 and enable_fp8 and _TE_AVAILABLE
               and (conf_value > enter_fp8_threshold):
                use_fp8 = True
            elif use_fp8 and (conf_value < exit_fp8_threshold):
                use_fp8 = False
        # 5) EOS 处理
        if eos_id is not None:
            if (tokens[:, -1] == eos_id).all():
                break
    return tokens
# ----------------------------
# 示例(已注释):
# ----------------------------
# model = ...  # 启用 TE 的模型(或任意 torch.nn.Module)
# input_ids = torch.randint(0, vocab_size, (batch_size, seq_len))
# out = decode_with_dynamic_precision(model, input_ids, max_steps=128,
# eos_id=tokenizer.eos_token_id)
# print(out.shape)
                use_fp8 = True
            elif use_fp8 and (conf_value < exit_fp8_threshold):
                use_fp8 = False
        # 5) EOS handling
        if eos_id is not None:
            if (tokens[:, -1] == eos_id).all():
                break
    return tokens
# ----------------------------
# Example (commented):
# ----------------------------
# model = ...  # your TE-enabled model (or any torch.nn.Module)
# input_ids = torch.randint(0, vocab_size, (batch_size, seq_len))
# out = decode_with_dynamic_precision(model, input_ids, max_steps=128,
# eos_id=tokenizer.eos_token_id)
# print(out.shape)
Here we see that PyTorch autocast supports only reduced-precision FP16 and BF16 as of this writing. In this case, you need to use the Transformer Engine library to route supported modules to FP8 kernels.这里可以看到,截至本文撰写时,PyTorch autocast 仅支持降精度的 FP16 和 BF16。在这种情况下,需要使用 Transformer Engine 库将受支持的模块路由到 FP8 内核。
This pattern creates an elastic precision regime and maximizes throughput. When the model operates in predictable (e.g., low-entropy) regions, such as generating punctu-ation or boilerplate completions, it continues in FP8 to maximize performance. When it enters higher-entropy segments, such as ambiguous prompts or decision points, it returns to FP16 to preserve numerical accuracy.这种模式构建了一种弹性精度机制,并最大化吞吐量。当模型运行在可预测的(例如低熵)区域时,例如生成标点符号或模板化的补全内容,它会继续以 FP8 运行以最大化性能。当进入更高熵的片段时,例如含义模糊的提示词或决策点,它会回到 FP16 以保持数值精度。
When paired with a modern GPU’s support for low-precision operations, token-level dynamic precision switching offers an adaptive strategy for high-throughput, latency-sensitive inference. It applies low precision only when needed, reduces compute overhead, and maintains response quality across many different prompt conditions.结合现代 GPU 对低精度运算的支持,词元级动态精度切换为高吞吐、时延敏感的推理提供了一种自适应策略。它仅在需要时应用低精度,降低计算开销,并在多种不同的提示词条件下保持响应质量。
Transformer 自注意力与 MLP 路径的内核自动调优
Kernel Autotuning for Transformer Self-Attention and MLP Paths
The performance of neural network layers on GPUs can vary drastically depending on low-level parameters like thread block size, tile dimensions, loop unrolling, and memory access patterns. For fixed-size models, libraries typically choose these parameters only once—often using general heuristics or offline tuning.GPU 上神经网络层的性能会因线程块大小、分块维度、循环展开和显存访问模式等底层参数的不同而剧烈变化。对于固定尺寸的模型,库通常只选择一次这些参数——往往使用通用启发式规则或离线调优。
However, in an online inference service scenario, input sizes, including sequence lengths and batch sizes, can vary from request to request. Kernel autotuning refers to a runtime mechanism that selects—or even JIT-compiles—the optimal kernel variant for the current workload.然而,在在线推理服务场景中,输入尺寸(包括序列长度和批大小)可能因请求而异。内核自动调优指的是一种运行时机制,它为当前工作负载选择——甚至进行 JIT 编译——最优的内核变体。
In the context of large transformer models, the two major compute phases of inference are self-attention and feed-forward MLP layers. Both can benefit from autotuning of their GPU kernels. Let’s cover each of these in the context of kernel autotuning.在大型 Transformer 模型的语境下,推理的两个主要计算阶段是自注意力和前馈 MLP 层。两者都能从各自 GPU 内核的自动调优中获益。下面我们在内核自动调优的语境下分别讨论这两者。
Consider an attention layer that processes a sequence of length L with H attention heads. There are many implementations of attention, including standard attention and optimized FlashAttention—and its multiple variants.考虑一个处理长度为 L 的序列、具有 H 个注意力头的注意力层。注意力有许多实现,包括标准注意力和经过优化的 FlashAttention——以及它的多个变体。
FlashAttention and its variants are significantly faster for long sequences due to tiling, parallelism, and memory-access improvements. However, for very short sequences, its overhead might outweigh its benefit. A dynamic engine can switch between a FlashAttention kernel and a simpler kernel depending on the sequence length, L.得益于分块、并行化和显存访问方面的改进,FlashAttention 及其变体在长序列上明显更快。然而,对于非常短的序列,其开销可能超过收益。动态引擎可以根据序列长度 L 在 FlashAttention 内核和更简单的内核之间切换。
For instance, if a request has L = 256 tokens, the engine might use a straightforward kernel launch that computes attention in one go using global memory reads, which are sufficient for small L. If another request comes in with L = 2,048, it could switch to FlashAttention’s specialized tiling kernel known to scale better for large L by reusing data in shared memory and avoiding unnecessary HBM data fetches. This is demonstrated as a condition statement based on the input sequence length, as shown here:例如,如果一个请求的 L = 256 个词元,引擎可能会使用一次直接的内核启动,通过全局内存读取一次性计算注意力,这对较小的 L 已经足够。如果另一个请求的 L = 2,048,它可以切换到 FlashAttention 专用的分块内核,该内核通过在共享内存中复用数据并避免不必要的 HBM 数据读取,在大 L 下具有更好的扩展性。如下所示,这体现为一个基于输入序列长度的条件语句:
// 注意:此处展示的是示例阈值
if (seq_len < 256) {
    // 全局内存版本,适用于较小的 L
    attn_kernel = standard_attention_kernel;
} else {
    // 分块加载,适用于较大的 L
    attn_kernel = tiled_attention_kernel;
}
output = attn_kernel(Q, K, V, mask);
// Note: example threshold shown here
if (seq_len < 256) {
    // global-memory version, best for small L
    attn_kernel = standard_attention_kernel;
} else {
    // tiled loads, best for large L
    attn_kernel = tiled_attention_kernel;
}
output = attn_kernel(Q, K, V, mask);
Behind the scenes, attn_kernel picks between completely different CUDA implementations. One implementation is optimized for small inputs using the default attention kernel, and another is optimized for large contexts using the tiled kernel.在幕后,attn_kernel 会在完全不同的 CUDA 实现之间进行选择。一种实现使用默认注意力内核针对小输入进行优化,另一种实现使用分块内核针对大上下文进行优化。
The ideal tile dimensions depend on your GPU’s shared-memory capacity and compute resources. Frameworks like CUTLASS and OpenAI’s Triton include autotuners that benchmark a range of (TILE_Q, TILE_K) combinations at initialization—or even adaptively at runtime—to select the fastest variant. Table 19-3 shows examples of how different tile sizes perform on a Blackwell-class GPU.理想的分块维度取决于 GPU 的共享内存容量和计算资源。CUTLASS 和 OpenAI 的 Triton 等框架内置自动调优器,它们在初始化时——甚至在运行时自适应地——对一系列 (TILE_Q, TILE_K) 组合进行基准测试,以选出最快的变体。表 19-3 展示了不同分块大小在 Blackwell 级 GPU 上的性能示例。
| Tile size分块大小 | Shared memory (KB)共享内存(KB) | Occupancy (%)占用率(%) | Throughput (GOPS)吞吐量(GOPS) |
|---|---|---|---|
| 64 × 6464 × 64 | 4848 | 8585 | 8.28.2 |
| 128 × 64128 × 64 | 6464 | 7878 | 10.510.5 |
| 128 × 128128 × 128 | 9696 | 7272 | 9.89.8 |
| 256 × 128256 × 128 | 128128 | 6060 | 11.311.3 |
By choosing the right variant at runtime based on the input, you avoid the huge performance cliff of a one-size-fits-all approach. In practice you might benchmark on your target hardware to find that around L = 128 is the breakeven point.通过在运行时根据输入选择正确的变体,可以避免“一刀切”方案带来的巨大性能断崖。在实践中,你可以在目标硬件上进行基准测试,发现 L = 128 左右是盈亏平衡点。
Next, let’s analyze the feed-forward MLP kernels in the context of autotuning. The feed-forward layers are essentially large matrix multiplications—specifically, two linear projections with a nonlinear activation in between.接下来,我们在自动调优的背景下分析前馈 MLP 内核。前馈层本质上是大规模矩阵乘法——具体来说,是两个线性投影,中间夹一个非线性激活。
Modern AI frameworks like PyTorch use highly optimized GEMM kernels using optimized CUDA libraries like cuBLAS and CUTLASS. There are often multiple algorithmic variants in these libraries for a given matrix size that use different tiling strategies, different Tensor Cores, and separate fallback paths.现代 AI 框架(如 PyTorch)使用高度优化的 GEMM 内核,这些内核基于 cuBLAS 和 CUTLASS 等经过优化的 CUDA 库。对于给定的矩阵尺寸,这些库中通常存在多种算法变体,它们采用不同的分块策略、不同的张量核心,以及各自独立的回退路径。
For instance, NVIDIA’s cuBLAS and cuBLASLt libraries can autotune GEMM kernels by first trying a few algorithms, then picking the fastest algorithm for the given dimensions. However, this typically happens the first time a GEMM of that shape is encountered—and not revisited.例如,NVIDIA 的 cuBLAS 和 cuBLASLt 库可以对 GEMM 内核进行自动调优:先尝试若干算法,再为给定维度挑选最快的算法。不过,这通常只在该形状的 GEMM 首次出现时发生——之后不会重新评估。
In an inference server that sees many different batch sizes, one can explicitly invoke such autotuning mechanisms—or maintain a cache of best algorithms. For instance, for the MLP’s GEMM of shape [batch_size, hidden_dim] x [hidden_dim, 4*hid den_dim], the optimal kernel might differ for batch_size = 1 versus batch_size = 16.在需要处理多种不同批大小的推理服务器中,可以显式调用这类自动调优机制,也可以维护一份最优算法缓存。例如,对于多层感知机(MLP)中形状为 [batch_size, hidden_dim] x [hidden_dim, 4*hid den_dim] 的通用矩阵乘法(GEMM),batch_size = 1 与 batch_size = 16 时的最优内核可能不同。
The engine can detect a new batch size and run a quick microbenchmark of candidate kernels using cuBLASLt or a custom implementation to select the fastest kernel. Subsequent calls with that batch size can then directly use the chosen kernel.引擎可以检测到新的批大小,并使用 cuBLASLt 或自定义实现对候选内核运行快速微基准测试,以选出最快的内核。之后使用该批大小的调用便可直接使用选定的内核。
In addition, some inference frameworks and runtimes use OpenAI’s Triton GPU kernel domain-specific library (DSL) to compile attention and MLP kernels on the fly with autotuned tile sizes. In this case, the runtime would generate a few variants of a kernel with different tile sizes (e.g., 128 × 128, 64 × 256, etc.) and measure which performs better given the actual hardware and input shape.此外,一些推理框架和运行时使用 OpenAI 的 Triton GPU 内核领域特定库(DSL),以自动调优的分块大小即时编译注意力与 MLP 内核。在这种情况下,运行时会针对一个内核生成若干采用不同分块大小的变体(例如 128 × 128、64 × 256 等),并测量在给定实际硬件与输入形状下哪个表现更好。
You can use tools like Nsight Systems to empirically profile different kernel variants side by side.你可以使用 Nsight Systems 等工具,对不同内核变体进行并排的实测性能剖析。
Specifically, Nsight Systems provides detailed CUDA timelines, including memcpy and NVLink activity, and Nsight Compute provides memory workload analysis that helps attribute cache and memory behavior to kernel sites. This is particularly useful when evaluating tile-size and shared-memory trade-offs. In addition, it can often reveal nonobvious bottlenecks like L2 cache misses that will further guide your tuning decisions.具体而言,Nsight Systems 提供详细的 CUDA 时间线,包括 memcpy 与 NVLink 活动,而 Nsight Compute 提供内存工作负载分析,有助于将缓存与内存行为归因到具体的内核位置。在评估分块(tile)大小与共享内存之间的权衡时,这一点尤其有用。此外,它往往还能揭示诸如 L2 缓存未命中等不易察觉的瓶颈,从而进一步指导你的调优决策。
Dynamic tile switching affects GPU occupancy and should be considered when choosing a tile size. Using a larger tile can increase reuse and reduce kernel-launch overhead, but it can also use more registers and shared memory. This will potentially reduce the number of thread blocks that can run concurrently—reducing occupancy. A proper autotuner will consider this trade-off.动态分块切换会影响 GPU 占用率,因此在选择分块大小时应加以考虑。使用更大的分块可以提高数据复用并减少内核启动开销,但也会占用更多寄存器和共享内存。这可能减少可并发运行的线程块数量——从而降低占用率。一个合适的自动调优器会考虑这一权衡。
In attention kernels, a larger tile (e.g., 128 × 128) maximizes data reuse in shared memory. This is ideal for long sequences since you issue fewer global-memory loads, amortize loop overhead, and produce higher sustained throughput.在注意力内核中,更大的分块(例如 128 × 128)可最大化共享内存中的数据复用。这对于长序列是理想选择,因为全局内存加载次数更少、循环开销得以摊销,并能产生更高的持续吞吐量。
For shorter sequences, however, that same large tile can consume too much shared memory, which limits the occupancy, or number of concurrent thread blocks running on each SM. By reducing the tile size (e.g., 64 × 64) for shorter sequences, you free up shared memory so you can schedule more blocks in parallel. This boosts SM occupancy and reduces per-kernel latency.然而对于较短的序列,同样的大分块会消耗过多共享内存,从而限制占用率,即每个 SM 上可并发运行的线程块数量。通过为较短序列减小分块大小(例如 64 × 64),可以释放共享内存,从而并行调度更多线程块。这会提升 SM 占用率并降低单内核时延。
By adapting the tile size based on the input sequence length, the kernel can achieve near-optimal occupancy in most cases. Some systems even query the CUDA Occupancy API at runtime to choose kernel-launch parameters dynamically, such as thread block size. An example of the Occupancy API in C++ is shown next, but a Python API is also available:通过根据输入序列长度自适应调整分块大小,内核在大多数情况下都能达到接近最优的占用率。一些系统甚至在运行时查询 CUDA Occupancy API,以动态选择内核启动参数,例如线程块大小。下面给出一个 C++ 中 Occupancy API 的示例,同时也提供 Python API:
// 基于占用率的启动配置伪代码
int maxBlocks, bestThreads;
for (int threads = 64; threads <= 256; threads *= 2) {
    cudaOccupancyMaxActiveBlocksPerMultiprocessor(
        &maxBlocks, MyKernel, threads,
// Pseudocode for occupancy-based launch configuration
int maxBlocks, bestThreads;
for (int threads = 64; threads <= 256; threads *= 2) {
    cudaOccupancyMaxActiveBlocksPerMultiprocessor(
        &maxBlocks, MyKernel, threads,
        sharedMemPerBlock(threads));
    // 选择 "threads" 以最大化占用率
    // (注意不要超过每个 SM 的最大线程数限制(例如 2,048)
    float occupancy = (float) maxBlocks * threads /
                              hardwareMaxThreadsPerSM;
}
        sharedMemPerBlock(threads));
    // choose "threads" to maximize occupancy
    // (remember to not exceed the max threads per SM limit (e.g., 2,048)
    float occupancy = (float) maxBlocks * threads /
                              hardwareMaxThreadsPerSM;
}
This pseudo-C++ illustrates evaluating different thread block sizes for a kernel. It checks how many blocks per SM can run given their shared-memory usage. The kernel launch then adjusts the number of threads—or shared-memory use—accordingly. High-performance frameworks and inference engines automate this type of logic internally using the following set of steps:这段伪 C++ 代码演示了如何为一个内核评估不同的线程块大小。它会检查在给定共享内存用量下,每个 SM 能运行多少个线程块。随后内核启动会相应地调整线程数——或共享内存用量。高性能框架和推理引擎会在内部通过以下步骤自动完成这类逻辑:
- 1. Measure workload1. 测量工作负载
- Inspect the current input dimensions (batch size
B, sequence lengthL, etc.) for the next model forward.检查下一次模型前向传播的当前输入维度(批大小B、序列长度L等)。
- 2. Select candidate kernels2. 选择候选内核
- Determine available kernel implementations for each component, such as standard attention or flash attention for the attention phase and an appropriate GEMM algorithm for the MLP phase.确定每个组件可用的内核实现,例如注意力阶段的标准注意力或 flash attention,以及 MLP 阶段合适的 GEMM 算法。
- 3. Estimate or benchmark3. 估算或基准测试
- Run a quick run of each candidate by executing each algorithm for a few iterations on sample data.在样本数据上对每个算法执行若干次迭代,从而对每个候选实现做一次快速试跑。
- 4. Choose best variant4. 选择最佳变体
- Select the kernel with minimal execution time—or sufficient throughput—based on the measured dimensions.根据实测的维度,选择执行时间最短——或吞吐量足够——的内核。
- 5. Cache result5. 缓存结果
- Store the choice in a lookup table keyed by the input dimension or workload signature. This way, if a similar request appears, the best kernel is known without having to rerun these steps.将选择结果存入查找表,以输入维度或工作负载签名(workload signature)为键。这样,当出现类似请求时,无需重新执行上述步骤即可得知最佳内核。
- 6. Execute6. 执行
- Run the model layer using the chosen kernel implementation.使用选定的内核实现运行该模型层。
By following such a process, the inference runtime continuously tunes itself. Over time, the system builds a library of optimized paths for various scenarios, such as short versus long prompts, small versus large batches, etc. The overhead of on-the-fly tuning is kept low by either doing it asynchronously—testing new kernels in a separate stream while the current inference uses a default kernel—or during low-traffic periods so as not to impact latency.通过遵循这样的流程,推理运行时能够持续自我调优。随着时间推移,系统会为各种场景构建一个优化路径库,例如短提示词与长提示词、小批大小与大批大小等。即时调优的开销通过以下方式保持在较低水平:要么异步进行——在单独的流中测试新内核,而当前推理使用默认内核——要么在低流量时段进行,以免影响时延。
It’s recommended to incorporate an initial warm-up phase when a model is loaded by running a variety of sample inputs through to trigger autotuning. This can include extremes—like max sequence length, max batch, etc.—so that the engine preoptimi-zes kernels for those cases.建议在加载模型时加入一个初始预热阶段,通过运行各种样本输入来触发自动调优。这些输入可以包含极端情况——例如最大序列长度、最大批大小等——以便引擎针对这些情况预先优化内核。
Also, it’s best to monitor execution time at each layer during runtime. If a layer suddenly becomes a bottleneck due to a change in input characteristics, then it’s time to revisit the kernel selection.此外,最好在运行时监控每一层的执行时间。如果某一层因输入特征的变化而突然成为瓶颈,那就该重新审视内核选择了。
In short, autotuning transforms static kernels into adaptive ones. This squeezes the highest performance out of your GPU cluster for each set of inputs regardless of the workload. You can be confident that the system is constantly adapting.简而言之,自动调优将静态内核转变为自适应内核。无论工作负载如何,这都能针对每一组输入从 GPU 集群中榨取最高性能。你可以确信系统始终在持续自适应。
动态共享内存分配与占用率感知的内核选择
Dynamic Shared-Memory Allocation and Occupancy-Aware Kernel Selection
Closely related to kernel tuning is the management of GPU shared memory and overall streaming multiprocessor (SM) occupancy. Modern GPUs feature a large shared memory per SM. By dynamically allocating threads at runtime based on the problem size—as well as current shared-memory utilization and occupancy—you can significantly improve overall AI system performance.与内核调优密切相关的是 GPU 共享内存的管理以及整体流多处理器(SM)占用率。现代 GPU 每个 SM 都配备大容量共享内存。通过在运行时根据问题规模——以及当前共享内存利用率和占用率——动态分配线程,可以显著提升 AI 系统的整体性能。
With dynamic shared-memory allocation, the system adjusts the amount of shared memory that each thread block uses based on the problem size. With occupancy-aware kernel selection, the system is choosing kernel-launch parameters that make best use of the SM’s resources—including registers, shared memory, and warps—to keep the GPU busy.借助动态共享内存分配,系统根据问题规模调整每个线程块使用的共享内存量。借助占用率感知的内核选择,系统选择能够最佳利用 SM 资源——包括寄存器、共享内存和线程束——的内核启动参数,以让 GPU 保持忙碌。
Choosing a tiled attention algorithm should balance data reuse against SM occupancy. For instance, consider T as your tile width, in tokens, per thread block. Each thread block reserves on the order of O(*T*2) floats in shared memory to hold the query, key, and value chunks since self-attention is quadratic in nature.选择分块注意力算法时,需要在数据复用与 SM 占用率之间取得平衡。例如,将 T 视为每个线程块的分块宽度(以 token 为单位)。由于自注意力本质上是二次的,每个线程块会在共享内存中预留约 O(*T*2) 个浮点数,用于存放 query、key 和 value 分块。
A large tile size (e.g., T=256) loads each key/value block once from DRAM and reuses it for many queries. This reduces global-memory traffic closer to O(T) floats per thread block. But because each thread block now uses a lot of shared memory, only a few thread blocks can run on an SM at once given hardware limits. This reduces occupancy. For example, if only 1 block per SM can run at T=256 versus 4 blocks at T=128, you might see only 30% SM occupancy using T=256.较大的分块尺寸(例如 T=256)会从 DRAM 中一次性加载每个 key/value 块,并将其复用于大量 query。这将全局内存流量降低到接近每个线程块 O(T) 个浮点数。但由于每个线程块现在使用大量共享内存,受硬件限制,一个 SM 上同时只能运行少数几个线程块。这会降低占用率。例如,如果在 T=256 时每个 SM 只能运行 1 个块,而在 T=128 时可运行 4 个块,那么使用 T=256 时可能只能看到 30% 的 SM 占用率。
A small tile size (e.g., T=64) uses far less shared memory, which allows more thread blocks to fit into each SM. This better hides latency and boosts utilization. However, you end up reloading the same key/value data more often, which increases DRAM accesses.较小的分块尺寸(例如 T=64)使用的共享内存少得多,因此每个 SM 可以容纳更多线程块。这能更好地隐藏时延并提升利用率。然而,最终会更频繁地重新加载相同的 key/value 数据,从而增加 DRAM 访问。
The optimal tile size, T, depends on a few factors, including your sequence length L, the GPU’s shared-memory capacity, and the SM count. You want a tile that’s large enough to amortize DRAM reads but small enough to keep occupancy high enough that many thread blocks are active on the SM concurrently.最优分块尺寸 T 取决于若干因素,包括序列长度 L、GPU 的共享内存容量以及 SM 数量。你希望分块足够大,以摊销 DRAM 读取;同时又足够小,使占用率保持足够高,从而让多个线程块在 SM 上并发活跃。
In practice, you could manually pick a handful of candidate T values, such as 64, 128, and 256—and benchmark each value on your specific hardware using a sequence length, L, that represents your dataset. You would then choose the value of T that produces the best overall throughput. However, instead of hard-coding T ahead of time, you can compute it right before launching your kernel, as shown here:在实践中,你可以手动挑选若干候选 T 值,例如 64、128 和 256,并使用代表你的数据集的序列长度 L,在特定硬件上对每个值进行基准测试。然后选择能带来最佳整体吞吐量的 T 值。不过,与其提前硬编码 T,你可以在启动内核之前即时计算它,如下所示:
int T = choose_tile(L, gpu_shared_mem_per_block, num_sms);
// 根据分块大小计算共享内存字节数
// (乘以 3 以容纳 Q、K 和 V)
size_t shared_mem_bytes = 3 * T * T * sizeof(float);
numBlocks = ...
MyAttentionKernel<<<numBlocks, threadsPerBlock, shared_mem_bytes>>>(...);
int T = choose_tile(L, gpu_shared_mem_per_block, num_sms);
// calculate shared memory in bytes based on the tile size
// (multiplying by 3 for Q, K, and V)
size_t shared_mem_bytes = 3 * T * T * sizeof(float);
numBlocks = ...
MyAttentionKernel<<<numBlocks, threadsPerBlock, shared_mem_bytes>>>(...);
Here, T is computed from the sequence length L; the GPUs’ shared-memory limits per thread block, gpu_shared_mem_per_block; and the number of SMs, num_sms. Then, shared memory per thread block, shared_mem_bytes, is computed at runtime based on the computed tile size, T.这里,T 由序列长度 L、GPU 每个线程块的共享内存上限 gpu_shared_mem_per_block 以及 SM 数量 num_sms 计算得出。随后,根据计算出的分块尺寸 T,在运行时计算每个线程块的共享内存量 shared_mem_bytes。
You can then launch the CUDA kernel with the shared-memory argument, shared_mem_bytes. The kernel itself would contain the following to define an extern __shared__ array to allocate the shared-memory buffer of size shared_mem_bytes for each thread block:然后,你可以使用共享内存参数 shared_mem_bytes 启动 CUDA 内核。内核本身将包含以下内容,用于定义一个 extern __shared__ 数组,从而为每个线程块分配大小为 shared_mem_bytes 的共享内存缓冲区:
// 存放 Q、K 和 V 的 3 个 T×T 浮点分块
extern __shared__ float smem[];
// Q 分块:smem[0 ... T*T-1]
float* tile_q = smem;
// K 分块:smem[T*T ... 2*T*T-1]
// holds 3 tiles of T×T floats for Q, K, and V
extern __shared__ float smem[];
// Q tile: smem[0 ... T*T-1]
float* tile_q = smem;
// K tile: smem[T*T ... 2*T*T-1]
float* tile_k = smem + T*T;
// V 分块:smem[2*T*T ... 3*T*T-1]
float* tile_v = smem + 2*T*T;
float* tile_k = smem + T*T;
// V tile: smem[2*T*T ... 3*T*T-1]
float* tile_v = smem + 2*T*T;
By varying shared_mem_bytes per launch, the same kernel binary can run with different tile sizes. After selecting T, you can query occupancy using the CUDA Occupancy API to see how many blocks fit per SM.通过在每次启动时改变 shared_mem_bytes,同一个内核二进制文件可以以不同的分块尺寸运行。选定 T 后,你可以使用 CUDA Occupancy API 查询占用率,查看每个 SM 能容纳多少个块。
If occupancy is too low and only one block is allocated per SM, you can reduce T. If you’re thrashing DRAM, you can increase T. This can be implemented as an automatic feedback loop in which the kernel programmatically measures its own achieved occupancy using the CUDA Occupancy API or NVIDIA’s Data Center GPU Manager (DCGM)—and adjusts T on subsequent iterations. This way each attention layer uses the optimal configuration based on the current sequence length, L, and the hardware limits.如果占用率过低、每个 SM 只分配到一个块,你可以减小 T。如果你正在反复冲刷 DRAM,可以增大 T。这可以实现为一个自动反馈回路:内核通过 CUDA Occupancy API 或 NVIDIA 的 Data Center GPU Manager(DCGM)以编程方式测量自身达到的占用率,并在后续迭代中调整 T。这样,每个注意力层都会根据当前序列长度 L 和硬件限制使用最优配置。
As we saw in Chapter 6, you also need to consider register usage per thread when optimizing SM occupancy. Using more registers (e.g., unrolling loops) can speed up single-thread performance, but it can reduce overall SM occupancy since each SM has a limited register file.正如我们在第 6 章中所见,在优化 SM 占用率时,还需要考虑每个线程的寄存器使用量。使用更多寄存器(例如展开循环)可以加快单线程性能,但由于每个 SM 的寄存器文件有限,这可能降低整体 SM 占用率。
Fewer warps can be scheduled if each warp uses many registers. A dynamic runtime can detect if a kernel is hitting occupancy limits due to registers and switch to a version that uses fewer registers—at the expense of extra instructions. These low-level considerations are critical for adaptive, high-performance inference servers.如果每个线程束使用大量寄存器,可调度的线程束就会更少。动态运行时可以检测内核是否因寄存器而触及占用率上限,并切换到使用更少寄存器的版本——代价是额外的指令。这些底层考量对于自适应的高性能推理服务器至关重要。
Dynamic shared-memory tuning requires profiling occupancy versus throughput. Tools such as NVIDIA Nsight Systems/Compute and the CUDA Occupancy API can show the achieved occupancy and execution efficiency of each kernel. Meanwhile, DCGM provides real-time GPU utilization and SM occupancy metrics at the system level. An adaptive system can use this information to notice that an attention kernel with sequence length 2,048 achieves only 30% occupancy, for example, because each thread block uses a large amount of shared memory.动态共享内存调优需要对占用率与吞吐量进行性能剖析。NVIDIA Nsight Systems/Compute 和 CUDA Occupancy API 等工具可以显示每个内核实际达到的占用率和执行效率。同时,DCGM 在系统层面提供实时的 GPU 利用率和 SM 占用率指标。自适应系统可以利用这些信息发现:例如,序列长度为 2,048 的注意力内核只达到 30% 的占用率,原因是每个线程块使用了大量共享内存。
In this case, the system could dynamically switch to a kernel configuration that reduces shared memory per thread block by splitting the attention computation across two passes, for instance. This would increase occupancy—and potentially increase throughput—if memory latency was the bottleneck.在这种情况下,系统可以动态切换到某种内核配置,例如通过将注意力计算拆分为两趟来减少每个线程块的共享内存。如果内存时延是瓶颈,这样做会提高占用率——并有可能提高吞吐量。
Conversely, if a kernel is memory bound and not saturating ALUs, using more shared memory—even if occupancy drops—can improve effective throughput by reducing memory stalls. It’s important to understand these trade-offs—especially with occupancy since it’s less intuitive, in some cases, than other metrics.反之,如果内核受内存限制且未使 ALU 饱和,那么使用更多共享内存——即使占用率下降——也可以通过减少内存停顿来提高有效吞吐。理解这些权衡很重要——尤其是占用率,因为它在某些情况下不如其他指标直观。
It’s recommended to design kernels that allow tunable shared memory and thread block sizes at runtime. The system can then adapt the tuning configuration to runtime conditions based on input and hardware feedback. For example, it can provide runtime parameters and template parameters for tile sizes used by libraries like CUTLASS, which provide runtime-tunable kernel variants for exactly this reason.建议设计允许在运行时调节共享内存和线程块大小的内核。这样系统就可以根据输入和硬件反馈,使调优配置适应运行时条件。例如,它可以为 CUTLASS 等库使用的分块大小提供运行时参数和模板参数,这些库正是出于这一原因提供了可在运行时调优的内核变体。
You should also continuously monitor SM utilization metrics. Consider many idle warps (e.g., < 50% active warps) or memory stall cycles (> 70% stalled). This indicates an imbalance, as either occupancy is too low (idle warps)—or your tile size is too small and causes excessive memory traffic. As such, your system should adjust accordingly to restore the balance.你还应持续监控 SM 利用率指标。注意大量空闲线程束(例如活跃线程束 < 50%)或内存停顿周期(> 70% 停顿)。这表明存在失衡:要么占用率过低(空闲线程束)——要么分块尺寸过小,导致过多的内存流量。因此,系统应相应调整以恢复平衡。
For inference serving, it’s common to maintain a small table of optimal thread block configurations for different problem sizes. This mapping can be implemented as a JSON or config file that maps sequence length ranges to launch parameters. This allows easy updates as models and hardware evolve.对于推理服务,通常会维护一张针对不同问题规模的最优线程块配置小表。该映射可以实现为 JSON 或配置文件,将序列长度区间映射到启动参数。这样随着模型和硬件演进可以轻松更新。
For instance, whenever your system performs attention with sequence length 512, it will use 128 threads/block and 16 KB shared memory. Or, for sequence length 4,096, it will use 256 threads/block and 64 KB shared memory, etc. This extends the concept of autotuning to resource allocation.例如,每当系统执行序列长度为 512 的注意力计算时,它将使用 128 线程/块和 16 KB 共享内存。或者,对于序列长度 4,096,它将使用 256 线程/块和 64 KB 共享内存,等等。这把自动调优的概念扩展到了资源分配。
Remember that modern NVIDIA GPUs provide a unified on-chip pool for L1 data cache and shared memory. And the carveout controls how much of that pool is reserved for shared memory versus L1. Adjust the carveout with cudaFuncSetAttri bute to increase the fraction available to shared memory when kernels demand larger tiles.请记住,现代 NVIDIA GPU 为 L1 数据缓存和共享内存提供统一的片上池。而缓存划分(carveout)控制该池中有多少保留给共享内存、多少留给 L1。当内核需要更大的分块时,使用 cudaFuncSetAttri bute 调整缓存划分,以增加可用于共享内存的比例。
Modern NVIDIA GPUs provide a unified on-chip pool for L1 data cache and shared memory. NVIDIA’s device driver allows you to set the L1 cache versus shared-memory split percentage, or “carveout” percentage. As such, you can configure an SM to prefer more shared memory or more L1 cache depending on the use case. For instance, you can increase the fraction available to shared memory when kernels demand larger tiles.现代 NVIDIA GPU 为 L1 数据缓存和共享内存提供统一的片上池。NVIDIA 的设备驱动允许你设置 L1 缓存与共享内存的划分百分比,即“carveout”百分比。因此,你可以根据使用场景将 SM 配置为偏好更多共享内存或更多 L1 缓存。例如,当内核需要更大的分块时,你可以增加可用于共享内存的比例。
A sophisticated runtime can toggle this carve-out percentage at launch time using cudaFuncSetAttribute() with cudaFuncAttributePreferredSharedMemoryCarve out or specific kernels. For instance, if an attention kernel uses very large tiles and needs more shared memory, you might want to reduce the L1 to 25% and increase shared memory to 75% (assuming the carveout value starts at 50%).复杂的运行时可以在启动时使用 cudaFuncSetAttribute() 配合 cudaFuncAttributePreferredSharedMemoryCarve out,针对特定内核切换该缓存划分百分比。例如,如果某个注意力内核使用非常大的分块并需要更多共享内存,你可能希望将 L1 降到 25%、把共享内存提高到 75%(假设缓存划分值起始为 50%)。
In short, dynamic shared memory and occupancy-aware techniques ensure that every SM is kept as busy as possible for the given task. These techniques adapt the kernel’s resource usage to the specific use case. This is essential for large models in which some layers or batch sizes could otherwise underutilize the SMs.简而言之,动态共享内存与占用率感知技术可确保每个 SM 在给定任务下尽可能保持忙碌。这些技术使内核的资源使用适配具体用例。对于大模型而言这一点至关重要,否则某些层或批大小可能无法充分利用 SM。
投机式 KV 预取以加速 TTFT
Speculative KV Prefetching for Faster TTFT
When serving LLMs in a real-time setting, time-to-first-token (TTFT) is a critical metric, as it measures how quickly the system can produce the first token of the model’s response. This directly affects the end user’s experience.在实时场景中服务 LLM 时,首 token 时延(time-to-first-token,TTFT)是一项关键指标,因为它衡量系统能以多快速度产出模型响应的第一个 token。这直接影响最终用户的体验。
One major contributor to TTFT in large models is the time spent setting up the model’s internal states, such as the key-value (KV) cache, before token generation can begin. Remember from earlier chapters that the attention KV cache stores the past tokens’ key and value projections for each layer.在大模型中,TTFT 的一个主要来源是在 token 生成开始之前建立模型内部状态(例如键值(KV)缓存)所花费的时间。回顾前面章节可知,注意力 KV 缓存为每一层存储过去 token 的键投影与值投影。
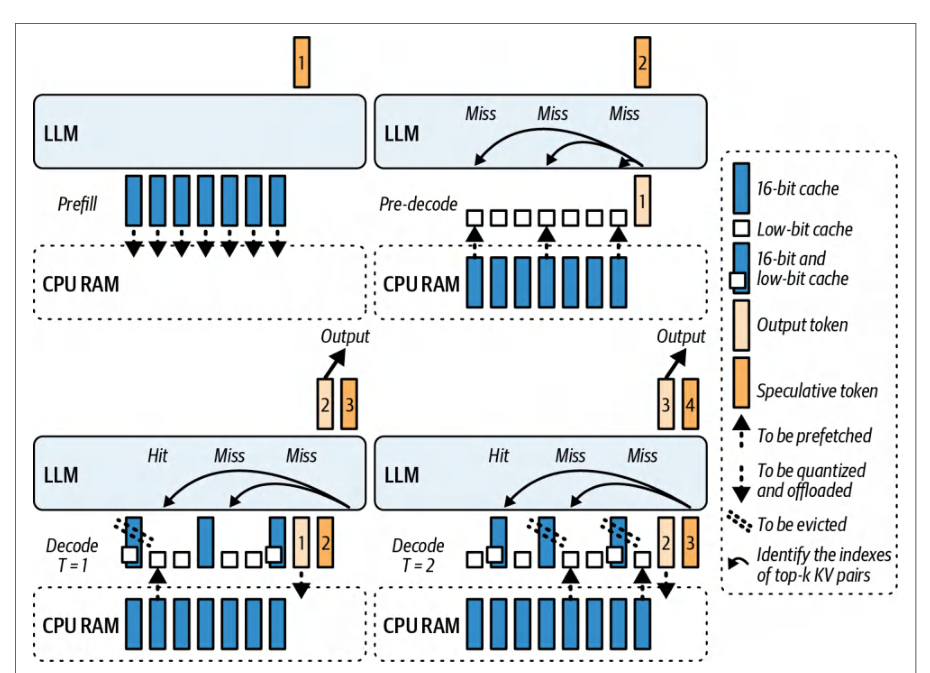
Speculative KV prefetching is an optimization in which the system anticipates the data needed for the first token—and loads the necessary data into the GPU in advance. This effectively overlaps KV cache preparation with other steps, such as compute. This way, the token generation can start more quickly. An example of speculative KV caching is SpeCache, as shown in Figure 19-3.投机式 KV 预取是一种优化手段:系统预测首个 token 所需的数据,并提前将必要数据加载到 GPU 中。这实际上让 KV 缓存的准备与其他步骤(例如计算)重叠进行。如此一来,token 生成便能更快启动。投机式 KV 缓存的一个示例是 SpeCache,如图 19-3 所示。
With SpeCache, the KV cache is compressed (16-bit, in this case) and moved off-GPU one layer at a time. This reduces the memory footprint. After generating the first output token, a speculative “next” token is computed. At the same time, the model prefetches the corresponding reduced-precision KV pairs needed for that first decoding step.使用 SpeCache 时,KV 缓存会被压缩(此处为 16 位),并逐层移出 GPU。这降低了显存占用。在生成第一个输出 token 之后,会计算一个投机的“下一个”token。与此同时,模型预取该首个解码步骤所需的、对应的低精度 KV 对。
On each subsequent step, the model decodes two tokens in parallel, including the actual output token and the speculative token. Both results are fed into the next step, and, before each step, the top-k most relevant 16-bit KV pairs for the speculative path are prefetched. This way, both paths have their required KV cache data ready. In short, SpeCache reports TTFT improvements by prefetching reduced-precision KV and overlapping with compute.在其后的每一步中,模型并行解码两个 token,即实际输出 token 与投机 token。两个结果都会被送入下一步;并且在每一步之前,都会为投机路径预取相关性最高的 top-k 个 16 位 KV 对。这样,两条路径所需的 KV 缓存数据都已就绪。简而言之,SpeCache 通过预取低精度 KV 并与计算重叠,报告了 TTFT 的改善。
The KV cache can be extremely large due to the number of layers in modern LLMs, the increasing size of the LLM context window (effectively limitless at this point), and the large amount of reasoning chains generated by modern “thinking” models. Modern inference systems will often swap the KV cache between GPU, CPU memory, and SSD to better manage capacity—especially for extremely long contexts, which don’t fit in GPU memory.由于现代 LLM 的层数、LLM 上下文窗口的不断增大(目前实际上已近乎无限),以及现代“思考”模型生成的大量推理链,KV 缓存可能极其庞大。现代推理系统常常在 GPU、CPU 内存与 SSD 之间交换 KV 缓存,以更好地管理容量——尤其是对于无法放入 GPU 显存的超长上下文。
When a new token is being generated, a naive approach would be to fetch the KV data from wherever it resides (some on GPU, some on CPU) in synchronous fashion—and then perform the computation to decode the next token. This can add significant latency for the first token—especially if the cache has been paged out to CPU memory or NVMe storage.在生成新 token 时,朴素的做法是以同步方式从 KV 数据所在的任意位置(部分在 GPU、部分在 CPU)取回数据,然后再执行计算以解码下一个 token。这会显著增加首个 token 的时延——尤其是当缓存已被换页到 CPU 内存或 NVMe 存储时。
KV cache prefetching helps by starting the KV data transfers ahead of time. As soon as the user’s prompt is received, the server can start copying the necessary KV pages—as well as the model weights—directly into GPU memory. By the time the model finishes computing the prompt in the prefill phase, the necessary data is in place to generate the first output token.KV 缓存预取通过提前启动 KV 数据传输来提供帮助。一旦收到用户提示词,服务器便可开始将必要的 KV 页以及模型权重直接复制到 GPU 显存中。当模型在预填充阶段完成对提示词的计算时,生成首个输出 token 所需的数据已经就位。
Specifically, this mechanism keeps only the current layer’s KV in GPU memory—and offloads the other layers’ KV to the CPU. It asynchronously prefetches the next layer’s cache into the GPU while the current layer is being computed. Additionally, it simultaneously writes the previous layer’s cache back to the CPU.具体而言,该机制仅在 GPU 显存中保留当前层的 KV,而将其他层的 KV 卸载到 CPU。它在当前层进行计算的同时,异步地将下一层的缓存预取到 GPU。此外,它还会同时将上一层的缓存写回 CPU。
This overlap of communication and computation means the GPU rarely waits for data. The result is that using an offloaded KV cache in CPU memory has minimal impact on latency. For example, you might see ~5%–10% lower tokens/s throughput when offloading due to the extra data-transfer overhead.这种通信与计算的重叠意味着 GPU 很少需要等待数据。结果是,使用位于 CPU 内存中的卸载 KV 缓存对时延的影响极小。例如,由于额外的数据传输开销,卸载后你可能会看到 tokens/s 吞吐量下降约 5%–10%。
An example of KV cache offloading is in Hugging Face’s Transformers library in the form of the OffloadedCache mechanism. This can be enabled when calling gener ate(cache_implementation="offloaded") orKV 缓存卸载的一个示例是 Hugging Face 的 Transformers 库中的 OffloadedCache 机制。可以在调用 gener ate(cache_implementation="offloaded") 或
generate(cache_implementa
tion="offloaded_static"). This will generate tokens with the Transformer library, as shown here. This makes it a low-effort, high-impact optimization:tion="offloaded_static") 时启用。这将使用 Transformer 库生成 token,如下所示。这使其成为一项低投入、高收益的优化:
# 动态、变长服务与滑动层
# (推荐的默认值)
out = model.generate(..., cache_implementation="offloaded")
# 静态形状 + torch.compile 与 CUDA 图
# (固定形状下吞吐量最高,配合 torch.compile 使用)
# out = model.generate(..., cache_implementation="offloaded_static")
# Dynamic, variable-length serving and sliding layers
# (recommended default)
out = model.generate(..., cache_implementation="offloaded")
# Static shapes + torch.compile and CUDA Graphs
# (highest throughput with fixed shapes, use with torch.compile)
# out = model.generate(..., cache_implementation="offloaded_static")
Under the hood, when generation begins, the OffloadedCache will ensure that layer 1’s KV is moved to the GPU. While layer 1 computes, OffloadedCache issues an asynchronous DMA for layer 2’s KV from the CPU to the GPU, etc. It’s always prefetching one layer ahead.在底层,当生成开始时,OffloadedCache 会确保第 1 层的 KV 被移动到 GPU。在第 1 层计算期间,OffloadedCache 会发起一次异步 DMA,将第 2 层的 KV 从 CPU 传输到 GPU,依此类推。它始终提前预取一层。
By the time the forward pass reaches layer 2, its KV is already local. This reduces the stall that would occur if we used a synchronous copy for each layer. Now that we have described KV prefetching, let’s move to speculative KV prefetching.当前向传播到达第 2 层时,其 KV 已经在本地。这减少了若对每一层都使用同步拷贝会出现的停顿。既然我们已经介绍了 KV 预取,接下来转向推测性 KV 预取。
Speculative KV prefetching extends beyond just the one-layer lookahead of regular KV prefetching. Imagine an inference server configuration with multiple model replicas—or multiple possible paths like MoE models in which a token can be routed to one of several expert networks.推测性 KV 预取超越了常规 KV 预取仅提前一层的预读范围。设想一个推理服务器配置,其中包含多个模型副本——或者多条可能的路径,例如 MoE 模型中一个 token 可以被路由到若干专家网络之一。
KV prefetching helps at the boundary between the phases. By the end of the prefill phase, ideally, the caches for all layers are either already in GPU memory or queued to come into GPU memory. This directly minimizes TTFT since, once generation starts, the model isn’t waiting on memory transfers.KV 预取在两个阶段的交界处很有帮助。到预填充阶段结束时,理想情况下所有层的缓存要么已经在 GPU 显存中,要么已排队等待进入 GPU 显存。这直接最小化了 TTFT,因为一旦生成开始,模型就不必等待显存传输。
To implement KV prefetching in your own stack without stalling inference, you can use CUDA streams for overlap (as described in Chapter 11). This way, it runs concurrently with your main computation stream. You would then use CUDA events to synchronize the streams only when the prefetched data is needed, as shown here:要在自己的技术栈中实现 KV 预取而不使推理停顿,可以使用 CUDA 流来实现重叠(如第 11 章所述)。这样,它就能与主计算流并发运行。然后,仅在需要预取数据时才使用 CUDA 事件同步这些流,如下所示:
// kv_prefetch_overlap.cu
#include <cstdio>
#include <cuda_runtime.h>
// 示例尺寸
static constexpr size_t KV_BYTES =
  /* set to your chunk size */ 8ull<<20; // 8 MiB
__global__ void forward_kernel(/* ... */) {
  // 计算当前 token 的 logits ...
}
__global__ void consume_prefetched_kv(/* use prefetch_dest */) {
  // 消费 prefetch_dest 中的 KV ...
}
int main() {
  // 在该 GPU 上分配目标缓冲区
  void* prefetch_dest = nullptr;
  cudaMalloc(&prefetch_dest, KV_BYTES);
  // 示例:在主机上暂存源数据。必须使用锁页内存才能实现真正的重叠。
  void* kv_src_host = nullptr;
  cudaMallocHost(&kv_src_host, KV_BYTES);  // 锁页(page-locked)
  // 用第一次迭代的数据填充 kv_src_host……
  cudaStream_t compute_stream, prefetch_stream;
  cudaStreamCreateWithFlags(&compute_stream, cudaStreamNonBlocking);
  cudaStreamCreateWithFlags(&prefetch_stream, cudaStreamNonBlocking);
  cudaEvent_t kv_ready;
  cudaEventCreateWithFlags(&kv_ready, cudaEventDisableTiming);
  bool done = false;
  while (!done) {
    // 1) 为当前 token 启动计算
    forward_kernel<<< /*grid*/1, /*block*/1, 0, compute_stream>>>();
// kv_prefetch_overlap.cu
#include <cstdio>
#include <cuda_runtime.h>
// Example sizes
static constexpr size_t KV_BYTES =
  /* set to your chunk size */ 8ull<<20; // 8 MiB
__global__ void forward_kernel(/* ... */) {
  // compute logits for current token ...
}
__global__ void consume_prefetched_kv(/* use prefetch_dest */) {
  // consumes KV in prefetch_dest ...
}
int main() {
  // Allocate destination buffer on this GPU
  void* prefetch_dest = nullptr;
  cudaMalloc(&prefetch_dest, KV_BYTES);
  // Example: staging source on host. MUST be pinned for real overlap.
  void* kv_src_host = nullptr;
  cudaMallocHost(&kv_src_host, KV_BYTES);  // pinned (page-locked)
  // Fill kv_src_host with data for the first iteration...
  cudaStream_t compute_stream, prefetch_stream;
  cudaStreamCreateWithFlags(&compute_stream, cudaStreamNonBlocking);
  cudaStreamCreateWithFlags(&prefetch_stream, cudaStreamNonBlocking);
  cudaEvent_t kv_ready;
  cudaEventCreateWithFlags(&kv_ready, cudaEventDisableTiming);
  bool done = false;
  while (!done) {
    // 1) Launch compute for current token
    forward_kernel<<< /*grid*/1, /*block*/1, 0, compute_stream>>>();
    // 2) 异步预取下一个 KV 块
    // 如果源是另一块 GPU,请使用 cudaMemcpyPeerAsync
    // 并启用对等访问。
    cudaMemcpyAsync(prefetch_dest, kv_src_host, KV_BYTES,
                               cudaMemcpyHostToDevice, prefetch_stream);
    cudaEventRecord(kv_ready, prefetch_stream);
    // 3) 确保 compute_stream 上的消费者恰好在需要时等待
    cudaStreamWaitEvent(compute_stream, kv_ready, /*flags*/0);
    // 4) 启动消费已预取 KV 的工作
    consume_prefetched_kv<<< /*grid*/1, /*block*/1, 0, compute_stream>>>();
    // 5) ……推进状态,为下一次迭代更新 kv_src_host,设置 `done`
    done = true; // 演示
  }
  cudaEventDestroy(kv_ready);
  cudaStreamDestroy(prefetch_stream);
  cudaStreamDestroy(compute_stream);
  cudaFree(prefetch_dest);
  cudaFreeHost(kv_src_host);
  return 0;
}
    // 2) Asynchronously prefetch next KV chunk
    // If your source is another GPU, use cudaMemcpyPeerAsync
    // and enable peer access.
    cudaMemcpyAsync(prefetch_dest, kv_src_host, KV_BYTES,
                               cudaMemcpyHostToDevice, prefetch_stream);
    cudaEventRecord(kv_ready, prefetch_stream);
    // 3) Ensure consumer on compute_stream waits just-in-time
    cudaStreamWaitEvent(compute_stream, kv_ready, /*flags*/0);
    // 4) Launch work that consumes the prefetched KV
    consume_prefetched_kv<<< /*grid*/1, /*block*/1, 0, compute_stream>>>();
    // 5) ...advance state, update kv_src_host for next iteration, set `done`
    done = true; // demo
  }
  cudaEventDestroy(kv_ready);
  cudaStreamDestroy(prefetch_stream);
  cudaStreamDestroy(compute_stream);
  cudaFree(prefetch_dest);
  cudaFreeHost(kv_src_host);
  return 0;
}
In this setup, cudaMemcpyAsync runs on prefetch_stream while model.forward() uses the compute_stream. This allows the CUDA driver to overlap data transfer with compute. You synchronize only when the prefetched KV data is actually needed by waiting on kv_ready event before continuing with the computation that consumes it. The event enforces just-in-time synchronization at the handoff point.在此设置中,cudaMemcpyAsync 在 prefetch_stream 上运行,而 model.forward() 使用 compute_stream。这允许 CUDA 驱动程序将数据传输与计算重叠。只有在实际需要预取的 KV 数据时才进行同步——在继续执行使用该数据的计算之前等待 kv_ready 事件。该事件在交接点强制执行即时同步。
Using a separate stream ensures efficient pipelining. As one token is being generated, the next token’s KV cache is being prefetched without interrupting the compute stream. This maximizes GPU utilization by masking transfer latency and keeping the compute units continuously fed with data. Modern LLM inference engines use this automatically in the form of paged KV caching.使用独立的流可以确保高效的流水线化。在生成一个 token 的同时,下一个 token 的 KV 缓存正在被预取,而不会中断计算流。这通过掩盖传输时延、让计算单元持续获得数据供给,从而最大化 GPU 利用率。现代 LLM 推理引擎以分页 KV 缓存(paged KV caching)的形式自动使用这一机制。
It’s best to consider weight and KV cache data movement as part of the overall inference pipeline. Just as you should pipeline compute operations, you should also pipeline data movement. Always have the next needed data in flight while the current computation is ongoing. KV cache compression is yet another option to improve performance at the KV cache layer. Let’s cover this next.最好将权重和 KV 缓存的数据搬运视为整体推理流水线的一部分。正如你应当对计算操作进行流水线化,你也应当对数据搬运进行流水线化。在当前计算进行的同时,始终让下一份所需数据处于传输之中。KV 缓存压缩是提升 KV 缓存层性能的另一种选择。接下来我们将讨论这一点。
实时 KV 缓存压缩与策略切换
Real-Time KV Cache Compression and Policy Switching
As an LLM generates more and more tokens in a session, the KV cache grows linearly. For long conversations, documents, and reasoning chains, the KV cache consumes a huge amount of GPU memory and often utilizes the most GPU memory.随着 LLM 在一次会话中生成越来越多的 token,KV 缓存呈线性增长。对于长对话、长文档和推理链,KV 缓存会消耗大量 GPU 显存,而且往往是占用 GPU 显存最多的部分。
KV cache is a good candidate for compression/quantization. Like any form of compression, KV cache compression reduces its memory footprint. Doing this in real time means performing compression on the fly during inference.KV 缓存是压缩/量化的良好候选对象。与任何形式的压缩一样,KV 缓存压缩可减小其显存占用。实时执行意味着在推理过程中即时进行压缩。
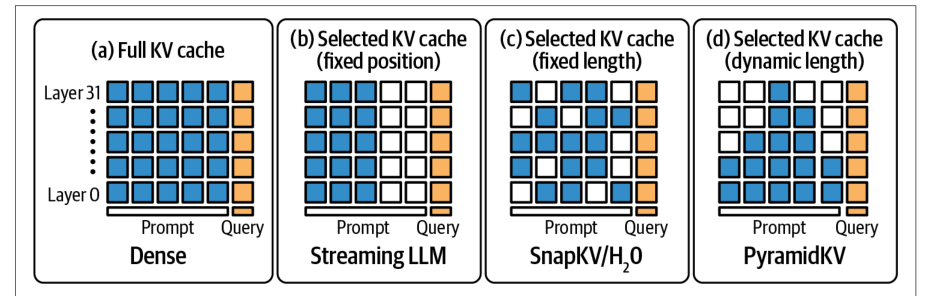
Policy switching means that the compression strategy can change based on the current context. The goal is to free up memory and network bandwidth when needed— without impacting model accuracy or slowing down computations that involve the KV cache data. Figure 19-4 shows a few different types of KV cache compression algorithms.策略切换意味着压缩策略可以根据当前上下文而变化。其目标是在需要时释放内存和网络带宽——同时不影响模型精度,也不拖慢涉及 KV 缓存数据的计算。图 19-4 展示了几种不同类型的 KV 缓存压缩算法。
A straightforward and simple approach to KV compression is to just reduce its precision. Many frameworks default to FP16 or BF16 for KV cache since 16-bit is typically what the model uses for activations. However, one can often compress keys and values to 8-bit or even 4-bit with minimal impact on output quality—especially for tokens at the end of the LLM’s context.一种直接而简单的 KV 压缩方法是降低其精度。许多框架默认对 KV 缓存使用 FP16 或 BF16,因为 16 位通常是模型用于激活值的精度。然而,人们常常可以将键和值压缩到 8 位甚至 4 位,而对输出质量的影响极小——尤其是对于位于 LLM 上下文末尾的 token。
Hugging Face’s Transformers library supports a QuantizedCache, including INT8 and INT4 for KV memory. This feature can be enabled in one line by specifying cache_implementation="quantized" with a specific bit-width. The result is a massive memory savings at the cost of a tiny amount of extra compute for the quantization/ dequantization operations. And the overall model quality does not suffer in most cases.Hugging Face 的 Transformers 库支持 QuantizedCache,包括用于 KV 内存的 INT8 和 INT4。通过指定 cache_implementation="quantized" 以及具体的位宽,可以一行代码启用该特性。其结果是节省大量内存,代价是量化/反量化操作带来极少量额外计算。而且在大多数情况下,整体模型质量不会受损。
Next, let’s discuss dynamic policy switching. An example of a policy is keeping the last 128 tokens in full precision but compressing the rest of the tokens in 4-bit. This way, the most recent context—which likely has the most impact on predicting the next token—is preserved with higher precision, whereas the older history is stored in lower precision to save storage.接下来,我们讨论动态策略切换。一个策略示例是:将最后 128 个 token 保持全精度,而将其余 token 压缩为 4 位。这样,最近的上下文——它很可能对预测下一个 token 影响最大——以更高精度保留,而较早的历史则以较低精度存储以节省存储空间。
If the model suddenly needs to attend to older tokens, it’s usually not disastrous since many LLMs have recency bias anyway. This means that they prioritize recent context. This way, earlier parts of the input sequence may not affect the final output as much.如果模型突然需要关注更早的 token,通常也不会造成灾难性后果,因为许多 LLM 本身就存在近因偏置。这意味着它们会优先考虑较近的上下文。这样一来,输入序列中较早的部分对最终输出的影响可能就没那么大。
You might further adapt this window based on user prompt length. For example, you can use a larger full-precision window for very long prompts—or compress more aggressively if GPU memory usage is above a threshold.你还可以根据用户提示词的长度进一步调整这个窗口。例如,对于非常长的提示词,可以使用更大的全精度窗口;或者如果 GPU 显存占用超过某个阈值,就进行更激进的压缩。
Alternatively, a policy could be based on memory usage. For instance, the policy could dictate that if GPU memory usage exceeds 80%, it should compress the entire KV cache into 8-bit. This helps avoid OOM errors during long generations. The policy might include multitier compression in which the system compresses the KV cache to 8-bit under mild pressure, then changes to 4-bit compression under extreme pressure.另一种做法是让策略基于显存占用。例如,策略可以规定:如果 GPU 显存占用超过 80%,就把整个 KV 缓存压缩为 8 位。这有助于避免长序列生成过程中的 OOM 错误。该策略还可以包含多级压缩:在轻度压力下把 KV 缓存压缩到 8 位,在极端压力下再切换为 4 位压缩。
With true dynamic, real-time policy switching, the engine can change to a different compression during token generation. In this case, the implementation would need to maintain multiple representations of the cache simultaneously. For instance, it would initially store KV in FP16 but concurrently maintain an INT8 version of the same data.借助真正的动态、实时策略切换,引擎可以在 token 生成过程中改用另一种压缩方式。在这种情况下,实现上需要同时维护缓存的多种表示。例如,它最初以 FP16 存储 KV,但同时维护同一份数据的 INT8 版本。
The system would use FP16 by default, but if memory utilization crosses a certain threshold, it could start using the INT8 version—with appropriate scaling factors— and free the FP16 memory to relieve memory pressure. Future attention reads would then retrieve dequantized values from INT8 storage.系统默认使用 FP16,但如果显存利用率越过某个阈值,就可以开始使用带相应缩放因子的 INT8 版本,并释放 FP16 占用的显存以缓解显存压力。此后进行注意力读取时,就从 INT8 存储中取回反量化后的值。
This requires careful synchronization, however, to ensure the compressed version is kept up-to-date and ready by the time it’s needed. Techniques like double buffering and background compression threads are useful in this case.不过,这需要谨慎的同步,以确保压缩版本始终保持最新,并在需要时已经就绪。双缓冲和后台压缩线程之类的技术在这种情况下很有用。
Often a CPU thread can handle the compression asynchronously using vectorized INT8 quantization operations. It can then copy the compressed block to GPU memory when ready.通常,一个 CPU 线程可以使用向量化的 INT8 量化操作异步完成压缩,然后在压缩块就绪后将其复制到 GPU 显存。
There are other techniques, such as lossless compression, that use entropy coding and clustering to compress activations without losing information bit-for-bit. However, these implementations are complex and may be too slow to do in real time—even on a GPU.还有其他技术,例如无损压缩,它利用熵编码和聚类来逐位无损地压缩激活值。不过,这类实现较为复杂,而且即便在 GPU 上也可能太慢,无法实时完成。
Simpler mechanisms like chunk-wise ZFP, a type of floating-point compression, or even generic CPU-based compression should be considered. However, the simplest, most-effective, and well-supported method so far has been quantization.应当考虑更简单的机制,例如分块 ZFP(一种浮点压缩),甚至通用的基于 CPU 的压缩。不过,迄今为止最简单、最有效且支持最好的方法仍是量化。
For minimal quality impact, you can experiment with per-head and per-token scaling. Quantizing the KV cache is most effective with per-head, group-wise scaling rather than per-token scaling. The Hugging Face QuantizedCache Transformer implementation calibrates the range of values per attention head.为了把质量影响降到最低,可以尝试按注意力头和按 token 的缩放。对 KV 缓存做量化时,按注意力头进行分组缩放比按 token 缩放更有效。Hugging Face 的 QuantizedCache Transformer 实现会按注意力头校准数值范围。
Specifically, QuantizedCache implements per-channel, group-wise quantization with a configurable group size and a residual window that keeps the most recent tokens in the original precision. You enable it by setting cache_implementation="quantized" and passing cache_config as a dictionary. You can compute the max absolute value in a tensor and scale the 4-bit or 8-bit quantization accordingly. This is essentially a form of min-max, or magnitude-based quantization.具体来说,QuantizedCache 实现的是按通道、分组量化,组大小可配置,并带有一个残差窗口,用于把最近的 token 保留在原始精度。你只需设置 cache_implementation="quantized" 并以字典形式传入 cache_config 即可启用。你可以计算张量中的最大绝对值,并据此对 4 位或 8 位量化进行缩放。这本质上是一种 min-max 量化,即基于幅值的量化。
A useful implementation of QuantizedCache is the Half-Quadratic Quantization (HQQ) backend. HQQ provides a calibration-free, on-the-fly quantizer that supports a wide range of low-bit formats, including 2-bit, 3-bit, 4-bit, and 8-bit. It uses a robust optimization to model outliers and heavy-tailed error distributions. And HQQ integrates well into the Hugging Face Transformers’ KV cache implementation. It provides both a PyTorch and custom CUDA kernel implementation for fast inference.QuantizedCache 的一个实用实现是半二次量化(Half-Quadratic Quantization,HQQ)后端。HQQ 提供无需校准的即时量化器,支持包括 2 位、3 位、4 位和 8 位在内的多种低位格式。它使用稳健的优化方法来建模离群值和重尾误差分布。并且 HQQ 能很好地集成到 Hugging Face Transformers 的 KV 缓存实现中。它同时提供 PyTorch 实现和自定义 CUDA 内核实现,以实现快速推理。
We can implement a dynamic policy that can switch between an 8-bit quantization and 4-bit quantization depending on memory pressure. The sharpness or distribution of values might also guide the decision. If the cached values are mostly small and have low variance, they can usually be quantized more aggressively. Switching the compression policy in real time can be integrated with the Hugging Face Quantized Cache mechanism.我们可以实现一种动态策略,根据显存压力在 8 位量化和 4 位量化之间切换。数值的锐度或分布也可能指导这一决策。如果缓存中的数值大多较小且方差较低,通常可以更激进地量化。实时切换压缩策略可以与 Hugging Face 的 Quantized Cache 机制集成。
Unfortunately, Transformers does not support changing the bit-width of an already-initialized cache object in place. However, to implement a dynamic policy, our code can generate tokens in small chunks and, on memory pressure, start the next chunk with a new quantized cache configuration on the fly. This implementation is similar to falling back to an offloaded cache upon hitting an out-of-memory (OOM) error. Here is the code:遗憾的是,Transformers 不支持就地修改已初始化缓存对象的位宽。不过,为实现动态策略,我们的代码可以按小块生成 token,并在出现显存压力时,动态地以新的量化缓存配置开始下一块。这种实现类似于在遇到显存不足(OOM)错误时回退到卸载缓存。代码如下:
# dynamic_quantized_cache.py
# 使用 Hugging Face Transformers 的 QuantizedCache(2025)实现动态 KV 缓存策略。
# 以 int8 HQQ 起步,在设备显存紧张时降至 int4。
# 依赖:transformers >= 4.55、hqq(用于 HQQ 后端)。
#
# 本示例仅使用公开 API:
#   - cache_implementation="quantized"
#   - cache_config 以字典形式传入
#
# 参考资料:
#   - KV 缓存策略文档(QuantizedCache、HQQ/Quanto 后端)
from __future__ import annotations
from typing import Dict, Optional
import logging
import torch
from transformers import AutoModelForCausalLM, AutoTokenizer
def make_cache_config(
    *,
    backend: str,
    nbits: int,
    device: torch.device,
    compute_dtype: torch.dtype = torch.float16,
    q_group_size: int = 64,
    residual_length: int = 128,
    axis_key: int = 1,
    axis_value: int = 1,
) -> Dict:
    """
    Build a cache_config dictionary accepted by Transformers' quantized cache.
    HQQ supports nbits in {2, 4, 8}; Quanto supports {2, 4}.
    axis_key/axis_value=1 are recommended for HQQ.
    """
    return {
        "backend": backend,                 # "HQQ" 或 "quanto"
        "nbits": int(nbits),
        "axis_key": axis_key,
        "axis_value": axis_value,
        "q_group_size": int(q_group_size),  # 沿 head_dim 的分组大小
# dynamic_quantized_cache.py
# Dynamic KV cache policy using Hugging Face Transformers' QuantizedCache (2025).
# Starts with int8 HQQ and drops to int4 when device memory is tight.
# Requires: transformers >= 4.55, hqq (for HQQ backend).
#
# This uses only public APIs:
#   - cache_implementation="quantized"
#   - cache_config as a dict
#
# References:
#   - KV cache strategies docs (QuantizedCache, HQQ/Quanto backends)
from __future__ import annotations
from typing import Dict, Optional
import logging
import torch
from transformers import AutoModelForCausalLM, AutoTokenizer
def make_cache_config(
    *,
    backend: str,
    nbits: int,
    device: torch.device,
    compute_dtype: torch.dtype = torch.float16,
    q_group_size: int = 64,
    residual_length: int = 128,
    axis_key: int = 1,
    axis_value: int = 1,
) -> Dict:
    """
    Build a cache_config dictionary accepted by Transformers' quantized cache.
    HQQ supports nbits in {2, 4, 8}; Quanto supports {2, 4}.
    axis_key/axis_value=1 are recommended for HQQ.
    """
    return {
        "backend": backend,                 # "HQQ" or "quanto"
        "nbits": int(nbits),
        "axis_key": axis_key,
        "axis_value": axis_value,
        "q_group_size": int(q_group_size),  # group size along head_dim
        "residual_length": int(residual_length), # 最近的 token(原始精度)
        "compute_dtype": compute_dtype,     # 反量化计算 dtype
    }
def _gpu_used_ratio() -> float:
    """
    Return fraction of device memory used as 1 - free/total.
    Uses CUDA driver info, which reflects true device state,
    not just the PyTorch allocator's reserved bytes.
    """
    free, total = torch.cuda.mem_get_info()
    return 1.0 - (free / total)
@torch.no_grad()
def generate_with_dynamic_quantized_cache(
    model: AutoModelForCausalLM,
    tokenizer: AutoTokenizer,
    prompt: str,
    *,
    max_new_tokens: int = 256,
    chunk_tokens: int = 32,
    memory_threshold: float = 0.90,   # 若 used_ratio >= threshold 则切换策略
    backend: str = "hqq",             # "hqq" 或 "quanto"
    start_bits: int = 8,              # 初始缓存位宽
    fallback_bits: int = 4,           # 压力下降低位宽
    residual_length: int = 128,
) -> str:
    """
    Generate text in chunks while allowing mid-run policy changes.
    The policy applies to each chunk by choosing cache_config for that chunk.
    If memory is tight, we switch from int8 to int4 in subsequent chunks.
    """
    backend = backend.lower()
    assert backend in {"hqq", "quanto"}, "backend must be 'hqq' or 'quanto'"
    if backend == "quanto":
        assert start_bits in {2, 4} and fallback_bits in {2, 4},
               "Quanto supports only 2 or 4 bits"
    if backend == "hqq":
        assert start_bits in {2, 4, 8} and fallback_bits in {2, 4, 8},
               "HQQ supports 2, 4, or 8 bits"
    device = model.device
    inputs = tokenizer(prompt, return_tensors="pt").to(device)
    generated_ids = inputs["input_ids"]   # [batch=1, seq_len]
    tokens_remaining = int(max_new_tokens)
    current_bits = int(start_bits)
    # 如果可用,使用 EOS 提前终止。
    eos_id: Optional[int] = tokenizer.eos_token_id
        "residual_length": int(residual_length), # recent tokens (orig precision)
        "compute_dtype": compute_dtype,     # dequantization compute dtype
    }
def _gpu_used_ratio() -> float:
    """
    Return fraction of device memory used as 1 - free/total.
    Uses CUDA driver info, which reflects true device state,
    not just the PyTorch allocator's reserved bytes.
    """
    free, total = torch.cuda.mem_get_info()
    return 1.0 - (free / total)
@torch.no_grad()
def generate_with_dynamic_quantized_cache(
    model: AutoModelForCausalLM,
    tokenizer: AutoTokenizer,
    prompt: str,
    *,
    max_new_tokens: int = 256,
    chunk_tokens: int = 32,
    memory_threshold: float = 0.90,   # switch policy if used_ratio >= threshold
    backend: str = "hqq",             # "hqq" or "quanto"
    start_bits: int = 8,              # initial cache bit-width
    fallback_bits: int = 4,           # lower bit-width on pressure
    residual_length: int = 128,
) -> str:
    """
    Generate text in chunks while allowing mid-run policy changes.
    The policy applies to each chunk by choosing cache_config for that chunk.
    If memory is tight, we switch from int8 to int4 in subsequent chunks.
    """
    backend = backend.lower()
    assert backend in {"hqq", "quanto"}, "backend must be 'hqq' or 'quanto'"
    if backend == "quanto":
        assert start_bits in {2, 4} and fallback_bits in {2, 4},
               "Quanto supports only 2 or 4 bits"
    if backend == "hqq":
        assert start_bits in {2, 4, 8} and fallback_bits in {2, 4, 8},
               "HQQ supports 2, 4, or 8 bits"
    device = model.device
    inputs = tokenizer(prompt, return_tensors="pt").to(device)
    generated_ids = inputs["input_ids"]   # [batch=1, seq_len]
    tokens_remaining = int(max_new_tokens)
    current_bits = int(start_bits)
    # Use EOS if available to terminate early.
    eos_id: Optional[int] = tokenizer.eos_token_id
    while tokens_remaining > 0:
        # 根据当前显存压力决定该块的策略。
        if torch.cuda.is_available():
            # 对信号做平滑处理以避免振荡
            # 当多个进程同时处于活动状态时。
            if 'used_ratio' in locals():
                used_ratio = 0.8 * used_ratio + 0.2 * _gpu_used_ratio()
            else:
                used_ratio = _gpu_used_ratio()
            if used_ratio >= memory_threshold:
                current_bits = min(current_bits, fallback_bits) # 丢弃位数
                logging.info(f"Current bits {current_bits}")
        cache_cfg = make_cache_config(
            backend=backend,
            nbits=current_bits,
            device=device,
            compute_dtype=torch.bfloat16,
            q_group_size=64,
            residual_length=residual_length,
            axis_key=1,
            axis_value=1,
        )
        # 使用选定的缓存策略生成一个小块。
        this_chunk = min(chunk_tokens, tokens_remaining)
        out = model.generate(
            input_ids=generated_ids,
            max_new_tokens=this_chunk,
            do_sample=False,       # 为清晰起见采用确定性设置;可按需调整
            use_cache=True,
            cache_implementation="quantized",          # 选择 QuantizedCache
            cache_config=cache_cfg,                    # 传入后端 + 设置
            pad_token_id=eos_id,
            return_dict_in_generate=False,        # 此处只需要 token
        )
        # 'out' 的形状为 [1, old_len + this_chunk];切出新生成的尾部
        new_tokens = out[:, generated_ids.shape[1]:]
        generated_ids = out
        tokens_remaining -= new_tokens.shape[1]
        # 若模型输出了 EOS,则提前终止。
        if eos_id is not None and int(new_tokens[0, -1].item()) == eos_id:
            break
    return tokenizer.decode(generated_ids[0], skip_special_tokens=True)
if __name__ == "__main__":
    # 示例用法。请替换为支持你所使用硬件的模型。
    while tokens_remaining > 0:
        # Decide policy for this chunk based on current memory pressure.
        if torch.cuda.is_available():
            # Smooth the signal to avoid oscillation
            # when multiple processes are active.
            if 'used_ratio' in locals():
                used_ratio = 0.8 * used_ratio + 0.2 * _gpu_used_ratio()
            else:
                used_ratio = _gpu_used_ratio()
            if used_ratio >= memory_threshold:
                current_bits = min(current_bits, fallback_bits) # drop bits
                logging.info(f"Current bits {current_bits}")
        cache_cfg = make_cache_config(
            backend=backend,
            nbits=current_bits,
            device=device,
            compute_dtype=torch.bfloat16,
            q_group_size=64,
            residual_length=residual_length,
            axis_key=1,
            axis_value=1,
        )
        # Generate a small chunk with the chosen cache policy.
        this_chunk = min(chunk_tokens, tokens_remaining)
        out = model.generate(
            input_ids=generated_ids,
            max_new_tokens=this_chunk,
            do_sample=False,       # deterministic for clarity; adjust as needed
            use_cache=True,
            cache_implementation="quantized",          # select QuantizedCache
            cache_config=cache_cfg,                    # pass backend + settings
            pad_token_id=eos_id,
            return_dict_in_generate=False,        # we only need the tokens here
        )
        # 'out' is [1, old_len + this_chunk]; slice out newly generated suffix
        new_tokens = out[:, generated_ids.shape[1]:]
        generated_ids = out
        tokens_remaining -= new_tokens.shape[1]
        # Early termination if the model emitted EOS.
        if eos_id is not None and int(new_tokens[0, -1].item()) == eos_id:
            break
    return tokenizer.decode(generated_ids[0], skip_special_tokens=True)
if __name__ == "__main__":
    # Example usage. Replace with a model that supports your hardware.
    ckpt = "meta-llama/Llama-3.1-8B-Instruct"
    tok = AutoTokenizer.from_pretrained(ckpt)
    mdl = AutoModelForCausalLM.from_pretrained(ckpt,
                                            torch_dtype=torch.float16).to("cuda")
    text = generate_with_dynamic_quantized_cache(
        mdl,
        tok,
        "Explain attention key-value caches in one paragraph.",
        max_new_tokens=120,
        chunk_tokens=32,
        memory_threshold=0.90,
        backend="hqq",         # 或 "quanto"(若已安装 Quanto)
        start_bits=8,
        fallback_bits=4,
        residual_length=128,
    )
    print(text)
    ckpt = "meta-llama/Llama-3.1-8B-Instruct"
    tok = AutoTokenizer.from_pretrained(ckpt)
    mdl = AutoModelForCausalLM.from_pretrained(ckpt,
                                            torch_dtype=torch.float16).to("cuda")
    text = generate_with_dynamic_quantized_cache(
        mdl,
        tok,
        "Explain attention key-value caches in one paragraph.",
        max_new_tokens=120,
        chunk_tokens=32,
        memory_threshold=0.90,
        backend="hqq",         # or "quanto" if you installed Quanto
        start_bits=8,
        fallback_bits=4,
        residual_length=128,
    )
    print(text)
Here, we start with an INT8 HQQ cache for modest compression and switch to INT4 when actual GPU free memory drops below a threshold. This is measured with torch.cuda.mem_get_info(), which reflects true free versus total device memory. This provides the right signal for the policy choice.这里,我们从 INT8 HQQ 缓存开始以获得适度的压缩,并在实际 GPU 空闲内存低于阈值时切换到 INT4。该值通过 torch.cuda.mem_get_info() 测量,它反映的是真实的空闲内存与设备总内存。这为策略选择提供了正确的信号。
We then generate tokens in small chunks so that we can safely switch the policy between chunks without trying to mutate an existing cache instance. This avoids reaching into private attributes or quantizing tensors manually. The cache backend does the work inside the model’s forward pass.随后我们按小块生成 token,这样就能在块与块之间安全地切换策略,而无需试图修改已有的缓存实例。这避免了访问私有属性或手动量化张量。缓存后端在模型的前向传播内部完成这些工作。
Similarly, you can dynamically turn off compression if conditions improve. Suppose a long conversation just ended and the next question is short. The system could decide to stop compressing or even restore some caches to higher precision if it will produce better quality responses. The difference is likely small, so it might not be worth it.同样,如果条件改善,你也可以动态关闭压缩。假设一段长对话刚刚结束,而下一个问题很短。系统可以决定停止压缩,甚至将部分缓存恢复到更高精度,如果这样能产生质量更好的响应。差异可能很小,因此可能并不值得。
It’s important to avoid rapid fluctuations in compression since toggling compression on/off too often could thrash performance. To do this, you can introduce intentional delays (aka hysteresis and cooldown) between changes. For example, if a higher-compression strategy is changed, keep it until GPU memory drops well below a given threshold. This way, you avoid oscillations and thrashing.重要的是避免压缩的剧烈波动,因为过于频繁地开启/关闭压缩会造成性能抖动(thrashing)。为此,可以在变更之间引入有意的延迟(即*迟滞*和*冷却*)。例如,如果切换到更高压缩的策略,就保持该策略,直到 GPU 显存降到远低于给定阈值。这样可以避免振荡和抖动。
Having this flexibility is useful if, for instance, your service sometimes prioritizes maximum quality (no compression) for premium users versus maximum throughput (heavy compression) for free-tier users. The policy can switch based on request metadata as well, including the user’s subscription type.这种灵活性很有用,例如,当你的服务有时要为高级用户优先保证最高质量(不压缩),而为免费层用户优先保证最大吞吐量(重度压缩)时。该策略也可以根据请求元数据(包括用户的订阅类型)来切换。
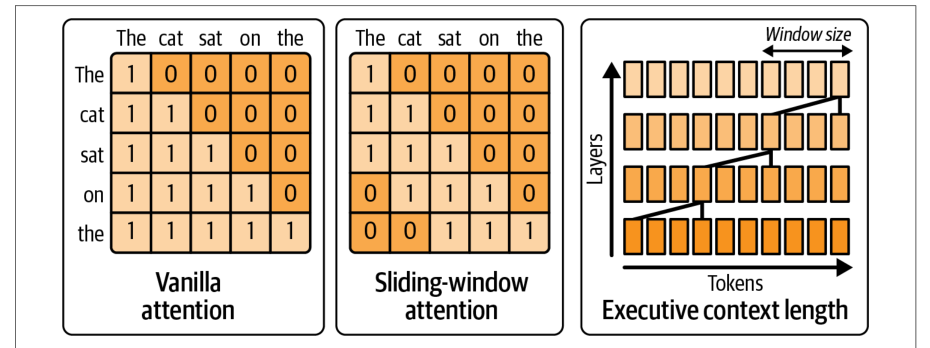
No discussion on caching is complete without considering eviction strategies, such as Least Recently Used (LRU) eviction. If context length becomes too long, some model architectures—like those with recency bias or sliding-window attention—might choose to discard or downsample very old tokens entirely. Sliding-window attention is shown in Figure 19-5.如果不考虑淘汰策略(例如最近最少使用(LRU)淘汰),关于缓存的讨论就是不完整的。如果上下文长度变得过长,某些模型架构——例如具有近因偏置或滑动窗口注意力的架构——可能会选择完全丢弃或降采样非常旧的 token。滑动窗口注意力如图 19-5 所示。
While LRU eviction of earlier tokens from the context is not exactly compression, it’s yet another type of policy that can be dynamically chosen at runtime. For instance, the system can decide that, beyond 2,048 tokens, the model likely won’t need the earlier tokens—based on some heuristics or a smaller LLM.虽然从上下文中逐出较早 token 的 LRU 策略并不完全是压缩,但它是另一种可以在运行时动态选择的策略。例如,系统可以基于某些启发式规则或一个更小的 LLM 来判断:超过 2,048 个 token 之后,模型很可能不再需要较早的那些 token。
In this case, the system could start dropping those older tokens—or periodically compress them into a smaller summary. This starts getting into model and algorithmic territory—and requires more support, maintenance, and model training—but it is a form of dynamic context management that should be considered in advanced serving engines.在这种情况下,系统可以开始丢弃这些较旧的 token——或者定期将它们压缩成一份更小的摘要。这就开始进入模型与算法层面了——需要更多的支持、维护和模型训练——但它是动态上下文管理的一种形式,在高级服务引擎中应当予以考虑。
In short, you should consider quantized cache mechanisms provided by your inference engine, as they can handle the details of maintaining quantization-scale factors, interfacing with attention kernels, and monitoring GPU memory allocators at runtime. At a minimum, when the system sees memory utilization approaching a certain limit, log that and see if enabling a compression policy at that point would avoid OOM without hurting latency.简而言之,你应当考虑推理引擎提供的量化缓存机制,因为它们能够处理维护量化缩放因子、与注意力内核对接,以及在运行时监控 GPU 显存分配器等细节。至少,当系统发现显存利用率接近某个上限时,应记录该事件,并观察此时启用压缩策略能否在不损害时延的前提下避免 OOM。
If it makes sense to use dynamic compression policies, you can implement the trigger. As with any quantization and compression strategy, be sure to test their impact on your model’s output specific to your domain. Many generative tasks tolerate aggressive compression, but it’s always good to verify that using 4-bit versus 8-bit doesn’t introduce errors or unexpected outputs.如果使用动态压缩策略是合理的,你就可以实现该触发机制。与任何量化与压缩策略一样,务必针对你的领域测试它们对模型输出的影响。许多生成式任务能够容忍激进的压缩,但始终最好验证一下使用 4 位而非 8 位是否会引入错误或意外输出。
用于在运行时调优 AI 系统的强化学习智能体
Reinforcement Learning Agents for Tuning AI Systems at Runtime
Many of the techniques we’ve discussed so far involve decisions based on the system’s current state. These decisions often require trade-offs, such as speed versus accuracy and throughput versus latency. Rather than collecting more and more heuristics to make decisions, we can tune our inference system with reinforcement learning with an RL agent, environment, policy, and reward.到目前为止我们讨论的许多技术都涉及基于系统当前状态做出决策。这些决策往往需要权衡,例如速度与精度、吞吐量与时延。与其收集越来越多的启发式规则来做决策,我们可以用强化学习来调优推理系统,其中包含强化学习智能体、环境、策略与奖励。
Specifically, our inference engine watches server metrics (the environment), chooses actions (the policy) to maximize throughput while keeping latency under a target, and receives feedback (the reward) that guides continual improvement. In this way, the system becomes an online optimizer—continually refining its decision making as conditions change.具体而言,我们的推理引擎观察服务器指标(环境),选择动作(策略)以在将时延控制在目标之内的同时最大化吞吐量,并接收引导持续改进的反馈(奖励)。通过这种方式,系统成为一个在线优化器——随着条件变化不断改进其决策。
For instance, one could set up an environment in which each RL “step” is an inference request. And the RL actions include things like the following:例如,可以搭建这样一个环境:其中每个强化学习“步骤”就是一次推理请求。而强化学习的动作包括如下这些:
- Action 1动作 1
- Choose parallelism mode: single, TP, PP, and hybrid.选择并行模式:单卡、TP、PP 与混合。
- Action 2动作 2
- Choose precision: full FP8 versus mixing FP8 and FP4.选择精度:全 FP8 与混合 FP8 和 FP4。
- Action 3动作 3
- Adjust batch size or batch-waiting time.调整批大小或批次等待时间。
- Action 4动作 4
- Enable or disable cache compression.启用或禁用缓存压缩。
- Action 5动作 5
- Enable or disable speculative decoding.启用或禁用投机解码。
- Action 6动作 6
- Select a smaller draft model for speculative decoding.为投机解码选择更小的草稿模型。
- Action 7动作 7
- Select a larger draft model for speculative decoding.为投机解码选择更大的草稿模型。
- Action 8动作 8
- Enable or disable speculative KV prefetching.启用或禁用投机式 KV 预取。
…more actions………更多动作……
The current RL state observed by the agent might include GPU utilization, memory utilization, average latency, queue length of requests, etc. The RL reward is then defined by capturing business objectives, such as reward = throughput - λ * max(0, latency - SLA). λ is a tunable penalty weight in this reward function that scales how harshly you punish latency violations.智能体观测到的当前 RL 状态可能包括 GPU 利用率、显存利用率、平均时延、请求队列长度等。随后通过刻画业务目标来定义 RL 奖励,例如 reward = throughput - λ * max(0, latency - SLA)。λ 是该奖励函数中一个可调的惩罚权重,用于缩放对时延违约的惩罚力度。
Here, a larger λ makes the agent prioritize staying within the SLA over squeezing out extra throughput. A smaller λ lets it risk occasional latency overshoots to achieve higher token rates overall. Essentially, this reward function penalizes latency that exceeds the SLA but otherwise tries to increase throughput.在这里,较大的 λ 会让智能体优先保证不超出 SLA,而不是榨取额外吞吐量。较小的 λ 则允许它冒偶尔时延超调的风险,以换取整体更高的 token 速率。本质上,该奖励函数会惩罚超出 SLA 的时延,除此之外则尽量提升吞吐量。
Over many iterations, the RL agent can learn when it’s beneficial to compress caches—for instance, when memory is high and latency isn’t immediately impacted. Or it could learn to switch to pipeline parallel mode when GPU utilization is low but one GPU is overloaded, etc.经过多次迭代,RL 智能体可以学会何时压缩缓存是有益的——例如当显存占用很高而时延尚未立即受到影响时。或者它可以学会在 GPU 利用率低但某块 GPU 过载时切换到流水线并行模式,等等。
This helps because PP breaks the model into sequential stages across multiple devices and redistributes the heavy work away from the bottlenecked device—smoothing out utilization and avoiding single-GPU hotspots.这之所以有效,是因为 PP 将模型拆分为跨多个设备的顺序阶段,并把繁重的工作从瓶颈设备上重新分配出去——从而平滑利用率、避免单 GPU 热点。
The agent can find nonintuitive configurations that produce better performance. For instance, it might learn that for prompts above a certain length, it should enable both PP and FP4 compression to produce the best token throughput, whereas, for shorter prompts, it learns to use just pure tensor parallel in FP8. If we tried to encode this logic as a set of static rules, we might miss complex interaction.智能体可以找到产生更优性能的非直觉配置。例如,它可能学会:对于超过某一长度的提示,应同时启用 PP 和 FP4 压缩以获得最佳 token 吞吐量;而对于较短的提示,则学会只使用 FP8 下的纯张量并行。如果我们试图把这一逻辑编码为一组静态规则,就可能遗漏复杂的相互作用。
An RL agent can more easily discover optimal combinations by exploring the action space—and ultimately exploiting the optimal configuration until the environmental conditions change. At this point, the RL would adjust the inference system accordingly since it’s always exploring the action space and trying new configurations.RL 智能体通过探索动作空间,可以更容易地发现最优组合——并最终利用该最优配置,直到环境条件发生变化。此时,由于它始终在探索动作空间并尝试新配置,RL 会相应地调整推理系统。
Training such an agent can be done offline using simulators and libraries such as Hugging Face’s Transformer RL (TRL) libraries. For instance, we could log a bunch of data from a running system under various conditions—and then train an RL policy in simulation to predict outcomes. At a very high level, the RL reward and update loop would look something like the following pseudocode:训练这样的智能体可以离线完成,使用模拟器和 Hugging Face 的 Transformer RL(TRL)等库。例如,我们可以在各种条件下从运行中的系统记录大量数据——然后在模拟中训练 RL 策略来预测结果。从很高层面看,RL 的奖励与更新循环大致如下伪代码所示:
# RL 驱动的调优器的伪结构
# 该循环在独立线程/进程中与主推理服务并行运行。
# 例如,{gpu_util:0.7, mem_util:0.9, avg_latency:120ms, req_queue:5}
state = get_system_state()
# 例如,0 -> 高精度,1 -> 低精度
action = rl_agent.select_action(state)
# 将动作映射为实际的参数变更
if action == 0:
    precision_policy = "FP8"
else:
    precision_policy = "FP4"
# (本可设置多个动作,此处为便于说明只用一个动作)
apply_precision_policy(precision_policy)
# …… 在生成下一个 token 或一组 token 之后 ……
new_state = get_system_state()
reward = compute_reward(old_state, new_state)
rl_agent.update(state, action, reward, new_state)
# Pseudo structure for an RL-driven tuner
# This loop runs in separate thread/process alongside main inference service.
# e.g., {gpu_util:0.7, mem_util:0.9, avg_latency:120ms, req_queue:5}
state = get_system_state()
# e.g., 0 -> high precision, 1 -> low precision
action = rl_agent.select_action(state)
# Map action to actual parameter changes
if action == 0:
    precision_policy = "FP8"
else:
    precision_policy = "FP4"
# (We could have multiple actions, but single action for illustration)
apply_precision_policy(precision_policy)
# ... After the next token or set of tokens ...
new_state = get_system_state()
reward = compute_reward(old_state, new_state)
rl_agent.update(state, action, reward, new_state)
Here, the loop continuously runs in the background of the inference server. The com pute_reward function incorporates throughput (e.g., tokens per second since last step) and latency metrics. Since we are trying to balance throughput with latency, this is a multi-objective optimization problem in which we are optimizing multiple goals at once. A common approach is to use a weighted sum to combine the multiple objectives into a single objective.在这里,该循环持续在推理服务器的后台运行。com pute_reward 函数综合了吞吐量(例如自上一步骤以来的每秒 token 数)与时延指标。由于我们试图在吞吐量与时延之间取得平衡,这是一个多目标优化问题,即同时优化多个目标。一种常见做法是使用加权和,将多个目标组合为单一目标。
These kinds of multiparameter interactions are hard to tune with basic grid search methods. As such, RL and optimization techniques like proximal policy optimization (PPO) are best used for tuning inference workloads. PPO is known for stabler learning in continuous action spaces. It’s well-suited for continuous updating in real-time environments as it adjusts the policy gradually. This avoids extreme oscillations, which is important for inference stability. We don’t want the agent thrashing between decisions on every request.这类多参数交互很难用基础的网格搜索方法调优。因此,RL 以及近端策略优化(PPO)之类的优化技术最适合用于调优推理负载。PPO 以在连续动作空间中学习更稳定而著称。它适合在实时环境中持续更新,因为它会逐步调整策略。这避免了剧烈振荡,而这对推理稳定性很重要。我们不希望智能体在每次请求的决策之间来回摇摆。
Another technique to reduce oscillations is called damping. This requires that an action stay in effect for a minimum amount of time—or minimum number of requests. You can override damping for critical SLO violations, if needed, but this should be done sparingly.另一种减少振荡的技术称为*阻尼*(damping)。它要求某个动作至少持续最短时间——或最少请求数。如有需要,你可以针对严重的 SLO 违例覆盖阻尼设置,但应尽量少用。
It’s important to know that RL agents might make unsafe or suboptimal moves while learning. To mitigate that, you can constrain the action space to a reasonable set of ranges. It’s also recommended to start with a good default policy using the heuristics that we have already identified. The agent can then fine-tune around that initial default policy.需要知道的是,RL 智能体在学习过程中可能做出不安全或次优的动作。为缓解这一点,你可以将动作空间约束在一组合理范围内。还建议使用我们已经识别出的启发式规则,从一个良好的默认策略开始。随后智能体可以围绕该初始默认策略进行微调。
Alternatively, the agent can be trained online in shadow mode using a live system that incorporates an exploration phase. During exploration, the system occasionally tries a random or slightly modified strategy to gather new data. Otherwise, it exploits the current best policy.另一种做法是让智能体在*影子模式*(shadow mode)下,利用包含探索阶段的在线系统进行在线训练。在探索期间,系统偶尔尝试随机或稍作修改的策略以收集新数据;否则就利用当前最优策略。
Another technique is to apply reward shaping, which keeps the agent from violating critical constraints. For instance, the RL system would generate a high negative reward if latency is greater than a hard limit—or if an OOM error occurs due to a bad action.另一项技术是奖励塑形(reward shaping),它可防止智能体违反关键约束。例如,如果时延超过硬性上限——或因不当动作而发生 OOM 错误——RL 系统会产生很高的负奖励。
Additionally, you can hard-code the system to avoid unsafe actions—even if the reward suggests the system do so. This puts in place extra safeguards so that the agent’s natural exploration won’t cause a catastrophic failure. This is a practical approach that combines RL with rule-based guardrails.此外,你还可以在系统中硬编码以避免不安全的动作——即使奖励函数建议这么做。这样可建立额外的防护措施,使智能体的自然探索不会导致灾难性故障。这是一种将 RL 与基于规则的护栏相结合的实用方法。
Designing a proper reward function is important. For instance, if we care about throughput under a latency limit, a reward would look like the code here:设计合适的奖励函数很重要。例如,如果我们关心在时延上限下的吞吐量,奖励函数就像下面代码所示:
reward = tokens_per_second - 1000 * (1 if latency > SLA else 0)
Here, a large penalty is applied if the latency SLA is exceeded. Otherwise, no penalty is applied. Another option is to apply a continuous penalty that is proportional to how far the latency overshoots the target SLA. A simple continuous-penalty reward can be written, as shown here:这里,如果超过时延 SLA,则施加很大的惩罚;否则不施加惩罚。另一种选择是施加与时延超出目标 SLA 的程度成正比的连续惩罚。一个简单的连续惩罚奖励可以写成如下形式:
reward = tokens_per_second – λ * max(0.0, latency – SLA)
Here, λ is your penalty weight, and max(0.0, latency – SLA) grows linearly with how far you exceed the SLA. This way, the agent receives a smoothly increasing penalty the longer its latency overshoots the target. This will produce smoother gradients and more gradual trade-off decisions. In practice, a continuous (soft) penalty often produces a more stable policy than a binary (hard) penalty.这里,λ 是惩罚权重,max(0.0, latency – SLA) 随超出 SLA 的程度线性增长。这样,智能体的时延超出目标越多,收到的惩罚就平滑增加。这将产生更平滑的梯度以及更渐进的权衡决策。在实践中,连续(软)惩罚通常比二值(硬)惩罚产生更稳定的策略。
Logging and observability are important. You should continuously log the decisions that the RL agent makes—as well as the decision outcomes. For example, you should use structured logging—or even counters and telemetry dashboards—to track state → action → reward sequences in real time. This will help debug the agent’s behavior if it starts behaving erratically.日志记录与可观测性很重要。你应持续记录 RL 智能体所做的决策以及决策结果。例如,你应使用结构化日志——甚至计数器和遥测仪表盘——来实时跟踪状态 → 动作 → 奖励序列。如果智能体开始出现异常行为,这将有助于调试。
It’s also recommended to provide an escape hatch, or kill switch. This way, if the agent starts doing something obviously bad, like consistently making latency worse, you can have the system fall back to a safe, static configuration while you diagnose the issue and retrain a new policy offline. For example, if p95 latency increases by more than 50% after enabling the agent, the system will automatically disable the agent’s actions and send an alert to the system on call.还建议提供一个逃生通道,即*终止开关*(kill switch)。这样,如果智能体开始做出明显糟糕的事情,比如持续使时延变差,你可以让系统回退到安全的静态配置,同时诊断问题并在离线状态下重新训练新策略。例如,如果启用智能体后 p95 时延增加超过 50%,系统将自动禁用智能体的动作,并向值班人员发送告警。
While not yet mainstream in modern inference serving engines as of this writing, RL-based, online inference tuning is just beginning to appear. Expect more inference platforms to include self-tuning capabilities as these techniques mature. This is important since these models and systems are becoming more complex. Manually managing all of these tuning knobs is difficult under rapidly changing conditions— it’s difficult for humans, anyway!尽管截至本文撰写时,基于 RL 的在线推理调优在现代推理服务引擎中尚未成为主流,但它才刚刚开始出现。随着这些技术逐渐成熟,预计会有更多推理平台具备自调优能力。这一点很重要,因为模型和系统正变得越来越复杂。在快速变化的环境下,手动管理所有这些调优旋钮十分困难——无论如何,对人类来说都很困难!
An intelligent agent that adapts in real time is a natural evolution of system optimization. We are starting to see self-optimizing AI inference servers that achieve expert-level performance tuning automatically. And they’re doing this just by learning from their own real-time telemetry metrics.能够实时自适应的智能体是系统优化的自然演进。我们开始看到自优化的 AI 推理服务器能够自动达到专家级的性能调优水平。而它们做到这一点,仅仅是通过从自身的实时遥测指标中学习。
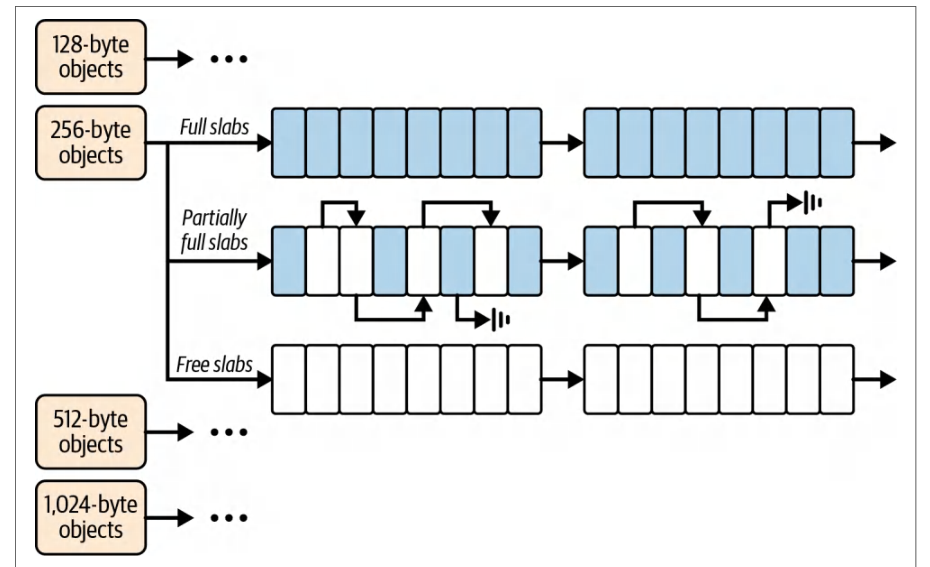
动态显存分配切换(slab、缓存与流序分配对比)
Dynamic Memory-Allocation Switching (Slab Versus Caching Versus Stream-Ordered)
GPU memory fragmentation and nonoptimal memory allocation can be silent performance killers. Inference servers allocate and free thousands of tensors per second for many objects, including tokens, intermediate activations, etc. The strategy used by the memory allocator can influence fragmentation and allocation latency.GPU 显存碎片和非最优的显存分配可能是无声的性能杀手。推理服务器每秒要为众多对象(包括 token、中间激活值等)分配和释放数千个张量。显存分配器所采用的策略会影响碎片程度和分配时延。
Switching the memory allocator dynamically means that the system can change how it allocates memory on the fly. For instance, the system can use a slab allocator for certain allocation sizes—or switch to use CUDA’s stream-ordered (cudaMallocAsync) allocator. The decision depends on the observed pattern of allocations and expected memory fragmentation.动态切换显存分配器意味着系统可以在运行过程中改变其分配内存的方式。例如,系统可以对某些分配大小使用 slab 分配器,或者切换为使用 CUDA 的流序(cudaMallocAsync)分配器。这一决策取决于观测到的分配模式和预期的显存碎片情况。
By default, PyTorch uses a variant of the buddy/best-fit memory allocator called best-fit with coalescing, or BFC. It grabs big chunks of GPU memory and subdivides the chunks to satisfy allocation requests. This reuses free space and avoids frequent calls to the relatively slow and synchronous cudaMalloc and cudaFree.默认情况下,PyTorch 使用伙伴/最佳适配显存分配器的一种变体,称为*带合并的最佳适配*(best-fit with coalescing),简称 BFC。它抓取大块的 GPU 显存,并将这些块细分以满足分配请求。这样复用了空闲空间,避免频繁调用相对缓慢且同步的 cudaMalloc 和 cudaFree。
A buddy allocator splits memory into blocks whose sizes are powers of two. A slab allocator works on top of the buddy system to efficiently manage small, fixed-size objects. It preallocates slabs, or collections of objects of a given type, and maintains a free list within each slab, as shown in Figure 19-6.伙伴分配器将内存切分为大小为 2 的幂的块。slab 分配器构建在伙伴系统之上,用于高效管理小的、固定大小的对象。它预分配 slab(即某一给定类型的对象集合),并在每个 slab 内维护一个空闲链表,如图 19-6 所示。
A slab allocator allows fast reuse without fragmentation. A buddy allocator handles coarse-grained page allocation, while a slab allocator optimizes fine-grained object reuse.slab 分配器可实现无碎片的快速复用。伙伴分配器负责粗粒度的页分配,而 slab 分配器优化细粒度的对象复用。
The default PyTorch caching allocator works well for many workloads. However, it can suffer fragmentation if the pattern of allocations varies widely due to alternating between large and small allocations. In a long-running server that handles different types of queries, fragmentation can build up.默认的 PyTorch 缓存分配器对许多工作负载都表现良好。然而,如果由于大分配与小分配交替出现而导致分配模式变化很大,它就可能产生碎片。在长时间运行、处理不同类型查询的服务器中,碎片会逐渐累积。
In this case, plenty of memory is free, but the memory is not contiguous enough for large tensor allocations. This leads to OOM errors—even though memory is technically available.在这种情况下,有大量内存空闲,但内存的连续性不足以满足大张量分配。这会导致 OOM 错误——尽管从技术上讲内存是可用的。
Remember that PyTorch provides torch.cuda.memory_summary() to evaluate memory fragmentation, as well as a memory profiler built into torch.profiler (pro file_memory=True). You can use these to determine which operations allocate a lot of memory. Also, NVIDIA Nsight Systems provides CUDA memory event and Unified Memory page-fault tracking on the timeline, and Nsight Compute provides memory workload analysis.请记住,PyTorch 提供了 torch.cuda.memory_summary() 来评估显存碎片,torch.profiler 中也内置了内存性能剖析器(pro file_memory=True)。你可以用它们确定哪些操作分配了大量内存。此外,NVIDIA Nsight Systems 在时间线上提供 CUDA 内存事件和统一内存缺页跟踪,Nsight Compute 则提供内存工作负载分析。
Together, these tools let you observe allocation behavior and fragmentation effects over time. And you can use these tools during development and testing to initiate your memory-allocator tuning strategy—including a dynamic tuning strategy, as discussed next.这些工具结合起来,让你能够观察随时间变化的分配行为和碎片影响。你可以在开发和测试期间使用这些工具来启动显存分配器调优策略——包括接下来讨论的动态调优策略。
A brute-force way to reduce memory fragmentation is to periodically reset the allocator’s state. However, a more clever way is to use CUDA’s stream-ordered caching allocator, cudaMallocAsync, which uses a similar concept internally by binning per allocation size up to a certain limit. But slab allocation takes it even further by never mixing sizes.降低显存碎片的一种暴力做法是定期重置分配器的状态。然而,更聪明的做法是使用 CUDA 的流序缓存分配器 cudaMallocAsync,它在内部采用类似的概念,按分配大小分箱,直至某个上限。而 slab 分配则更进一步,从不混用不同大小。
cudaMallocAsync behaves somewhat like a slab allocator combined with a buddy system—and it’s managed by the CUDA driver for you. This gives you most of the benefit of custom allocators with little effort—and makes it a great default memory allocator to leave on all the time, if you prefer.cudaMallocAsync 的行为在某种程度上类似于 slab 分配器与伙伴系统的结合——并且由 CUDA 驱动为你管理。这让你几乎不费力气就能获得自定义分配器的大部分好处——如果你愿意,它还是一个可以一直启用的绝佳默认显存分配器。
Specifically, cudaMallocAsync uses stream-ordered pools that automatically recycle memory when references to the memory are released. It then coalesces the freed blocks behind the scenes since it knows the dependency order of the memory-frees— unlike standard allocators.具体来说,cudaMallocAsync 使用流序(stream-ordered)显存池,当对内存的引用被释放时会自动回收内存。随后它在后台合并这些已释放的块,因为它知道内存释放的依赖顺序——这一点与标准分配器不同。
When using cudaMallocAsync with a PyTorch runtime, you can dynamically adjust max_split_size_mb by setting the PYTORCH_ALLOC_CONF=max_split_size_mb: <value> environment variable. This can adjust the split size under different conditions.在 PyTorch 运行时中使用 cudaMallocAsync 时,可以通过设置 PYTORCH_ALLOC_CONF=max_split_size_mb: <value> 环境变量来动态调整 max_split_size_mb。这样就能在不同条件下调整分割大小。
For instance, a dynamic system could increase max_split_size_mb when large allocations are expected. This way they don’t get broken into small pieces. Conversely, the system can decrease max_split_size_mb when running many small requests to allow more reuse of large blocks.例如,当预期会有大块分配时,动态系统可以提高 max_split_size_mb,这样它们就不会被拆成小块。反之,当运行大量小请求时,系统可以降低 max_split_size_mb,以便更多地复用大块。
Consider a scenario in which your service detects fragmentation—perhaps using PyTorch’s memory snapshot functionality that shows holes caused by fragmentation. In this case, the system could dynamically switch to use cudaMallocAsync, which can consolidate memory usage.设想这样一个场景:你的服务检测到碎片——也许是通过 PyTorch 的内存快照功能,它能显示出碎片造成的空洞。在这种情况下,系统可以动态切换为使用 cudaMallocAsync,它能够整合显存使用。
You should use memory monitoring tools to track—and log—memory fragmentation. For instance, in PyTorch, you can use torch.cuda.memory_reserved() and torch.cuda.memory_allocated(). Here, the reserved memory is the total GPU memory held by the allocator. And allocated is how much of it is actually in use by tensors.你应当使用内存监控工具来跟踪并记录显存碎片。例如,在 PyTorch 中可以使用 torch.cuda.memory_reserved() 和 torch.cuda.memory_allocated()。这里,保留内存是分配器持有的 GPU 显存总量,而已分配内存则是其中实际被张量使用的部分。
A large gap between reserved and allocated means fragmentation since a lot of memory is reserved but not used. If that gap grows over time, a dynamic policy could be to periodically purge the cache to free all the unused memory back to the GPU or even restart the worker process to fully reset the allocator. These are intrusive but effective methods that are sometimes used in production for long-running processes with heavy fragmentation.保留内存与已分配内存之间差距很大,就意味着存在碎片,因为大量内存被保留却未被使用。如果这个差距随时间不断扩大,一种动态策略可以是定期清空缓存,把所有未使用的内存归还给 GPU,甚至重启工作进程以完全重置分配器。这些方法具有侵入性但很有效,在生产环境中有时会用于碎片严重的长时间运行进程。
To implement dynamic allocation switching in PyTorch, for example, you can start with the PyTorch native allocator. Then, if you catch an OOM error, you can retry using the cudaMallocAsync-based allocator.例如,要在 PyTorch 中实现动态分配切换,可以先从 PyTorch 原生分配器开始。然后,如果捕获到 OOM 错误,就可以改用基于 cudaMallocAsync 的分配器重试。
Unfortunately, the CUDA caching allocator is created the first time torch is imported or when the first CUDA context is touched. And Python’s importlib.reload does not unload C++ extensions or tear down the allocator. As such, changing PYTORCH_ALLOC_CONF (formerly PYTORCH_CUDA_ALLOC_CONF) on the fly and reloading the Python module will not reconfigure the allocator in-process.遗憾的是,CUDA 缓存分配器在首次导入 torch 或首次触及 CUDA 上下文时就被创建了。而 Python 的 importlib.reload 并不会卸载 C++ 扩展或销毁分配器。因此,动态修改 PYTORCH_ALLOC_CONF(原为 PYTORCH_CUDA_ALLOC_CONF)并重新加载 Python 模块,并不会在进程内重新配置分配器。
However, you can spawn a fresh process in which the environment variable is set before torch is imported. Below is a snippet of code that catches OOM, frees memory in the parent, and then spins up a clean child process with PYTORCH_ALLOC_CONF. This is a bit hacky but shows how you can dynamically set the backend:cudaMallocA sync and rerun the same call with the different allocator backend. Next is a PyTorch example that implements this dynamic strategy when the code catches a torch.cuda.OutOfMemoryError:不过,你可以启动一个全新进程,在导入 torch 之前就设置好该环境变量。下面这段代码会捕获 OOM、在父进程中释放内存,然后带着 PYTORCH_ALLOC_CONF 启动一个干净的子进程。这种做法有点取巧,但展示了如何动态设置 backend:cudaMallocA sync,并用不同的分配器后端重新运行同一个调用。接下来是一个 PyTorch 示例,它在代码捕获到 torch.cuda.OutOfMemoryError 时实现这一动态策略:
# dynamic_memory_allocator.py
# 若首次尝试发生 OOM,则在全新进程中使用 cudaMallocAsync 重试生成。
# 这是在运行时更换 CUDA 分配器的唯一可靠方式。
import os
import sys
import gc
import pickle
import tempfile
import subprocess
import importlib
from typing import Callable, Any
def _resolve_factory(factory_path: str) -> Callable[[], Any]:
    """
    Resolves a factory string like "my_package.my_mod:build_model" to a callable.
    The callable must return ready-to-use model with .generate(request) method.
    """
    module_name, func_name = factory_path.split(":", 1)
    module = importlib.import_module(module_name)  # 可安全导入,此时尚未引入 torch
    return getattr(module, func_name)
def generate_with_allocator_retry(
    model_factory_path: str,
    request_object: Any,
    *,
    allocator_conf: str = "backend:cudaMallocAsync"
) -> Any:
    """
    Attempts model.generate(request_object) in the current process.
    On torch.cuda.OutOfMemoryError, retries in a fresh subprocess with
    PYTORCH_ALLOC_CONF set to allocator_conf. request_object and the
    returned value must be picklable.
    """
    # 仅在函数内部 import torch;避免在模块导入时导入。
    import torch
    model_factory = _resolve_factory(model_factory_path)
    model = model_factory()  # 用户提供的函数构建模型,并将其移至 GPU
    try:
        # 首次尝试使用当前进程启动时所采用的分配器。
        return model.generate(request_object)
# dynamic_memory_allocator.py
# Retry generation in fresh process with cudaMallocAsync if first attempt OOMs.
# This is the only reliable way to change the CUDA allocator at runtime.
import os
import sys
import gc
import pickle
import tempfile
import subprocess
import importlib
from typing import Callable, Any
def _resolve_factory(factory_path: str) -> Callable[[], Any]:
    """
    Resolves a factory string like "my_package.my_mod:build_model" to a callable.
    The callable must return ready-to-use model with .generate(request) method.
    """
    module_name, func_name = factory_path.split(":", 1)
    module = importlib.import_module(module_name)  # safe to import, no torch yet
    return getattr(module, func_name)
def generate_with_allocator_retry(
    model_factory_path: str,
    request_object: Any,
    *,
    allocator_conf: str = "backend:cudaMallocAsync"
) -> Any:
    """
    Attempts model.generate(request_object) in the current process.
    On torch.cuda.OutOfMemoryError, retries in a fresh subprocess with
    PYTORCH_ALLOC_CONF set to allocator_conf. request_object and the
    returned value must be picklable.
    """
    # Import torch only inside function; avoid importing at module import time.
    import torch
    model_factory = _resolve_factory(model_factory_path)
    model = model_factory()  # user-supplied function builds model, moves to GPU
    try:
        # First attempt uses whatever allocator current process started with.
        return model.generate(request_object)
    except torch.cuda.OutOfMemoryError:
        # 在派生子进程之前,尽可能在父进程中释放内存。
        # 避免两个进程短暂重叠时压力叠加。
        try:
            del model
        finally:
            gc.collect()
            torch.cuda.empty_cache()
        # 将请求序列化到临时文件,并让全新的解释器执行工作。
        with tempfile.TemporaryDirectory() as td:
            req_path = os.path.join(td, "request.pkl")
            out_path = os.path.join(td, "output.pkl")
            with open(req_path, "wb") as f:
                pickle.dump(request_object, f)
            # 在子进程中,我们希望 torch 在导入时就能看到分配器配置。
            env = os.environ.copy()
            env["PYTORCH_ALLOC_CONF"] = allocator_conf
            # 将本模块作为辅助子进程重新运行。子进程将导入 torch
            # 仅在其环境中设置 PYTORCH_ALLOC_CONF 之后。
            cmd = [
                sys.executable,
                __file__,
                "--child",
                "--factory", model_factory_path,
                "--request", req_path,
                "--output", out_path,
            ]
            completed = subprocess.run(cmd, env=env, capture_output=True,
                                       text=True)
            if completed.returncode != 0:
                # 向上传递子进程的 stderr 以便调试
                raise RuntimeError(
                  f"Retry failed with exit code {completed.returncode}\n"
                  f"stdout:\n{completed.stdout}\n\nstderr:\n{completed.stderr}"
                )
            with open(out_path, "rb") as f:
                return pickle.load(f)
def _child_main(factory_path: str, request_path: str, output_path: str) -> None:
    """
    Child entrypoint: assumes PYTORCH_ALLOC_CONF is already present in env.
    Imports torch only now, builds the model, runs generate, and pickles result.
    """
    # 在父进程通过 subprocess.run(env=...) 设置环境变量之后再导入 torch。
    import torch
    except torch.cuda.OutOfMemoryError:
        # Free as much as possible in the parent before spawning the child.
        # Avoids compounding pressure when two processes momentarily overlap.
        try:
            del model
        finally:
            gc.collect()
            torch.cuda.empty_cache()
        # Serialize request to temp file and ask fresh interpreter to do work.
        with tempfile.TemporaryDirectory() as td:
            req_path = os.path.join(td, "request.pkl")
            out_path = os.path.join(td, "output.pkl")
            with open(req_path, "wb") as f:
                pickle.dump(request_object, f)
            # In the child, we want torch to see allocator config at import.
            env = os.environ.copy()
            env["PYTORCH_ALLOC_CONF"] = allocator_conf
            # Re-run this module as a helper child. The child will import torch
            # only after PYTORCH_ALLOC_CONF is set in its environment.
            cmd = [
                sys.executable,
                __file__,
                "--child",
                "--factory", model_factory_path,
                "--request", req_path,
                "--output", out_path,
            ]
            completed = subprocess.run(cmd, env=env, capture_output=True,
                                       text=True)
            if completed.returncode != 0:
                # Bubble up child stderr to aid debugging
                raise RuntimeError(
                  f"Retry failed with exit code {completed.returncode}\n"
                  f"stdout:\n{completed.stdout}\n\nstderr:\n{completed.stderr}"
                )
            with open(out_path, "rb") as f:
                return pickle.load(f)
def _child_main(factory_path: str, request_path: str, output_path: str) -> None:
    """
    Child entrypoint: assumes PYTORCH_ALLOC_CONF is already present in env.
    Imports torch only now, builds the model, runs generate, and pickles result.
    """
    # Import torch after env var set by the parent’s subprocess.run(env=...).
    import torch
    model_factory = _resolve_factory(factory_path)
    model = model_factory()  # 在子进程中构建模型
    with open(request_path, "rb") as f:
        request_object = pickle.load(f)
if __name__ == "__main__":
    import argparse
    parser = argparse.ArgumentParser()
    parser.add_argument("--child", action="store_true")
    parser.add_argument("--factory", type=str, default="")
    parser.add_argument("--request", type=str, default="")
    parser.add_argument("--output", type=str, default="")
    args = parser.parse_args()
    if args.child:
        _child_main(args.factory, args.request, args.output)
    else:
        print("This module is intended to be imported.")
    model_factory = _resolve_factory(factory_path)
    model = model_factory()  # build the model inside the child process
    with open(request_path, "rb") as f:
        request_object = pickle.load(f)
if __name__ == "__main__":
    import argparse
    parser = argparse.ArgumentParser()
    parser.add_argument("--child", action="store_true")
    parser.add_argument("--factory", type=str, default="")
    parser.add_argument("--request", type=str, default="")
    parser.add_argument("--output", type=str, default="")
    args = parser.parse_args()
    if args.child:
        _child_main(args.factory, args.request, args.output)
    else:
        print("This module is intended to be imported.")
Here, the model is constructed in the child using a factory so that nothing CUDA-related is imported before the PYTORCH_ALLOC_CONF env variable takes effect. The code empties the cache and releases unused memory to the GPU using torch.cuda.empty_cache(). This pattern guarantees that the allocator configuration is applied before torch is imported in the child. It also avoids trying to unload a native extension at runtime, which CPython does not support.这里,模型在子进程中通过工厂函数构建,从而确保在 PYTORCH_ALLOC_CONF 环境变量生效之前不会导入任何与 CUDA 相关的内容。代码使用 torch.cuda.empty_cache() 清空缓存,并将未使用的内存归还给 GPU。这种模式保证分配器配置在子进程导入 torch 之前就已生效。它还避免了在运行时尝试卸载原生扩展——CPython 并不支持这种做法。
In a non-PyTorch environment, such as a C++-based LLM inference engine, you can implement a pure slab allocator that allows configuration for specific allocation sizes. This type of slab allocator prepartitions memory into fixed-size “slabs.” It’s very efficient for repeated allocations of the same size and leads to virtually zero fragmentation for that specific size allocation.在非 PyTorch 环境中,例如基于 C++ 的 LLM 推理引擎,你可以实现一个纯 slab 分配器(slab allocator),允许针对特定的分配大小进行配置。这类 slab 分配器会把内存预先划分为固定大小的“slab”。对于相同大小的重复分配,它非常高效,并且对于该特定大小的分配几乎不会产生碎片。
In an LLM server, one very common technique is to allocate per-token output tensors such that each time you generate a token, you allocate a [layers, hidden_dim] tensor for that token’s activations, for instance. If those allocations are the same size every time, such as 64 KB, a slab for that exact size is ideal.在 LLM 服务器中,一种非常常见的技术是按 token 分配输出张量,例如每生成一个 token,就为该 token 的激活值分配一个 [layers, hidden_dim] 张量。如果这些分配每次大小都相同,例如 64 KB,那么为这一确切大小建立 slab 就是理想选择。
The system detects that it’s allocating a lot of 64 KB tensors repeatedly—and creates a “slab” of dedicated 64 KB blocks. A slab allocator often does not return memory to the general pool until the entire slab is freed.系统检测到它反复分配大量 64 KB 张量,于是创建一个由专用 64 KB 块组成的“slab”。slab 分配器通常要等到整个 slab 被释放后,才会把内存归还给通用显存池。
Allocator switching might involve completely different allocators for different parts of the system. For instance, you can use the default caching allocator with large static allocations for model weights since those are freed less often during inference. You can then use a custom allocator for ephemeral per-token allocations.分配器切换可能意味着为系统的不同部分使用完全不同的分配器。例如,对于模型权重这类在推理期间较少释放的数据,可以使用默认缓存分配器进行大型静态分配。随后,对于每个 token 的临时分配,可以使用自定义分配器。
You should always implement a fallback strategy for OOM errors. Many production systems use multitier memory such that if the GPU experiences an OOM error, it will offload to the CPU and try again rather than failing the request. For example, you can dynamically free the cache, offload some layers to the CPU, or compress the cache.你应当始终为 OOM 错误实现回退策略。许多生产系统使用多级内存,使得当 GPU 发生 OOM 错误时,会将数据卸载到 CPU 并重试,而不是让请求失败。例如,你可以动态释放缓存、将部分层卸载到 CPU,或压缩缓存。
In short, techniques like dynamic allocator management and multitiered memory make sure your system can handle long uptimes under different types of load—all without incurring memory fragmentation or allocation latency spikes. This is a behind-the-scenes optimization that users won’t directly see, but it’s essential for ultrascale robustness for long-running inference servers.简而言之,动态分配器管理和多级内存等技术可确保系统在不同类型的负载下都能长时间稳定运行——且不会产生显存碎片或分配时延尖峰。这是一种用户不会直接看到的后台优化,但对于长时间运行的推理服务器实现超大规模鲁棒性至关重要。
运行时内核性能改进与可热插拔实现
Runtime Kernel Performance Improvements and Hot-Swappable Implementations
In the fast-evolving world of GPU hardware and algorithmic innovations, new and faster kernel implementations are constantly emerging. This includes newer variants of FlashAttention, megakernels, and hardware-specific software optimizations.在 GPU 硬件与算法创新快速演进的世界里,更新、更快的内核实现不断涌现。这包括 FlashAttention 的更新变体、巨型内核(megakernel)以及针对特定硬件的软件优化。
Runtime kernel patching is the ability to integrate these new implementations into a running system without requiring a full redeployment or reload of the model. Essentially, we want to hot-swap a slower kernel function for a faster one on the fly.运行时内核打补丁(runtime kernel patching)是指无需完整重新部署或重新加载模型,就能将这些新实现集成到运行中的系统里的能力。本质上,我们希望在运行过程中把较慢的内核函数热替换为更快的实现。
Consider your inference server that uses the default PyTorch scaled dot product attention (SDPA) kernel for multiheaded attention. You then discover a new kernel implementation like FlashAttention-3, which gives a 20% speed boost for long sequences in some cases.假设你的推理服务器对多头注意力使用 PyTorch 默认的缩放点积注意力(scaled dot product attention,SDPA)内核。随后你发现了一个新的内核实现,例如 FlashAttention-3,它在某些情况下可为长序列带来 20% 的速度提升。
Traditionally, you’d have to install the updated library and restart the server to use the new implementation. But with runtime patching, you can dynamically load and redi-rect calls to the new kernel during runtime without interrupting the server’s uptime.传统上,你必须安装更新后的库并重启服务器,才能使用新的实现。但借助运行时补丁(runtime patching),你可以在运行时动态加载新内核并把调用重定向到它,而无需中断服务器的运行时间。
This zero-downtime upgrade approach is crucial in 24/7 services in which a restart or model reload would incur too much latency or cause an outage. In Python, this can be an easy monkey patch, as shown here:这种零停机升级方式对于 7×24 小时服务至关重要——在这类服务中,重启或重新加载模型会带来过高的时延,甚至导致服务中断。在 Python 中,这可以是一个简单的猴子补丁(monkey patch),如下所示:
import new_flash_attn_lib
# 对模型的 attention forward 做 monkey-patch,以使用新库
old_attn_forward = model.transformer.self_attn.forward
def new_attn_forward(self, *args, **kwargs):
    return new_flash_attn_lib.forward(*args, **kwargs)
model.transformer.self_attn.forward =
new_attn_forward.__get__(
model.transformer.self_attn,
type(model.transformer.self_attn))
# Monkey-patch the model's attention forward to use the new library
old_attn_forward = model.transformer.self_attn.forward
def new_attn_forward(self, *args, **kwargs):
    return new_flash_attn_lib.forward(*args, **kwargs)
model.transformer.self_attn.forward =
new_attn_forward.__get__(
model.transformer.self_attn,
type(model.transformer.self_attn))
This code replaces the forward method of the attention module with one that calls our new_flash_attn_lib.forward. We bind it to the instance (__get__) to simulate a proper method. After this patch, subsequent calls to that attention layer will go through the new implementation. As such, we have effectively hot-swapped the kernel.这段代码把注意力模块的 forward 方法替换为一个调用 new_flash_attn_lib.forward 的方法。我们通过 __get__ 将其绑定到实例上,以模拟一个真正的方法。打上这个补丁后,对该注意力层的后续调用都会走新的实现。由此,我们实际上完成了内核的热切换。
Another technique is JIT patching, which uses a just-in-time compiler like PyTorch Inductor or OpenAI Triton to generate a faster kernel at runtime—and then plugging it into the inference pipeline. As shown next, one can use PyTorch’s torch.compile to optimize a function and return its compiled version:另一种技术是 JIT 补丁(JIT patching),它使用 PyTorch Inductor 或 OpenAI Triton 之类的即时编译器在运行时生成更快的内核,然后将其接入推理流水线。如下所示,可以使用 PyTorch 的 torch.compile 优化一个函数并返回其编译后的版本:
compiled_forward =
    torch.compile(model.transformer.self_attn.forward,
                  backend="inductor")
model.transformer.self_attn.forward = compiled_forward
Now, whenever forward is called, it will execute the optimized code, which will fuse multiple operations, etc. If we do this after model initialization, it’s a form of hot patching since it does not require a model reload. It simply swaps out function pointers.现在,每当调用 forward 时,都会执行优化后的代码,它会融合多个操作等。如果我们在模型初始化之后做这件事,它就属于一种热补丁,因为不需要重新加载模型,只是替换了函数指针。
On the CUDA side, runtime module loading is possible using CUDA driver APIs. For instance, you can compile a custom PTX for a new kernel—and load it into the context without resetting the device. If the function signatures match, the system would just update the function pointers. Tools like NVIDIA Runtime Compilation (NVRTC) can compile PTX from strings at runtime, enabling this workflow.在 CUDA 侧,可以使用 CUDA 驱动 API 实现运行时模块加载。例如,你可以为新内核编译自定义 PTX,并在不重置设备的情况下将其加载到上下文中。如果函数签名匹配,系统只需更新函数指针。NVIDIA Runtime Compilation(NVRTC)之类的工具可以在运行时从字符串编译 PTX,从而支持这一工作流。
Doing this with CUDA C++ is a bit complex. Higher-level approaches like Python’s monkey-patch mechanism—or PyTorch’s extensible backends—are likely more practical and maintainable in the long term. However, your high-performance inference engine is likely not using a Python/PyTorch runtime.用 CUDA C++ 做这件事有点复杂。像 Python 的猴子补丁机制或 PyTorch 的可扩展后端这类更高层的方案,从长期来看可能更实用、更易维护。不过,你的高性能推理引擎很可能并不使用 Python/PyTorch 运行时。
Using well-defined module boundaries—like separating attention and MLP kernels— makes it easier to swap internals. This argues for writing your model code in a highly modular way so that you have these swap points. Monolithic model implementations are much harder to patch, but they can be more performant (e.g., megakernels).使用定义良好的模块边界——比如把注意力内核和 MLP 内核分开——可以让替换内部实现更容易。这也说明应当以高度模块化的方式编写模型代码,从而获得这些替换点。单体式(monolithic)模型实现要难打补丁得多,但它们可能性能更好(例如巨型内核 megakernel)。
Of course, one must ensure that the new kernel produces identical—or acceptably close—results to the old implementation. Typically these optimized kernels are designed to be numerically equivalent at the same precision (e.g., FP16).当然,必须确保新内核产生的结果与旧实现完全相同——或接近到可接受的程度。通常,这些优化内核被设计为在相同精度(例如 FP16)下数值等价。
Hot patching can also be used for quick fixes. Perhaps a particular sequence of operations is causing a known bug in the current kernel. Instead of waiting for a full update, you could quickly patch in a fix.热补丁也可以用于快速修复。也许是某个特定的操作序列触发了当前内核中一个已知的 bug。与其等待完整更新,你可以快速打补丁修复。
Consider deploying an FP8 kernel that starts to misbehave for certain edge inputs that you didn’t anticipate. If you have a safer but slightly slower version, you can detect the misbehaving condition and hot swap in the safe kernel in those cases. Make sure you log these events for future analysis.设想部署了一个 FP8 内核,它在某些你未曾预料到的边缘输入上开始表现异常。如果你有一个更安全但稍慢的版本,你可以检测出这种异常状况,并在这些情况下热切换到安全内核。务必记录这些事件,以便日后分析。
To manage multiple possible implementations, an engine might maintain a registry, such as attention_impl = "fast" or "safe"—and branch accordingly. This can be implemented as a feature flag so that you can toggle implementations without code changes. This is useful for quick rollbacks simply by changing the flag (just make sure your code is actively reading the values from the feature-flag system—otherwise the flag value remains static, which defeats the purpose of a feature flag).为了管理多种可能的实现,引擎可以维护一个注册表,例如 attention_impl = "fast" 或 "safe",并据此进行分支。这可以实现为一个功能开关(feature flag),这样无需修改代码即可切换实现。这对于快速回滚很有用——只需修改开关即可(但要确保代码确实在主动从功能开关系统读取值,否则开关值将保持不变,这就失去了功能开关的意义)。
A well-designed inference engine should also measure runtime performance of the new kernel. If the new kernel is not faster with live production data, the inference engine can roll it back. This can be due to slightly different hardware, untested batch sizes, or untested load conditions.设计良好的推理引擎还应测量新内核的运行时性能。如果新内核在真实生产数据下并没有更快,推理引擎可以将其回滚。这可能是因为硬件略有差异、批大小未经测试,或负载条件未经测试。
This is a perfect form of autotuning, described in the previous section. If the autotuner finds a faster implementation that outperforms the current default implementation beyond some threshold, the system could trigger a “patch” to promote the faster implementation to the default going forward.这正是上一节所述的自动调优(autotuning)的理想形式。如果自动调优器找到更快的实现,其性能超过当前默认实现一定阈值,系统就可以触发一次“补丁”,将该更快的实现提升为今后的默认实现。
This effectively closes the loop with the autotuner. The system not only finds better kernels on the fly, but it also swaps them in. This leads to a self-optimizing kernel-selection mechanism.这实际上与自动调优器形成了闭环。系统不仅能即时找到更好的内核,还能将其替换进来。这形成了一种自我优化的内核选择机制。
You can combine this strategy with the previous RL strategy we discussed. This way, you can have multiple implementations loaded—and let the RL agent choose which one to use for each different type of request.可以将此策略与我们之前讨论的强化学习(RL)策略结合。这样,你可以加载多种实现,并让 RL 智能体为每种不同类型的请求选择使用哪一种。
For instance, a highly optimized kernel might be best for long sequences, but a simpler kernel implementation might be fine for short sequences. A runtime system could choose between them per request. This effectively patches on a per-request basis based on the length of the input sequence.例如,高度优化的内核可能最适合长序列,而更简单的内核实现对于短序列可能就足够了。运行时系统可以按请求在两者之间进行选择。这实际上就是根据输入序列长度按请求进行打补丁。
In short, runtime kernel patching is about flexibility. It acknowledges that what is optimal today might change tomorrow and provides the means to adapt quickly. This type of agility makes sure that your serving infrastructure keeps up with the rapid advancements in model acceleration techniques. Popular inference engines like vLLM, SGLang, NVIDIA TensorRT-LLM, and NVIDIA Dynamo are well architected and provide a good amount of dynamic capabilities. For example, TensorRT-LLM allows you to load optimized kernels using runtime plugins. Use these capabilities to your advantage.简而言之,运行时内核打补丁关乎灵活性。它承认今天最优的方案明天可能就会改变,并提供了快速适应的手段。这种敏捷性可确保你的服务基础设施跟上模型加速技术的快速进步。vLLM、SGLang、NVIDIA TensorRT-LLM 和 NVIDIA Dynamo 等主流推理引擎架构良好,提供了相当多的动态能力。例如,TensorRT-LLM 允许你通过运行时插件加载优化后的内核。请充分利用这些能力。
使用时间序列预测持续预热 CUDA 图与缓存
Continuous Prewarming of CUDA Graphs and Caches Using Time-Series Prediction
In high-throughput inference situations, cold-start overheads can be a large contributor to request-response latency. CUDA Graphs, as described in Chapter 12, allow you to capture a sequence of GPU operations and replay the sequence with minimal launch overhead.在高吞吐量推理场景中,冷启动开销可能是请求-响应时延的重要来源。如第 12 章所述,CUDA 图允许捕获一系列 GPU 操作,并以最小的启动开销重放该序列。
Prewarming a CUDA Graph means setting up the graph before it’s actually needed. If we can predict when a certain request type or batch size will occur, the prewarmed CUDA Graph will be ready to execute.预热 CUDA 图意味着在实际需要之前就构建好该图。如果我们能预测某种请求类型或批大小何时出现,预热好的 CUDA 图就能随时执行。
This technique relies on prediction accuracy. If your forecast is off, you might prewarm a graph that isn’t used. You should monitor prediction hit rates to make sure the optimization is paying off.该技术依赖于预测准确性。如果预测出现偏差,你可能会预热一个并未被使用的图。应当监控预测命中率,以确保该优化确实带来收益。
By prewarming, the graph can skip costly launch and initialization steps when the request actually arrives. Using time-series prediction algorithms like ARIMA and Prophet, the system anticipates future workload patterns, including traffic surges and batch size changes, to proactively prepare the graph for fast execution.通过预热,当请求真正到达时,图可以跳过代价高昂的启动与初始化步骤。借助 ARIMA、Prophet 等时间序列预测算法,系统能够预判未来的工作负载模式,包括流量激增与批大小变化,从而主动为图的快速执行做好准备。
Consider an inference service that observes a daily cycle when, at 9 A.M. every day, there’s a spike in user traffic due to time zone–related traffic patterns. Knowing this, the system could prerun a few requests just before 9 A.M. to load the model into the GPU caches, JIT-compile the necessary kernels, and capture the CUDA Graphs for the expected batch sizes. At 9 A.M., when the real traffic load spikes, the incoming requests will reuse the warmed state for the expected batch size and usage pattern.设想一个推理服务观察到这样的每日周期:每天上午 9 点,由于时区相关的流量模式,用户流量会出现激增。了解这一点后,系统可以在上午 9 点之前预先运行少量请求,把模型加载进 GPU 缓存、JIT 编译所需的内核,并针对预期的批大小捕获 CUDA 图。到了上午 9 点真实流量负载激增时,到来的请求就会复用针对预期批大小与使用模式已预热好的状态。
In practice, this can be orchestrated by a cron-like job or a scheduling service that triggers the prewarm routine right before the traffic spike is expected to occur. Just remember to leave enough time for the resources to provision.在实践中,这可以由类似 cron 的作业或调度服务来编排,在预期流量激增之前触发预热例程。只需记得为资源预配留出足够的时间。
In PyTorch, wrapping your model’s computation within a torch.cuda.graph() context allows you to capture a static computation graph that includes GPU kernel launches. When replaying the graph, PyTorch bypasses the Python-to-CUDA dispatch overhead and submits the entire workload with a single cudaGraphLaunch. This leads to significantly faster execution—especially for large, repetitive input batches due to the minimal CPU involvement.在 PyTorch 中,把模型的计算包裹在 torch.cuda.graph() 上下文中,即可捕获包含 GPU 内核启动的静态计算图。重放该图时,PyTorch 会绕过 Python 到 CUDA 的调度开销,用单次 cudaGraphLaunch 提交整个工作负载。这带来显著更快的执行——尤其是对大型、重复的输入批次,因为 CPU 的参与极少。
The downside is that these graphs are static since they don’t easily allow variable shapes or lengths. But an inference server often deals with distinct batch sizes (1, 2, 4, 8, 16, etc.)—due to GPU memory limitations and algorithmic optimizations—which fits the graph model well.其缺点在于这些图是静态的,因为它们不容易支持可变的形状或长度。但推理服务器经常要处理不同的批大小(1、2、4、8、16 等)——这是受 GPU 显存限制与算法优化所致——而这恰好契合图模型。
To handle variability, you can maintain a pool of precaptured graphs for each common batch size or sequence length. You could use a continuous prewarming strategy to prepare the pool of graphs for these distinct batch sizes. For instance, a batch of 16 requests is common during peak hours. The server can capture a graph of the model’s forward pass upfront using a batch size of 16—and then store it for subsequent use.为了应对这种变化,你可以为每种常见批大小或序列长度维护一个预先捕获的图池。你可以采用持续预热策略,为这些不同的批大小准备好图池。例如,在高峰时段 16 个请求的批次很常见。服务器可以预先用批大小 16 捕获模型前向传播的图,然后存储起来供后续使用。
The next time a batch of 16 requests comes in simultaneously, the inference system feeds the batched inputs into the precaptured graph. The kernels inside are already prewarmed and optimized for graph execution, so there’s no need to enqueue and launch many individual operations, as just one graph launch is all that’s needed.下次同时到来一批 16 个请求时,推理系统就把这批输入送入预先捕获的图。其中的内核已经预热并针对图执行做过优化,因此无需再逐个入队并启动大量单独的操作,只需一次图启动即可。
Keep in mind that each captured graph stored in the pool will consume additional GPU memory for its workspace. You should monitor memory usage when storing many graphs. It might be necessary to evict less-used graphs from the pool if memory gets tight.请记住,图池中存储的每个已捕获图都会为其工作区额外占用 GPU 显存。在存储大量图时,你应当监控显存使用情况。如果显存变得紧张,可能有必要从图池中逐出较少使用的图。
To avoid the extra memory of a pool, you can potentially use graph patching, discussed in Chapter 12, to adjust graph nodes for minor size differences. However, in practice, a pool is a better option for performance.为了省去图池带来的额外显存,你可以考虑使用第 12 章讨论的图修补(graph patching),针对较小的尺寸差异调整图的节点。不过在实践中,图池在性能上是更好的选择。
CUDA Graphs also reduce CPU overhead since it coordinates just a single graph launch versus many individual kernel launches. This lets the CPU perform other operations like data preprocessing and other types of “real” work—instead of coordinating many kernel launches.CUDA 图还能降低 CPU 开销,因为它只需协调一次图启动,而不是大量单独的内核启动。这让 CPU 得以执行其他操作,例如数据预处理以及其他类型的“真正”工作——而不是去协调大量内核启动。
Again, you can use time-series prediction algorithms (e.g., ARIMA and Prophet) to forecast metrics like RPS and average prompt length. If the model predicts a jump in batch size or a particular pattern of requests, such as long input sequences, the system can start preparing and prewarming the appropriate CUDA Graphs, caches, and other resources. For instance, the system can proactively increase the batch size of the continuous batching algorithm, prefetch model weights from disk to GPU memory, and allocate additional GPU instances.同样,你可以使用时间序列预测算法(例如 ARIMA 和 Prophet)来预测 RPS 和平均提示长度等指标。如果模型预测到批大小会出现跃升,或出现某种特定的请求模式(例如长输入序列),系统就可以开始准备并预热相应的 CUDA 图、缓存和其他资源。例如,系统可以主动增大连续批处理算法的批大小、将模型权重从磁盘预取到 GPU 显存,并分配额外的 GPU 实例。
Related to caching and prewarming is anticipating the scale-out of prefill and decode workers. If we know a bunch of requests with long prompts are likely to arrive at a certain time due to a scheduled batch job or daily report scenario, the system can scale out the prefill workers and execute a representative forward pass with representative sample data to prewarm the CUDA Graphs and KV cache.与缓存和预热相关的另一件事是预判预填充和解码工作进程的横向扩容。如果我们知道由于某个定时批处理作业或日报场景,一批带有长提示的请求很可能在某个时间点到达,系统就可以横向扩容预填充工作进程,并用有代表性的样本数据执行一次有代表性的前向传播,以预热 CUDA 图和 KV 缓存。
The scale-out and prewarming events should also include the decode workers and CUDA Graphs. In the decode case, the speculative decoding draft model, for instance, can be prewarmed and loaded into GPU memory—as well as the draft model’s KV cache, etc. Other decode optimizations include loop unrolling for a fixed number of tokens that will be generated—either 1 token or multiple in the case of speculative decoding.横向扩容和预热事件也应涵盖解码工作进程和 CUDA 图。在解码场景下,例如可以将投机解码的草稿模型预热并加载到 GPU 显存中——草稿模型的 KV 缓存等也是如此。其他解码优化还包括针对将要生成的固定 token 数量进行循环展开——在投机解码的情况下,这个数量可能是 1 个 token,也可能是多个。
You should also consider caching the CUDA kernels themselves. CUDA will often cache the compiled kernels (C++ code => PTX instructions => SASS assembly) to speed up execution. The first time a kernel runs, there is likely some on-the-fly JIT compilation overhead.你还应考虑对 CUDA 内核本身进行缓存。CUDA 通常会缓存已编译的内核(C++ 代码 => PTX 指令 => SASS 汇编)以加快执行速度。内核首次运行时,很可能存在一些即时 JIT 编译开销。
You should coordinate this type of warm-up with your cluster autoscaler such that when new GPU instances spin up, the autoscaler runs a quick set of inferences on them using a few warm-up API calls. Doing this will validate the inference engines, cache JIT-compilation outputs, allocate memory pools, prepare CUDA Graphs, etc. This way, the engines are production-ready before adding them to the live traffic pool.你应将这类预热与集群自动扩缩器协调起来,使得新的 GPU 实例启动时,自动扩缩器通过少量预热 API 调用在这些实例上快速执行一组推理。这样做可以验证推理引擎、缓存 JIT 编译产物、分配显存池、准备 CUDA 图等。如此一来,这些引擎在被加入实时流量池之前就已达到生产就绪状态。
You should also monitor that the warm-up actually helps by comparing the latency of the first few requests during the predicted surge—both with and without warm-up. Adjust the timing and threshold as needed. And be aware that the time-series prediction can be wrong. Make sure that warm-up tasks do not impact overall inference performance if they run at the wrong time.你还应通过比较预测高峰期间最初几个请求的时延(分别在有预热和无预热的情况下)来监控预热是否确实有效。按需调整时机和阈值。并且要意识到时间序列预测可能出错。确保预热任务即使在错误的时机运行,也不会影响整体推理性能。
For instance, you should try to perform prewarming runs (with example data) when the GPUs are underutilized. CUDA allows stream priority scheduling so you can assign prewarm streams to a lower priority than your inference stream. This way, the prewarming does not compete for resources with the live, high-volume traffic requests.例如,你应尽量在 GPU 利用率较低时执行预热运行(使用示例数据)。CUDA 支持流优先级调度,因此你可以将预热流设为比推理流更低的优先级。这样,预热就不会与实时的高流量请求争抢资源。
Also, you should use lower-priority CUDA streams for these prewarming tasks, so they will yield to higher-priority live traffic that may arrive during prewarming. On the plus side, idle GPUs are a wasted opportunity, so doing warm-up computations on idle GPUs is essentially free—as long as it doesn’t collide with real work.此外,你应为这些预热任务使用较低优先级的 CUDA 流,这样它们会让位于预热期间可能到达的更高优先级实时流量。好的一面是,空闲的 GPU 是一种浪费,因此在空闲 GPU 上做预热计算基本上是免费的——只要不与真实工作冲突。
Grace Blackwell systems allow some additional tricks since the CPU and GPU share unified, coherent memory at low latency. For instance, you can have the CPU start prefilling data into unified memory that the GPU plans to use. This can avoid explicit GPU copy calls later.Grace Blackwell 系统允许一些额外的技巧,因为 CPU 与 GPU 以低时延共享统一的一致性内存。例如,你可以让 CPU 开始把数据预填充到 GPU 计划使用的统一内存中。这可以避免之后的显式 GPU 拷贝调用。
Continuous prewarming—guided by time series predictions—can make latency far more predictable. It turns the inference engine into an adaptive system that learns common traffic patterns, automatically prepares the data, readies the hardware, and stays a step ahead of demand. This will reduce jitter and decrease latency spikes by smoothing out expensive operations like compilation and memory transfers at times when they can be amortized.由时间序列预测引导的持续预热可以让时延的可预测性大大提高。它把推理引擎变成一个自适应系统,该系统学习常见的流量模式、自动准备数据、让硬件就绪,并始终领先需求一步。通过在开销可被摊薄的时间段内平滑编译和内存传输等昂贵操作,这将减少抖动并降低时延尖峰。
This is especially valuable for large models that have heavy one-time initialization costs. As models and contexts grow, such adaptive preloading will move from a niceto-have to a necessity in production LLM systems. Paying these costs predictively is much better than having end users churn because of a poor experience.这对于具有沉重一次性初始化开销的大模型尤其有价值。随着模型和上下文不断增长,这种自适应预加载在生产级 LLM 系统中将从锦上添花变为必需品。以可预测的方式支付这些开销,远比让最终用户因糟糕体验而流失要好得多。
自适应批处理与分块预填充调度
Adaptive Batching and Chunked Prefill Scheduling
In Chapter 16, we discussed how modern inference servers use different types of request batching (e.g., continuous batching) to maximize throughput and minimize latency across all requests. However, batching can increase latency for individual requests. The trade-offs can be dynamically addressed as conditions change throughout the day using a technique called adaptive batching.在第 16 章中,我们讨论了现代推理服务器如何使用不同类型的请求批处理(例如连续批处理)来最大化吞吐量并最小化所有请求的时延。然而,批处理可能增加单个请求的时延。使用一种称为*自适应批处理*的技术,可以在一天中条件变化时动态地处理这些权衡。
Adaptive batching dynamically adjusts how requests are grouped into batches depending on the load—and how well the requests are progressing. This type of dynamic strategy can adjust the batch size and threshold parameters in real time as the environment changes.自适应批处理根据负载——以及请求的推进情况——动态调整请求如何分组为批次。这类动态策略可以在环境变化时实时调整批大小和阈值参数。
For example, during peak load, the system can use a large batch size (e.g., 8 or 16) because throughput is critical. During periods of low load, the system can reduce the batch size to serve the requests sooner. This will prioritize latency over throughput.例如,在负载高峰期间,系统可以使用较大的批大小(例如 8 或 16),因为此时吞吐量至关重要。在低负载时段,系统可以减小批大小以更快地服务请求。这将优先考虑时延而非吞吐量。
To decide on the batch size, you can use a simple heuristic, such as, “If GPU utilization is > 80%, allow larger batches; if < 20%, use batch size 1 to minimize latency.” Or you can use a more sophisticated RL agent or predictive strategy, as discussed in the previous sections.为了决定批大小,你可以使用简单的启发式规则,例如,“如果 GPU 利用率 > 80%,允许更大的批次;如果 < 20%,使用批大小 1 以最小化时延。” 或者,你可以使用更复杂的 RL 智能体或预测策略,如前几节所述。
This difference in arithmetic intensity between the prefill and decode phases leads to mismatched durations of execution. As such, it’s best to disaggregate the stages and treat them as separate workloads that can be tuned independently using separate threads/processes for a single node or worker pools for a multinode cluster.预填充阶段与解码阶段之间算术强度的差异导致执行时长不匹配。因此,最好将这两个阶段解耦,把它们视为可以独立调优的独立工作负载——在单节点上使用独立的线程/进程,在多节点集群上使用工作进程池。
By disaggregating prefill and decode, we treat the two stages as separate operations. This allows them to be independently optimized for their unique compute and memory bandwidth needs. One of these optimizations is the batch sizes used for the prefill and decode phases.通过解耦预填充与解码,我们把这两个阶段当作独立的操作。这使它们能够针对各自独特的计算与显存带宽需求进行独立优化。其中一项优化就是预填充阶段与解码阶段所使用的批大小。
In practice, vLLM and other modern inference engines do exactly this. They form separate batches to send to the prefill and decode workers. As such, a batch of prefill requests can execute independently of the batch of decode requests. For example, the decode phase can benefit from larger batches to increase arithmetic intensity since it’s a memory-bound workload.在实践中,vLLM 和其他现代推理引擎正是这样做的。它们分别组成批次发送给预填充工作进程和解码工作进程。因此,一批预填充请求可以与一批解码请求独立执行。例如,解码阶段是显存受限的工作负载,可以从更大的批次中受益以提高算术强度。
Modern inference-serving frameworks like vLLM use adaptive scheduling loops to dynamically choose between processing a prefill or a decode batch. Specifically, vLLM supports chunked prefill and decode-maximal scheduling to interleave prefill and decode for better utilization. These techniques boost overall utilization and throughput without adding significant latency.像 vLLM 这样的现代推理服务框架使用自适应调度循环,在处理预填充批次还是解码批次之间动态选择。具体来说,vLLM 支持分块预填充(chunked prefill)和解码最大化调度(decode-maximal scheduling),将预填充与解码交错执行以获得更好的利用率。这些技术在不显著增加时延的情况下提升了整体利用率和吞吐量。
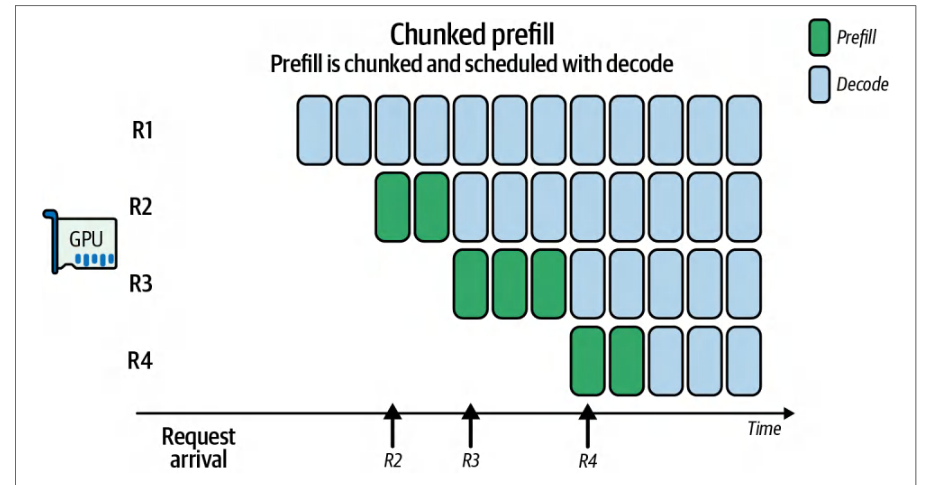
The mismatched system-resource characteristics of prefill and decode can impact PP as well. Consider one microbatch doing prefill on a long sequence while another microbatch is performing decode one token at a time. In this case, their durations are mismatched, and pipeline bubbles emerge.预填充与解码在系统资源特征上的不匹配同样会影响 PP。设想一个微批(microbatch)正在对长序列执行预填充,而另一个微批正在逐 token 执行解码。此时两者的持续时间不匹配,于是产生流水线气泡。
You can interleave large prefill requests with latency-sensitive decode tasks by slicing the prefill into small chunks and piggybacking decodes between them. This keeps all pipeline stages busy and minimizes idle “bubbles” in your GPU schedule.你可以将预填充切分为小块,并在其间捎带执行解码,从而把大型预填充请求与对时延敏感的解码任务交错执行。这样可以让所有流水线阶段保持忙碌,并最大限度地减少 GPU 调度中的空闲“气泡”。
Chunked prefill is a well-supported pattern used by all modern LLM inference engines to reduce pipeline bubbles. It effectively time-slices a big task (prefill) to create room for small tasks (decode) to execute in the pipeline gaps created by the chunks, as shown in Figure 19-7.分块预填充(chunked prefill)是所有现代 LLM 推理引擎都广泛支持的一种模式,用于减少流水线气泡。它实际上是对大任务(预填充)进行时间分片,为小任务(解码)腾出空间,使其能够在分块所产生的流水线空隙中执行,如图 19-7 所示。
The SARATHI paper demonstrated that this type of chunked prefill and piggybacking can help you find the right level of decode-maximal batching, reduce bubbles, and improve throughput by ~1.3–1.9× compared to naive scheduling. The name SARATHI is a reference to a charioteer that intelligently steers both prefill and decode tasks together. Fun!SARATHI 论文表明,这种分块预填充与捎带执行的方式可以帮助你找到合适的*解码最大化批处理*(decode-maximal batching)水平,减少气泡,并且与朴素调度相比将吞吐量提升约 1.3–1.9×。SARATHI 这个名字取自一位战车御者,他能够智能地将预填充与解码任务一同驾驭。有意思!
For example, consider a 10,000-token prefill request that does not use chunking. In this case, the single prefill pass will block the entire pipeline and cause decode tasks to queue up until the prefill completes.例如,考虑一个不使用分块的 10,000 个 token 的预填充请求。在这种情况下,单次预填充过程会阻塞整条流水线,导致解码任务排队等待,直到预填充完成。
However, if you use chunked prefill and divide the 10,000-token prefill request into five 2,000-token chunks, you can interleave decode batches in between prefill chunks to keep the GPU busy processing both phases and moving things forward. This will squeeze out pipeline bubbles, improve throughput, and smooth out GPU utilization.然而,如果使用分块预填充,将这个 10,000 个 token 的预填充请求划分为五个各含 2,000 个 token 的块,你就可以在预填充块之间插入解码批次,让 GPU 持续忙于处理这两个阶段并推动整体进展。这样可以挤出流水线气泡、提升吞吐量,并使 GPU 利用率更加平滑。
Modern inference engines like vLLM use adaptive scheduling loops to decide whether to process another prefill chunk—or perform a decode batch—based on GPU utilization and queue status. Specifically, vLLM continuously monitors token queues to make these decisions. vLLM’s scheduler explicitly supports chunked prefill and decode-maximal batching. Its executor and chunked-prefill features are designed to overlap large prefills with smaller interactive decodes.像 vLLM 这样的现代推理引擎使用自适应调度循环,根据 GPU 利用率和队列状态来决定是处理下一个预填充块,还是执行一个解码批次。具体而言,vLLM 持续监控 token 队列以做出这些决策。vLLM 的调度器显式支持分块预填充与解码最大化批处理。其执行器与分块预填充特性旨在让大型预填充与较小的交互式解码相互重叠。
An adaptive scheduler needs to consider GPU shared-memory limits and occupancy when choosing a chunked prefill size. A simple adaptive chunked prefill implementation is shown next. This code dynamically right-sizes the chunk size to keep SM and occupancy high on the GPU:自适应调度器在选择分块预填充的大小时,需要考虑 GPU 共享内存限制与占用率。下面给出一个简单的自适应分块预填充实现。这段代码动态地将块大小调整到合适值,以在 GPU 上保持较高的 SM 与占用率:
# 用于分块预填充/解码的自适应调度器示例
import cupy as cp
import torch
# 硬件约束
SHMEM_LIMIT   = 256 * 1024
BLOCK_THREADS = 256
TARGET_UTIL   = 0.85
OCC_THRESHOLD = 0.5
# 占用率结果与 tile 查找的缓存
_occ_cache = {}
_tile_table = {}  # 例如,{L: optimal_T}
# 1) 离线预计算 tile_table;这里在首次使用时惰性初始化
def get_optimal_tile(L):
    if L in _tile_table:
        return _tile_table[L]
    # 通过查询基于占用率的建议值来计算块大小
    min_grid, max_grid, block_size = ... # 为简洁起见省略
    T = min(block_size, L)
    T = max(32, (T // 32) * 32)
    _tile_table[L] = T
# Example adaptive scheduler for chunked prefill/decode
import cupy as cp
import torch
# Hardware constraints
SHMEM_LIMIT   = 256 * 1024
BLOCK_THREADS = 256
TARGET_UTIL   = 0.85
OCC_THRESHOLD = 0.5
# Cache for occupancy results and tile lookup
_occ_cache = {}
_tile_table = {}  # e.g., {L: optimal_T}
# 1) Precompute tile_table offline; here we lazy-initialize on first use
def get_optimal_tile(L):
    if L in _tile_table:
        return _tile_table[L]
    # compute block size by querying for an occupancy-based suggestion
    min_grid, max_grid, block_size = ... # left out for brevity
    T = min(block_size, L)
    T = max(32, (T // 32) * 32)
    _tile_table[L] = T
    return T
# 2) 带缓存的占用率查询
def get_occupancy(threads, shared_bytes):
    key = (threads, shared_bytes)
    if key in _occ_cache:
        return _occ_cache[key]
    max_blocks = cp.cuda.runtime.\
        cudaOccupancyMaxActiveBlocksPerMultiprocessor(
            attention_kernel_ptr, threads, shared_bytes
        )
    props = torch.cuda.get_device_properties(0)
    warps_per_block = threads // props.warp_size
    max_warps = props.max_threads_per_multi_processor // props.warp_size
    occ = (max_blocks * warps_per_block) / max_warps
    _occ_cache[key] = occ
    return occ
def scheduler_loop():
    stream = cp.cuda.Stream(non_blocking=True)
    while True:
        pending = get_pending_requests()
        util = gpu_utilization()
        if util < TARGET_UTIL and any(r.phase=='prefill' for r in pending):
            req = select_heaviest_prefill(pending)
            L   = req.remaining_length()
            T   = get_optimal_tile(L)
            shared_bytes = 3 * T * T * 4
            occ = get_occupancy(BLOCK_THREADS,
              shared_bytes)
            if occ < OCC_THRESHOLD:
                T = max(32, T // 2)
                shared_bytes = 3 * T * T * 4
            chunk = req.next_prefill_chunk(T)
            # 在我们的流上使用 CuPy RawKernel 启动
            attention_kernel((...grid...), (BLOCK_THREADS,),
               (chunk, ...), shared_mem=shared_bytes,
               stream=stream)
            # 记录一个事件以得知何时完成
            event = cp.cuda.Event()
            event.record(stream)
        elif any(r.phase=='decode' for r in pending):
            batch = form_decode_batch(pending, max_batch=16)
            # 跟踪自适应逻辑
            logger.info(f"T={T}, occ={occ:.2f},
                util={util:.2f}")
            launch_decode_kernel(batch, stream=stream)
            event = cp.cuda.Event()
            event.record(stream)
        else:
            # 轮询最后一个事件而不是休眠
            if not event.query():
    return T
# 2) Cached occupancy query
def get_occupancy(threads, shared_bytes):
    key = (threads, shared_bytes)
    if key in _occ_cache:
        return _occ_cache[key]
    max_blocks = cp.cuda.runtime.\
        cudaOccupancyMaxActiveBlocksPerMultiprocessor(
            attention_kernel_ptr, threads, shared_bytes
        )
    props = torch.cuda.get_device_properties(0)
    warps_per_block = threads // props.warp_size
    max_warps = props.max_threads_per_multi_processor // props.warp_size
    occ = (max_blocks * warps_per_block) / max_warps
    _occ_cache[key] = occ
    return occ
def scheduler_loop():
    stream = cp.cuda.Stream(non_blocking=True)
    while True:
        pending = get_pending_requests()
        util = gpu_utilization()
        if util < TARGET_UTIL and any(r.phase=='prefill' for r in pending):
            req = select_heaviest_prefill(pending)
            L   = req.remaining_length()
            T   = get_optimal_tile(L)
            shared_bytes = 3 * T * T * 4
            occ = get_occupancy(BLOCK_THREADS,
              shared_bytes)
            if occ < OCC_THRESHOLD:
                T = max(32, T // 2)
                shared_bytes = 3 * T * T * 4
            chunk = req.next_prefill_chunk(T)
            # Launch with CuPy RawKernel on our stream
            attention_kernel((...grid...), (BLOCK_THREADS,),
               (chunk, ...), shared_mem=shared_bytes,
               stream=stream)
            # Record an event to know when done
            event = cp.cuda.Event()
            event.record(stream)
        elif any(r.phase=='decode' for r in pending):
            batch = form_decode_batch(pending, max_batch=16)
            # Trace the adaptive logic
            logger.info(f"T={T}, occ={occ:.2f},
                util={util:.2f}")
            launch_decode_kernel(batch, stream=stream)
            event = cp.cuda.Event()
            event.record(stream)
        else:
            # Poll the last event rather than sleep
            if not event.query():
                cp.cuda.get_current_stream().synchronize()  # 或传入
            continue
                cp.cuda.get_current_stream().synchronize()  # or pass
            continue
Here, the scheduler is adjusting chunk size to use as much shared memory as possible. And, importantly, it does this without sacrificing parallelism.在这里,调度器调整块大小以尽可能多地使用共享内存。而且重要的是,它在这样做时不会牺牲并行性。
Specifically, the scheduler first computes a tile width T so that the three shared-memory buffers for queries, keys, and values—each requiring T x T floats—fit within the GPUs’ per-SM dynamic shared-memory limit. It then calls the CuPy API (Python) to measure how many thread blocks can run concurrently on each SM with that value of T.具体而言,调度器首先计算分块宽度 T,使得查询、键和值这三个共享内存缓冲区——每个需要 T x T 个浮点数——能够容纳在 GPU 的每 SM 动态共享内存限制之内。然后它调用 CuPy API(Python)来测量在该 T 值下每个 SM 上可以并发运行多少个线程块。
If occupancy falls below a given threshold of 50%, T is reduced by half. This will free up shared memory so that more blocks can co-reside, striking an optimal balance between data reuse (fewer DRAM loads) and parallelism.如果占用率低于给定的 50% 阈值,则将 T 减半。这会释放共享内存,使更多线程块可以共驻,从而在数据复用(更少的 DRAM 加载)与并行性之间取得最佳平衡。
When overall GPU utilization drops below 85% and prefill work is pending, the scheduler selects the largest remaining prefill request and breaks it into equal-sized chunks of T tokens so that each chunk can flow through the pipeline without monopolizing every stage.当整体 GPU 利用率降至 85% 以下且仍有待处理的预填充工作时,调度器会选择剩余的最大预填充请求,并将其拆分为大小为 T 个 token 的等长块,使每个块都能流经流水线,而不会独占每一个阶段。
And rather than fixing the chunk size, the helper function, next_prefill_chunk, adjusts T on the fly based on live metrics. It will shrink the chunk size if occupancy is low—and grow it if DRAM traffic is excessive. This makes sure that each slice maximizes GPU utilization without stalls.辅助函数 next_prefill_chunk 并不固定分块大小,而是根据实时指标动态调整 T。如果占用率偏低,它会缩小分块大小;如果 DRAM 流量过高,则会增大分块大小。这样可确保每个分片都能最大化 GPU 利用率而不出现停顿。
Between prefill chunks, the scheduler can use decode-maximal batches to bundle all of the ready decode requests into a single launch using form_decode_batch. This lets short, latency-sensitive token generations piggyback on otherwise idle pipeline gaps. This way, even users with short prompts see low latency because their decodes don’t wait for a huge prefill to finish. These decodes get scheduled in the pipeline gaps.在预填充分块之间,调度器可以使用*解码最大化批次*,通过 form_decode_batch 将所有就绪的解码请求打包成一次启动。这让短小、对时延敏感的 token 生成得以搭上原本空闲的流水线间隙。这样一来,即使提示词很短的用户也能获得低时延,因为他们的解码不必等待庞大的预填充完成。这些解码任务会被调度到流水线间隙中执行。
By continuously monitoring gpu_utilization(), the scheduler chooses whether to process another prefill chunk or drain the decode queue. Either way, it is always picking the action that fills SM slots and minimizes dead time. This is called a utilization-maximization policy and is similar to an OS scheduler aiming for 100% CPU utilization.通过持续监控 gpu_utilization(),调度器决定是再处理一个预填充分块,还是清空解码队列。无论哪种方式,它始终选择能填满 SM 槽位、最小化空闲时间的动作。这被称为*利用率最大化策略*,类似于追求 100% CPU 利用率的操作系统调度器。
Together, these mechanisms ensure that large-context prefill jobs never starve interactive decoding. At the same time, small, latency-critical requests are served immediately. This produces optimal throughput on modern GPUs without degrading the end-user experience.这些机制共同确保大上下文预填充任务永远不会饿死交互式解码。同时,小而关键的时延敏感请求能被立即处理。这能在现代 GPU 上产生最优吞吐量,同时不损害终端用户体验。
As you can see, the scheduler monitors real-time metrics and adapts on the fly. The chunked scheduling makes sure no single request can block an entire stage under varying conditions. This keeps all GPUs active and reduces the dreaded pipeline bubbles.如你所见,调度器监控实时指标并动态调整。分块调度确保在不断变化的条件下,没有任何单个请求能阻塞整个阶段。这能让所有 GPU 保持活跃,并减少令人头疼的流水线气泡。
It’s important to treat prefill and decode as separate queues with their own SLAs. It’s usually optimal to clear out latency-sensitive decode tasks first using dedicated time slices or CUDA streams, then use the leftover cycles to process large prefill jobs. For example, you can allocate a certain time budget (e.g., 1–5 ms per decode) to decode tasks to make sure they get more immediate attention.重要的是将预填充和解码视为各自拥有 SLA 的独立队列。通常最优的做法是先用专用时间片或 CUDA 流清空对时延敏感的解码任务,然后用剩余的周期处理大型预填充任务。例如,你可以为解码任务分配一定的时间预算(例如每次解码 1–5 ms),以确保它们得到更及时的关注。
By prioritizing the user-facing, real-time decodes, you minimize perceived inference lag. At the same time, you are still powering through bulk context builds when the system has spare capacity.通过优先处理面向用户的实时解码,你可以最小化用户感知到的推理延迟。同时,当系统有富余容量时,你仍在全力推进批量上下文构建。
Many high-performance inference engines use a producer-consumer model with separate threads for the separate phases. For instance, vLLM uses multithreading such that one thread prepares decode inputs while another prepares new prefills, etc., and they feed into a single execution stream in an optimized order. This is a proven pattern to overlap work efficiently.许多高性能推理引擎采用*生产者-消费者*模型,为不同阶段分配独立线程。例如,vLLM 使用多线程:一个线程准备解码输入,另一个线程准备新的预填充,等等,它们以优化的顺序汇入单一执行流。这是一种经过验证的高效重叠工作的模式。
If you have multiple nodes, you can send prefill requests to one set of nodes and decode requests to another set. In this case, the prefill and decode nodes can use different, heterogenous hardware specialized for their specific task of either prefill or decode.如果你有多个节点,可以将预填充请求发送到一组节点,将解码请求发送到另一组节点。在这种情况下,预填充节点和解码节点可以使用不同的异构硬件,分别针对预填充或解码的特定任务进行专门优化。
For instance, the prefill compute nodes can use GPUs with high FLOPS and less memory bandwidth since the prefill phase is compute bound. And the decode nodes can potentially use GPUs with higher memory bandwidth but less FLOPS capacity.例如,预填充计算节点可以使用高 FLOPS、较低显存带宽的 GPU,因为预填充阶段是计算密集型的。而解码节点则可以使用显存带宽更高但 FLOPS 能力较低的 GPU。
Be aware that while a heterogeneous prefill and decode worker configuration can save cost, it can complicate—and potentially limit—dynamic load balancing. If the prefill/ decode ratio shifts unexpectedly and more prefill work needs to be done on decode-optimized workers (less FLOPS), these decode workers may become a bottleneck.需要注意的是,虽然异构的预填充与解码工作节点配置可以节省成本,但它会使动态负载均衡变得复杂——甚至可能限制动态负载均衡。如果预填充/解码比例意外发生变化,需要在针对解码优化的节点(FLOPS 较低)上完成更多预填充工作,这些解码节点就可能成为瓶颈。
Regarding prefill and decode batching, it’s recommended that you batch your decode calls together whenever possible to maximize GPU throughput and minimize launch overhead. For prefill, you should avoid mixing very short and very long prompts in the same batch.关于预填充与解码的批处理,建议尽可能将解码调用合并成批,以最大化 GPU 吞吐量并最小化启动开销。对于预填充,应避免将极短和极长的提示词混在同一批中。
You should use length-based bucketing so each batch has similar sequence lengths. This might mean grouping incoming requests to the nearest 512-token bucket before completing the batch. This way, you don’t waste compute on excessive padding.应使用基于长度的分桶,使每个批内的序列长度相近。这可能意味着在组批完成之前,将到达的请求归入最接近的 512 token 桶。这样就不会把算力浪费在过多的填充上。
In practice, most modern inference engines implement a token-level scheduler that dynamically forms batches at each generation step. It will wait a few milliseconds to gather ready tokens, cap batch sizes to stay within memory and occupancy limits, and employ round-robin/maximum-delay rules to improve fairness between long and short prompts. (Make sure this feature is enabled in your inference engine’s configuration.)在实践中,大多数现代推理引擎都实现了 token 级调度器,在每个生成步动态组批。它会等待几毫秒以收集就绪的 token,限制批大小以保持在内存与占用率限制之内,并采用轮询/最大延迟规则来改善长提示词与短提示词之间的公平性。(请确保在推理引擎的配置中启用该特性。)
In short, adaptive batching and prefill/decode disaggregation can maximize GPU utilization and increase throughput without sacrificing too much latency. In fact, these techniques can often improve latency in aggregate, because they keep the GPU busy—and less GPU idle time means faster task completion overall.简而言之,自适应批处理与预填充/解码解耦可以在不牺牲太多时延的前提下最大化 GPU 利用率并提升吞吐量。事实上,这些技术往往能在总体上改善时延,因为它们让 GPU 保持忙碌——GPU 空闲时间越少,整体任务完成就越快。
多 GPU 下的拥塞感知与拓扑感知调度
Congestion-Aware and Topology-Aware Scheduling with Multiple GPUs
Modern multi-GPU and multirack systems like Grace Blackwell GB200 NVL72 systems (72 Blackwell B200 GPUs with 180 GB HBM each) and the newer Grace Blackwell Ultra GB300 NVL72 (72 B300 GPUs with 288 GB each) connect 72 GPUs in a single high-bandwidth NVLink/NVSwitch fabric. These architectures create a unified 72-GPU domain and give each GPU up to ~1.8 TB/s of aggregate bidirectional NVLink throughput. This provides over 130 TB/s of aggregate cross-sectional bandwidth across the NVSwitch network.现代多 GPU、多机架系统,如 Grace Blackwell GB200 NVL72 系统(72 块 Blackwell B200 GPU,每块 180 GB HBM)以及更新的 Grace Blackwell Ultra GB300 NVL72(72 块 B300 GPU,每块 288 GB),将 72 块 GPU 连接在单一高带宽 NVLink/NVSwitch 互联结构中。这些架构构成一个统一的 72 GPU 域,并为每块 GPU 提供最高约 1.8 TB/s 的 NVLink 双向聚合吞吐量。这在 NVSwitch 网络上提供了超过 130 TB/s 的聚合横截面带宽。
However, achieving peak performance for large-scale inference requires more than raw bandwidth. It needs intelligent and adaptive communication scheduling. Congestion-aware and topology-aware strategies make sure that data transfers avoid bottlenecks in real time, as shown in Figure 19-8.然而,要在大规模推理中达到峰值性能,仅靠原始带宽是不够的,还需要智能且自适应的通信调度。拥塞感知与拓扑感知策略可确保数据传输实时避开瓶颈,如图 19-8 所示。
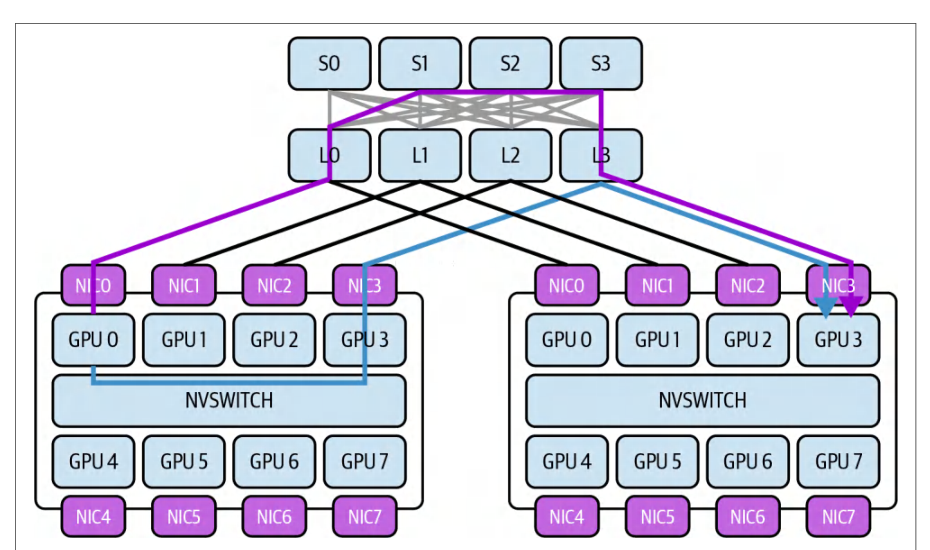
To address these bottlenecks, let’s consider link utilization telemetry, dynamic message routing, and scheduling waves of collectives. Next are some key principles and techniques that enable efficient scheduling of inter-GPU communication while maintaining low latency and high throughput. To keep things concrete, we’ll do this in the context of an NVL72 rack environment.为应对这些瓶颈,我们来考虑链路利用率遥测、动态消息路由以及集合通信的分波调度。以下是若干关键原则与技术,可在保持低时延和高吞吐量的同时,实现高效的 GPU 间通信调度。为使讨论更具体,我们将在 NVL72 机架环境中展开。
NVLink/NVSwitch 拓扑与带宽约束
NVLink/NVSwitch Topology and Bandwidth Constraints
NVLink provides high-speed point-to-point links between GPUs—and between GPUs and the Grace CPU in Grace Blackwell Superchip modules. NVSwitch acts as an on-rack network switch connecting all GPUs into an all-to-all topology.NVLink 在 GPU 之间——以及 Grace Blackwell 超级芯片模块中 GPU 与 Grace CPU 之间——提供高速点对点链路。NVSwitch 充当机架内网络交换机,将所有 GPU 连接成全互联(all-to-all)拓扑。
In an NVL72 rack system, each GPU features multiple NVLink ports (e.g., 18 NVLink links per GPU) that connect into a set of NVSwitch chips. This design gives every GPU peer-to-peer connectivity such that any GPU can reach any other in a single hop, or one traversal, through the NVSwitch fabric. This topology allows the 72 GPUs to behave like a single giant board with uniform connectivity.在 NVL72 机架系统中,每块 GPU 具备多个 NVLink 端口(例如每块 GPU 18 条 NVLink 链路),连接到一组 NVSwitch 芯片。该设计使每块 GPU 都具备点对点连通性,从而任意 GPU 都能通过 NVSwitch 互联结构以单跳(即一次穿越)到达任意其他 GPU。这种拓扑让 72 块 GPU 表现得像一块具有均匀连通性的巨型板卡。
Despite their high bandwidth, the interconnects have finite capacity. Each NVLink 5 port provides 100 GB/s per direction. And each GB200/GB300 superchip exposes 18 NVLink links per GPU for up to 1.8 TB/s bidirectional throughput per GPU. And while NVSwitch provides nonblocking all-to-all connectivity under balanced loads, certain patterns like all GPUs sending to one GPU can oversubscribe links since each NVSwitch chip has a limit on total switching throughput.尽管带宽很高,这些互连的容量仍然是有限的。每个 NVLink 5 端口单向提供 100 GB/s。每颗 GB200/GB300 超级芯片为每个 GPU 提供 18 条 NVLink 链路,使每个 GPU 的双向吞吐量最高可达 1.8 TB/s。虽然 NVSwitch 在负载均衡的情况下能够提供无阻塞的全互联(all-to-all)连接,但某些模式——例如所有 GPU 都向同一个 GPU 发送数据——会造成链路超额订阅,因为每颗 NVSwitch 芯片的总交换吞吐量是有限的。
Congestion will occur if too many GPUs send data simultaneously through the same switch—or into the same destination. This causes queues to build up and a drop in effective transfer throughput. For instance, a single GPU can theoretically communicate bidirectionally at 1.8 TB/s, but if multiple peers all target that same GPU simultaneously, they must share the same NVLink ingress bandwidth. Similarly, NVSwitch can be oversubscribed by certain communication patterns, like all GPUs exchanging data at the same time—even though it’s designed for full nonblocking bandwidth (under balanced loads.)如果过多 GPU 同时通过同一台交换机发送数据,或同时发往同一目的地,就会发生拥塞。这会导致队列堆积,并使实际传输吞吐量下降。例如,单个 GPU 理论上可以 1.8 TB/s 的双向速率通信,但如果多个对端同时以该 GPU 为目标,它们就必须共享同一条 NVLink 入口带宽。同样,某些通信模式也会使 NVSwitch 超额订阅,比如所有 GPU 同时交换数据——尽管 NVSwitch 的设计目标就是在负载均衡的情况下提供完全无阻塞的带宽。
Understanding the topology—which GPUs share NVSwitch components or NVLink paths—is critical to inference performance. On a smaller scale, GPUs on the same board or tray likely have faster and slightly more direct paths compared to GPUs in different trays or across nodes.理解拓扑结构——哪些 GPU 共享 NVSwitch 组件或 NVLink 路径——对推理性能至关重要。在较小规模上,同一板卡或同一托盘上的 GPU 之间的路径通常比不同托盘或跨节点 GPU 之间的路径更快,也更直接一些。
On a larger scale, communications that cross node/rack boundaries and leave the NVLink domain using InfiniBand/Ethernet will incur even higher latency and lower bandwidth than intra-NVL72 transfers. For example, InfiniBand NDR might add 5– 10 µs of latency per hop versus less than 1 µs of latency for NVSwitch hops.在更大规模上,跨越节点/机架边界、离开 NVLink 域而走 InfiniBand/Ethernet 的通信,其时延会比 NVL72 内部传输更高,带宽则更低。例如,InfiniBand NDR 每跳可能增加 5–10 µs 的时延,而 NVSwitch 每跳的时延不到 1 µs。
Because of the physical topology, some communication paths are cheaper than others. A congestion-aware scheduler uses this knowledge to prefer higher-bandwidth, lower-latency, less congested links to maximize performance.由于物理拓扑的限制,某些通信路径的代价低于其他路径。拥塞感知调度器利用这一知识,优先选择带宽更高、时延更低、拥塞更轻的链路,以最大化性能。
实时链路遥测与监控
Real-Time Link Telemetry and Monitoring
To manage congestion, the system must first observe it. NVIDIA provides telemetry interfaces to monitor link utilization in real time. The NVIDIA Management Library (NVML) and, specifically, the nvmlDeviceGetNvLinkUtilizationCounter, expose per-link throughput counters and utilization statistics for NVLink.要管理拥塞,系统必须首先*观测*到拥塞。NVIDIA 提供了遥测接口,可实时监控链路利用率。NVIDIA 管理库(NVML),特别是 nvmlDeviceGetNvLinkUtilizationCounter,可暴露 NVLink 的每链路吞吐量计数器和利用率统计信息。
An adaptive inference serving system can query metrics, such as bytes transferred per NVLink port, error rates, and traffic load between specific GPU pairs. For instance, you can query NVML or DCGM for throughput counters, bandwidth statistics, and other telemetry (e.g., errors, etc.). Note that nvidia-smi nvlink --status provides link health and configuration. NVML and DCGM are the preferred mechanisms for performance counters such as throughput.自适应推理服务系统可以查询各项指标,例如每个 NVLink 端口传输的字节数、错误率,以及特定 GPU 对之间的流量负载。例如,你可以向 NVML 或 DCGM 查询吞吐量计数器、带宽统计信息和其他遥测数据(如错误等)。请注意,nvidia-smi nvlink --status 提供链路健康状况与配置信息。对于吞吐量这类性能计数器,NVML 和 DCGM 是更可取的手段。
This is useful for identifying hotspot links that are saturated at close to 100% utilization while others are underused. These low-level hardware counters allow a scheduler to find exactly where bottlenecks are occurring. This includes specific NVSwitch uplinks—or the links between two specific GPUs.这对于识别热点链路很有用——这些链路利用率接近 100% 而趋于饱和,而其他链路则未被充分利用。这些底层硬件计数器使调度器能够精确定位瓶颈发生的位置,包括特定的 NVSwitch 上行链路,或两个特定 GPU 之间的链路。
In addition to NVML, higher-level profiling tools like Nsight Systems provide timeline views of GPU activity, including communication events. Nsight can display when data transfers occur on NVLink/NVSwitch—and how long they take.除 NVML 之外,Nsight Systems 等更高层的性能剖析工具可提供 GPU 活动(包括通信事件)的时间线视图。Nsight 能够显示数据在 NVLink/NVSwitch 上传输的时机,以及传输耗时。
By instrumenting inference runs with Nsight Systems, one can visualize if multiple transfers overlap and cause delays—or if certain stages are waiting on communication. For instance, the timeline might reveal that all pipeline stages attempt to send activations at the same moment over the same link, which will overwhelm the interconnect.通过使用 Nsight Systems 对推理运行进行插桩,可以可视化多个传输是否重叠并造成延迟——或者某些阶段是否在等待通信。例如,时间线可能揭示所有流水线阶段都试图在同一时刻通过同一条链路发送激活值,这会使互连不堪重负。
It’s recommended to integrate these metrics into your monitoring Grafana dashboards using Prometheus and DCGM exporter. This way, you can see link utilization in real time—as well as historically and over time. And when you identify hotspots, such as synchronization points, your system can insert a slight delay, reschedule tasks, or reassign GPU roles to alleviate the hotspot and smooth out traffic.建议使用 Prometheus 和 DCGM exporter 将这些指标集成到你的 Grafana 监控仪表板中。这样,你就可以实时查看链路利用率——也可以查看历史数据和随时间的变化。当你识别出热点(例如同步点)时,系统可以插入轻微延迟、重新调度任务或重新分配 GPU 角色,以缓解热点并平滑流量。
For example, the system can adjust the scheduling by inserting slight delays or overlapping differently to reduce contention. This real-time telemetry enables dynamic, adaptive, feedback-driven decisions. The scheduler can react on the fly to spikes in link utilization by rerouting traffic or rescheduling tasks to different GPUs, as described next.例如,系统可以通过插入轻微延迟或采用不同的重叠方式来调整调度,以减少争用。这种实时遥测使动态、自适应、反馈驱动的决策成为可能。调度器可以即时响应链路利用率的尖峰,通过重新路由流量或将任务重新调度到不同的 GPU,如下文所述。
自适应进程-GPU 映射
Adaptive Process-GPU Mapping
One powerful strategy is topology-aware placement of computation processes to minimize heavy communication across slow or congested links. For example, consider a multi-GPU inference pipeline in which different LLM layers (“processes”) reside on different GPUs. In this case, large intermediate tensors must be passed along the inference pipeline.一种强大的策略是进行计算进程的拓扑感知放置,以最小化跨慢速或拥塞链路的大量通信。例如,考虑一个多 GPU 推理流水线,其中不同的 LLM 层(“进程”)驻留在不同的 GPU 上。在这种情况下,大型中间张量必须沿着推理流水线传递。
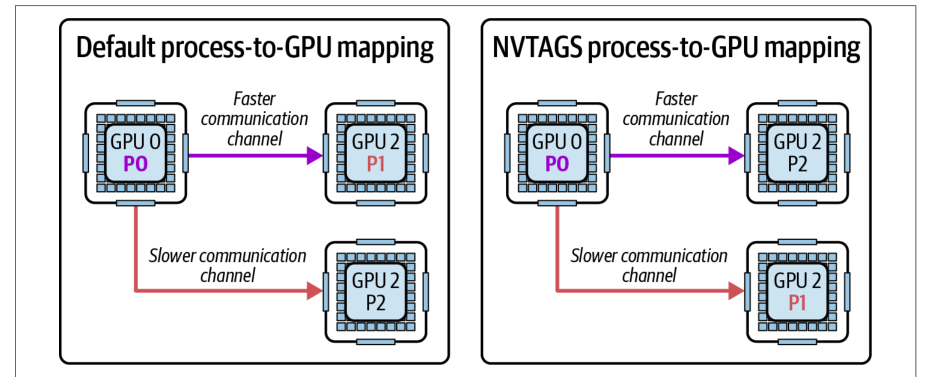
This is essentially a process-GPU placement-optimization problem, which requires mapping the graph of neural-network model layers onto GPU hardware that incurs the minimum amount of communication cost. If the original assignment of layers/ processes to GPUs is naive, these tensors might travel over long, expensive, congested paths. This could include multiple NVSwitch hops—or even off the NVLink fabric entirely onto another rack or data center. This will definitely reduce throughput and overall performance.这本质上是一个进程-GPU 放置优化问题,需要将神经网络模型层的图映射到通信开销最小的 GPU 硬件上。如果层/进程到 GPU 的初始分配是朴素的,这些张量可能会经过漫长、昂贵且拥塞的路径。这可能包括多个 NVSwitch 跳——甚至完全离开 NVLink 网络,转到另一个机架或数据中心。这必然会降低吞吐量和整体性能。
With adaptive process-GPU mapping, the system dynamically assigns processes to GPUs such that communication is kept as local (and balanced) as possible. For instance, consider our LLM layers (processes) partitioned across many GPUs in an NVL72 rack. If layer/process 0 on GPU 0 feeds layer/process 2 on GPU 2, but their GPUs are on opposite ends of the NVSwitch network, the data has to traverse more links. In this case, moving layer/process 2 to GPU 1 is the preferred process-GPU mapping, as shown in Figure 19-9, in the context of NVIDIA’s Topology-Aware GPU Selection (NVTAGS) system.借助自适应进程-GPU 映射,系统动态地将进程分配给 GPU,使通信尽可能保持本地化(且均衡)。例如,考虑我们的 LLM 层(进程)分布在 NVL72 机架中的许多 GPU 上。如果 GPU 0 上的层/进程 0 向 GPU 2 上的层/进程 2 提供输入,但它们的 GPU 位于 NVSwitch 网络的两端,数据就必须经过更多链路。在这种情况下,将层/进程 2 移到 GPU 1 是更优的进程-GPU 映射,如图 19-9 所示,这是在 NVIDIA 的拓扑感知 GPU 选择(NVTAGS)系统的语境下。
Here, NVTAGS automatically assigns GPU affinity to processes based on the communication patterns between the GPUs. NVTAGS is a topology-aware GPU selection framework from NVIDIA that automates process-to-GPU mapping using fabric dis-tances and link metrics. It actively profiles the topology and reassigns processes to GPUs with the fastest mutual links.在这里,NVTAGS 根据 GPU 之间的通信模式自动为进程分配 GPU 亲和性。NVTAGS 是 NVIDIA 的一个拓扑感知 GPU 选择框架,它利用网络结构距离和链路指标自动化进程到 GPU 的映射。它会主动对拓扑进行性能剖析,并将进程重新分配到相互之间链路最快的 GPU 上。
If telemetry indicates this link is becoming saturated because the activation tensor is very large, for instance, the scheduler can remap process 2 onto another GPU that is “closer” to GPU 0—ideally one that shares a high-bandwidth connection or is in the same NVSwitch module. The adaptive process-GPU remapping will dynamically reassign which GPU holds which model layer in the LLM inference example.例如,如果遥测表明由于激活张量非常大,这条链路正变得饱和,调度器就可以将进程 2 重新映射到另一个“更靠近”GPU 0 的 GPU 上——理想情况下是共享高带宽连接或位于同一 NVSwitch 模块中的 GPU。在 LLM 推理示例中,自适应进程-GPU 重映射将动态重新分配哪个 GPU 持有哪个模型层。
This remapping is done at initialization as well as between inferences. Some systems use upfront or periodic profiling runs to decide an optimal placement. If two processes exchange tens of GB per second, they should reside on the same node, if possible. Conversely, processes that are more compute bound or have minimal data transfer between them can tolerate more distance from one another.这种重映射既在初始化时进行,也在各次推理之间进行。一些系统使用预先的或周期性的性能剖析运行来决定最优放置。如果两个进程每秒交换数十 GB 的数据,那么它们应尽可能位于同一节点上。反之,计算受限程度更高、或彼此之间数据传输极少的进程,则可以容忍彼此之间更大的距离。
Remapping is adaptive when the system monitors performance and iteratively improves the mapping as conditions change. For instance, if after one pass the highest-traffic connection is between process 3 and process 4 on different nodes, the scheduler might swap one of those processes with another process on the same node to bring 3 and 4 together.当系统监控性能并随着条件变化迭代改进映射时,重映射就是*自适应*的。例如,如果在一轮之后,流量最高的连接位于不同节点上的进程 3 和进程 4 之间,调度器可能会将其中一个进程与同一节点上的另一个进程交换,从而把 3 和 4 放到一起。
The impact of adaptive remapping is an evolving GPU assignment schedule that responds to the observed traffic pattern. This approach directly reduces cross-node traffic by keeping data exchanges confined to local domains.自适应重映射的影响体现为一个不断演化的 GPU 分配调度方案,它响应观测到的流量模式。这种方法通过将数据交换限制在本地域内,直接减少了跨节点流量。
For example, after remapping, what was a 50 GB/s cross-node transfer might become two 25 GB/s within-node transfers. This eliminates a network bottleneck and reduces network latency by 50% for that communication.例如,重映射之后,原本 50 GB/s 的跨节点传输可能变成两次 25 GB/s 的节点内传输。这消除了网络瓶颈,并使该通信的网络时延降低 50%。
Remapping can be formulated as an optimization problem that uses a graph-partitioning algorithm. In this case, the graph’s edge weights are the volume of data traveling over the links. You would solve for the minimal cut.重映射可以形式化为一个使用图划分算法的优化问题。在这种情况下,图的边权重是在各条链路上传输的数据量。你需要求解最小割。
In deep learning inference, we can apply the idea of adaptive mapping to inter-GPU communications using pipeline, tensor, and expert parallel techniques. The GPUs that talk to one another the most should be assigned the strongest, least congested connections between them.在深度学习推理中,我们可以将自适应映射的思想应用于使用流水线并行、张量并行和专家并行技术的 GPU 间通信。彼此通信最频繁的 GPU 应被分配它们之间最强、最不拥塞的连接。
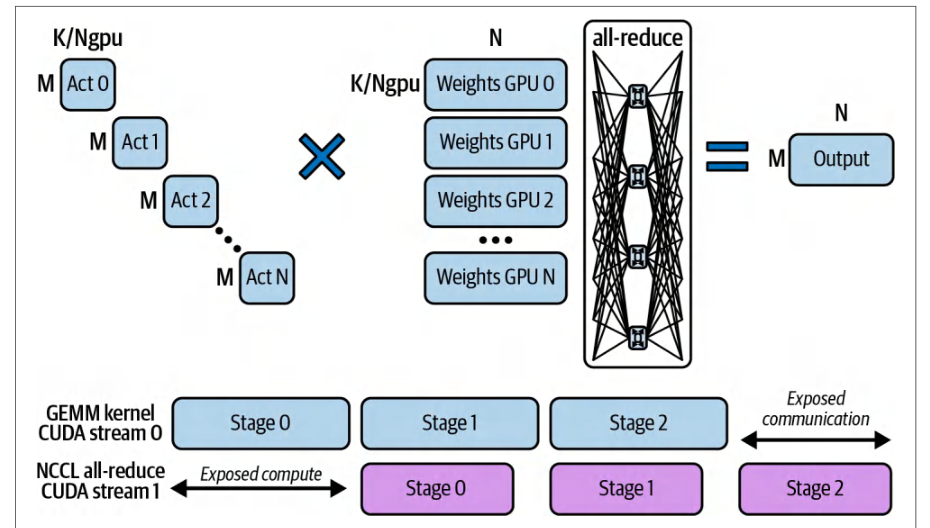
使用 NCCL 优化集合通信
Optimizing Collective Communication with NCCL
NVIDIA’s Collective Communications Library (NCCL) is the standard library managing these GPU collectives. It offers multiple algorithms and optimizations for multiple GPU environments.NVIDIA 的集合通信库(NCCL)是管理这些 GPU 集合通信的标准库。它为多 GPU 环境提供了多种算法和优化。
Many inference workloads involve collective communication patterns, such as gathering outputs from multiple experts, broadcasting parameters, or performing all-reduce operations, as shown in Figure 19-10. Here, NCCL communication (stream 1) overlaps with GEMM computations (stream 0).许多推理工作负载涉及集合通信模式,例如收集多个专家的输出、广播参数或执行全归约操作,如图 19-10 所示。在这里,NCCL 通信(流 1)与 GEMM 计算(流 0)重叠。
These NCCL optimizations can be applied dynamically by the scheduler in congestion-aware environments. By choosing the right collective algorithm and tuning it using the topology and congestion information, we can reduce communication overhead of our inference system. Next are some key considerations that the scheduler can use when tuning NCCL on the fly.在拥塞感知的环境中,调度器可以动态地应用这些 NCCL 优化。通过选择合适的集合通信算法,并利用拓扑和拥塞信息对其进行调优,我们可以降低推理系统的通信开销。下面列出调度器在动态调优 NCCL 时可以采用的一些关键考量。
环形全归约与树形全归约
Ring versus tree all-reduce
NCCL can perform reductions (along with other collectives) using a ring algorithm or a tree algorithm. In a ring all-reduce, each GPU passes data along a closed loop/ ring so that every piece of data traverses all GPUs in sequence.NCCL 可以使用环形算法或树形算法执行归约(以及其他集合通信操作)。在环形全归约中,每个 GPU 沿一个闭环/环传递数据,使得每一份数据都依次经过所有 GPU。
The ring approach maximizes bandwidth utilization on NVLink/NVSwitch by keeping all links busy, but it means the latency scales linearly with the number of GPUs. For instance, on a 72-GPU ring, the data makes 71 hops to complete one reduction.环算法通过让所有链路保持忙碌,最大化了 NVLink/NVSwitch 上的带宽利用率,但这意味着时延会随 GPU 数量线性增长。例如,在 72 个 GPU 组成的环上,数据要经过 71 跳才能完成一次归约。
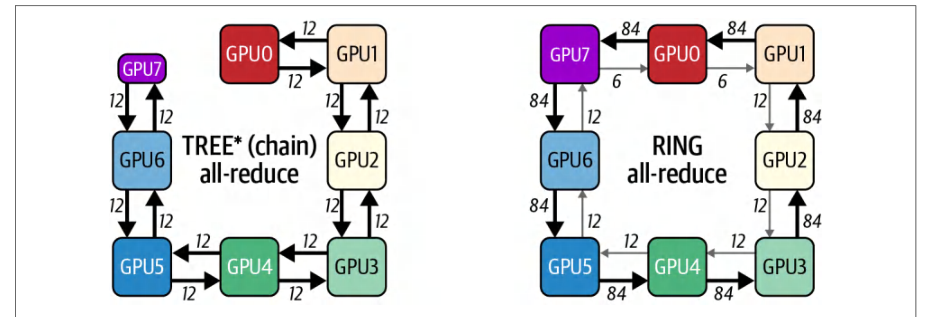
A tree algorithm, in contrast, reduces or broadcasts data in a logarithmic fashion since GPUs are organized into a logical binary tree where each step halves the number of participants. However, the GPUs are physically connected linearly, link-by-link, into what can be logically considered a tree-chain. Figure 19-11 compares tree-based and ring-based communication among GPUs.相比之下,树算法以对数方式完成数据的归约或广播,因为 GPU 被组织成一棵逻辑二叉树,每一步都将参与者数量减半。然而,GPU 在物理上是逐链路线性连接的,这种结构在逻辑上可视为一棵*树链*。图 19-11 对比了 GPU 之间基于树与基于环的通信。
Tree algorithms complete in fewer steps (e.g., log₂(72) in the case of a 72-GPU ring), which directly reduces latency—especially for “long haul” transfers across a large number of GPUs. Trees utilize the parallelism of NVSwitch since multiple independent reduction flows can occur simultaneously along different branches of the tree. The trade-off is that a tree may not fully saturate every link’s bandwidth at every moment, but it avoids any single link or GPU becoming a chokepoint through the long ring path.树算法所需的步数更少(例如在 72 个 GPU 的环这一情形下为 log₂(72)),这直接降低了时延——尤其是跨大量 GPU 的“长途”传输。树结构利用了 NVSwitch 的并行能力,因为多条相互独立的归约流可以沿树的不同分支同时进行。其代价是,树在每一时刻未必能完全占满每条链路的带宽,但它避免了任何单条链路或单个 GPU 因漫长的环路径而成为阻塞点。
By default, NCCL selects ring, tree, or hierarchical variants heuristically based on message size and topology. On NVSwitch-based intranode paths, rings are often favored for bandwidth, while across nodes, hierarchical and tree variants are common. On a fully connected, single-node NVSwitch system like the NVL72, it’s usually better to force a tree for large reductions.默认情况下,NCCL 会依据消息大小和拓扑,以启发式方式选择环、树或分层变体。在基于 NVSwitch 的节点内路径上,环算法常因带宽优势而被优先选用;而跨节点时,分层变体和树变体更为常见。在像 NVL72 这样全互联的单节点 NVSwitch 系统上,对于大规模归约,通常更好的做法是强制使用树算法。
Forcing a tree algorithm with the NCCL_ALGO environment variable, for instance, can alleviate congestion in a single NVL72 rack by not sending all data through one long ring path across all 72 GPUs. For example, a 72-GPU tree-based all-reduce will complete much faster than a ring-based algorithm. This is because the tree algorithm performs 6 (log₂(72)) sequential steps versus the ring algorithm’s 71 (71 = 72 – 1) sequential steps.例如,通过 NCCL_ALGO 环境变量强制使用树算法,可以避免让所有数据都经过一条横跨全部 72 个 GPU 的长环路径,从而缓解单个 NVL72 机架内的拥塞。举例来说,72 个 GPU 的树形全归约完成速度会远快于基于环的算法,因为树算法执行 6(log₂(72))个串行步骤,而环算法需要 71(71 = 72 – 1)个串行步骤。
The scheduler can explicitly choose the algorithm that best fits the current topology and message size using dynamic NCCL tuning parameters. For instance, it can favor tree all-reduce for very large GPU counts to avoid looping across the entire cluster for each update.调度器可以利用动态 NCCL 调优参数,显式选择最契合当前拓扑与消息大小的算法。例如,在 GPU 数量非常多时优先采用树形全归约,以避免每次更新都要在整个集群上绕行一圈。
轮换环端点
Rotating ring endpoints
When a ring algorithm is chosen due to its simplicity and bandwidth efficiency, for instance, one concern is that the same links could consistently carry the heaviest load—particularly the links between certain GPU pairs where the ring wraps around.当出于简单性和带宽效率而选择环算法时,一个顾虑是:同样的链路可能持续承载最重的负载——尤其是环回绕处某些 GPU 对之间的链路。
A congestion-aware approach is to rotate the ring ordering across iterations or collective operations. By periodically shifting which GPU is the start of the ring—and therefore which pairs communicate first—the communication load is distributed more evenly over all NVLink connections.一种拥塞感知的做法是在不同迭代或不同集合操作之间轮换环的顺序。通过周期性地改变哪个 GPU 作为环的起点——从而改变哪些 GPU 对先通信——通信负载会更均匀地分摊到所有 NVLink 连接上。
And while NCCL’s “inside/outside” ring mechanism already alternates ring direction on successive calls, the additional shuffling of ranks between steps will help if your workload is persistently imbalanced. This makes sure that no single NVLink becomes a perpetual bottleneck.尽管 NCCL 的“内侧/外侧”环机制已经在连续调用中交替环的方向,但如果你的工作负载持续不均衡,在步骤之间额外打乱 rank 顺序仍会有帮助。这可以确保没有任何一条 NVLink 成为永久性的瓶颈。
In practice, NCCL has an alternating rings enhancement that implements this kind of rotation under the hood, but it can also be managed by the scheduler using GPU reindexing in the communicator for different collectives. To do this, you can periodically call ncclCommInitRank with a permuted rank order. The effect is that, over time, no single link or GPU is always on the critical path for every collective. This smooths out utilization.实践中,NCCL 提供了交替环(alternating rings)增强,在底层实现了这类轮转,但也可以由调度器通过在不同集合通信的通信器中重新索引 GPU 来管理。为此,可以周期性地以置换后的 rank 顺序调用 ncclCommInitRank。其效果是,随着时间推移,没有任何一条链路或一块 GPU 会始终处于每个集合通信的关键路径上。这使利用率更加平滑。
集合通信的波次调度
Wave scheduling of collectives
Rather than launching one giant collective operation that uses all GPUs at once, wave scheduling breaks communications into phased waves to reduce instantaneous load. For instance, suppose an inference workload needs to perform an all-to-all exchange of embeddings among 72 GPUsa pattern common in mixtures-of-experts or certain ensemble methods.与其启动一个使用全部 GPU 的巨型集合通信操作,波次调度将通信拆分为分阶段的波次,以降低瞬时负载。例如,假设某个推理工作负载需要在 72 块 GPU 之间进行嵌入的全对全(all-to-all)交换——这种模式在专家混合模型或某些集成方法中很常见。
Doing this exchange as one monolithic step would mean that each GPU sends data to 71 others simultaneously. This is 72 GPUs × 71 messages that are saturating every link and NVSwitch port at once.若将这次交换作为单一整体步骤执行,就意味着每块 GPU 同时向其余 71 块 GPU 发送数据。也就是 72 块 GPU × 71 条消息,同时打满每一条链路和每一个 NVSwitch 端口。
With all 72 GPUs exchanging data simultaneously, this will cause a spike. Instead, you can split the exchange into 4 groups, or waves, of 18 GPUs to smooth out the traffic.全部 72 块 GPU 同时交换数据会造成尖峰。相反,可以把交换拆分为 4 组(即 4 个波次)、每组 18 块 GPU,从而平滑流量。
This is called wave scheduling, and it structures the exchange as a series of smaller allto-all exchanges that use only a subset of GPUs during each wave. It can also pipeline smaller chunks such that only a fraction of the traffic is in flight at any given moment.这称为*波次调度*,它把交换组织为一系列更小的全对全交换,每个波次只使用一部分 GPU。它还可以对小数据块进行流水线化,使得任意时刻只有一部分流量在途。
In NCCL terms, this might correspond to splitting a large all-reduce into multiple slices internally. NCCL actually does this automatically to pipeline data through a ring. The scheduler can also use NCCL to orchestrate a sequence of smaller collectives.用 NCCL 的话说,这相当于在内部把一次大规模全归约拆分为多个切片。NCCL 实际上会自动这样做,以便通过环流水线化数据传输。调度器也可以借助 NCCL 编排一系列更小的集合通信。
By staggering the start times of these communication waves, the network fabric has some headroom since one wave’s data is partly through the system before the next wave adds more traffic. This is called temporal multiplexing, and it avoids overwhelming the NVSwitch fabric. This technique is conceptually similar to pacing network traffic in order to avoid burstiness.通过错开这些通信波次的启动时间,网络结构便留有一定余量,因为一个波次的数据在下一个波次增加流量之前已部分通过系统。这称为*时间复用*,可避免压垮 NVSwitch 网络结构。该技术在概念上类似于对网络流量进行限速以避免突发。
Another example is overlapping computation and communication—a pattern we have seen repeatedly throughout this book. If layer outputs are reduced in waves, the system can schedule the next layer’s computation to overlap with later waves of the reduction.另一个例子是计算与通信的重叠——这是本书中反复出现的模式。如果层输出以波次方式归约,系统就可以调度下一层的计算,使其与归约的后续波次重叠。
This creates a pipeline between compute and communication such that while some GPUs are finalizing a reduction, other GPUs have moved on to the next layer’s compute. And this overlap essentially time-shifts some of the communication to a time when the compute units would otherwise be idle. The result is improved utilization of NVLink bandwidth without a massive one-time spike that causes congestion.这在计算与通信之间形成流水线:当一些 GPU 正在完成归约时,另一些 GPU 已经进入下一层的计算。这种重叠本质上把一部分通信时间平移到了计算单元原本空闲的时段。结果是提升了 NVLink 带宽的利用率,同时不会出现导致拥塞的一次性巨大尖峰。
It’s important to carefully optimize collectives, pick the right algorithm, and structure communication in balanced waves. This is essential to topology-aware scheduling— and it leads to more efficient, fair, and balanced usage of the NVLink/NVSwitch network among all GPUs.仔细优化集合通信、选择正确的算法,并以均衡的波次组织通信,这一点很重要。这对拓扑感知调度至关重要——它能带来所有 GPU 之间更高效、公平且均衡的 NVLink/NVSwitch 网络使用。
使用 GPUDirect RDMA 的多节点与多机架通信
Multinode and Multirack Communication with GPUDirect RDMA
When scaling beyond a single node (e.g., NVL72 rack), additional challenges will start to surface since communication is traveling over relatively slow network interfaces, such as InfiniBand and Ethernet. In this case, NVLink and NVSwitch no longer directly connect all of the GPUs in the system. Instead, GPUs in different nodes exchange data using NICs and network switches.当扩展到单个节点(例如 NVL72 机架)之外时,由于通信要经过相对较慢的网络接口(如 InfiniBand 和以太网),新的挑战就会浮现。此时,NVLink 和 NVSwitch 不再直接连接系统中的所有 GPU。相反,不同节点中的 GPU 通过网卡和网络交换机交换数据。
To maintain high performance in a multinode and multirack environment, modern AI systems use GPUDirect RDMA. As covered in Chapter 4, GPUDirect RDMA allows GPUs to directly send/receive data with remote GPUs’ memory—and without host CPU involvement, as shown in Figure 19-12.为了在多节点、多机架环境中保持高性能,现代 AI 系统使用 GPUDirect RDMA。如第 4 章所述,GPUDirect RDMA 允许 GPU 直接与远程 GPU 的内存收发数据,而无需主机 CPU 参与,如图 19-12 所示。
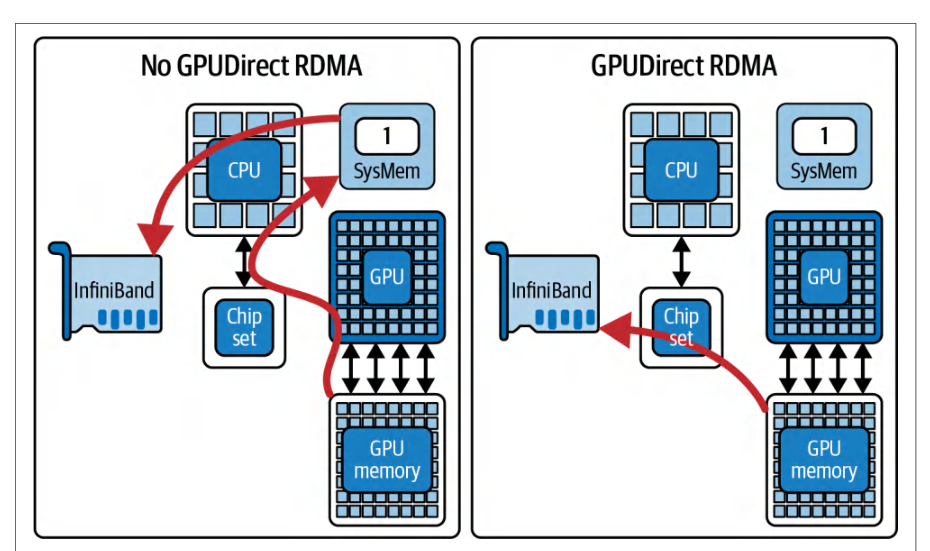
Even with RDMA efficiency, however, network bandwidth is still lower and latency is still higher than intranode NVLink. As such, network congestion in the cluster fabric will become the limiting factor without a dynamic and adaptive routing schedule. A congestion-aware scheduler can intelligently route and balance internode traffic in addition to intranode traffic, as we discussed earlier.然而,即便有 RDMA 的高效率,网络带宽仍低于节点内的 NVLink,时延也更高。因此,如果没有动态自适应的路由调度,集群网络中的网络拥塞将成为限制因素。正如前面所讨论的,拥塞感知调度器除了可以调度节点内流量,还能智能地路由并均衡节点间流量。
One key technique is leveraging multiple network interfaces, called multirail. High-end GPU servers often have several NICs, including dual InfiniBand ports per node—or even one per GPU in some designs. For instance, using two NICs per node can produce nearly 2× the throughput versus using one NIC. There is a bit of overhead when using multiple NICs, but it still provides a large gain.一项关键技术是利用多个网络接口,称为*多轨*(multirail)。高端 GPU 服务器通常配有多块网卡(NIC),包括每节点双 InfiniBand 端口——在某些设计中甚至每个 GPU 一个端口。例如,每节点使用两块网卡相比使用一块网卡可获得接近 2 倍的吞吐量。使用多块网卡会有少量开销,但仍能带来大幅收益。
NCCL automatically supports using multiple NICs in parallel to increase bandwidth. In addition, it will split rings and trees across these NICs. Topology awareness is critical here. Consider if each NIC connects to a different network switch to form separate “rails” in the cluster network. In this case, using more than one NIC per collective can reduce the load on any single network path.NCCL 自动支持并行使用多块网卡以提升带宽。此外,它还会将环形和树形算法拆分到这些网卡上。此时拓扑感知至关重要。设想每块网卡连接到不同的网络交换机,从而在集群网络中形成各自独立的“轨”。在这种情况下,每次集合通信使用多块网卡可以降低任一单条网络路径上的负载。
The NCCL environment variable NCCL_CROSS_NIC controls whether a collective operation is allowed to use different NICs on different nodes for the same ring/tree. By enabling this with a well-designed network topology, NCCL might send half the GPUs’ data out of NIC1 and the other half out of NIC2. This effectively doubles throughput and avoids bottlenecks on a single link.NCCL 环境变量 NCCL_CROSS_NIC 控制是否允许同一次集合通信操作在不同节点上使用不同的网卡来构成同一个环/树。在精心设计的网络拓扑下启用该变量后,NCCL 可能将一半 GPU 的数据从 NIC1 发出,另一半从 NIC2 发出。这实际上使吞吐量翻倍,并避免单条链路上的瓶颈。
The scheduler can detect if one NIC or path is reaching capacity. If it is reaching capacity, it can redistribute the traffic by moving some GPUs’ communications to an alternate interface or alternate network route if one is available. This can be improved using network-level adaptive routing, but your application can also pin certain GPU traffic to less-used NICs. To do this, you just need to set different NCCL channels to different NICs.调度器可以检测某块网卡或某条路径是否接近容量上限。若接近上限,它可以将部分 GPU 的通信迁移到备用接口或备用网络路由(如果存在)来重新分配流量。这可以通过网络级自适应路由进一步改善,但应用也可以将特定 GPU 的流量绑定到使用较少的网卡上。要做到这一点,只需将不同的 NCCL 通道设置到不同的网卡。
In a multinode context, rerouting can also mean cooperating with the network’s adaptive routing features. Modern InfiniBand networks have adaptive routing in which congested flows are automatically moved to less-congested paths in the fabric. While this is handled at the network level, a higher-level scheduler can influence it by changing which destination IP/route is used for a given GPU transfer, for instance. Or the scheduler can split transfers into smaller chunks so the network can balance them.在多节点场景下,重路由也意味着与网络的自适应路由特性协同工作。现代 InfiniBand 网络具备自适应路由能力,拥塞的流会被自动转移到网络中拥塞较轻的路径上。虽然这由网络层处理,但更高层的调度器也能施加影响,例如改变某次 GPU 传输所使用的目的 IP/路由。或者,调度器可以把传输拆分成更小的块,以便网络对其进行均衡。
Additionally, it’s important to enforce NIC affinity by binding each GPU’s communication to the NIC closest (e.g., the NIC on the same PCIe root complex or the same NVSwitch/CPU complex). This will reduce local contention.此外,通过将每个 GPU 的通信绑定到最近的网卡(例如位于同一 PCIe 根复合体或同一 NVSwitch/CPU 复合体上的网卡)来强制实施网卡亲和性也很重要。这可以减少本地争用。
To enforce GPU-NIC affinity, you can use NVML or NCCL to map GPU ↔ NIC locality. You need to configure NCCL to respect this mapping by supplying it with a static topology description that associates each GPU with its specific NIC (e.g., GPUs 0–3 ↔ NIC 0, GPUs 4–7 ↔ NIC 1).要强制实施 GPU 与网卡的亲和性,可以使用 NVML 或 NCCL 来映射 GPU ↔ 网卡的局部性关系。你需要向 NCCL 提供一份静态拓扑描述,将每个 GPU 与其特定网卡关联起来(例如 GPU 0–3 ↔ NIC 0,GPU 4–7 ↔ NIC 1),从而让 NCCL 遵循这一映射。
A well-designed system will align GPU-to-NIC pairings so that each GPU’s data takes the shortest path out of the node. If a particular NIC is congested due to multiple heavy GPU flows out of the same port, the scheduler can reassign one GPU’s traffic to another port on the node for the next round of communication. And while NCCL’s autotuning will do most of this for you, manual overrides may be needed to tackle specific and persistent issues.设计良好的系统会对齐 GPU 与网卡的配对,使每个 GPU 的数据以最短路径离开节点。如果某块网卡因同一端口上多条繁重的 GPU 流而拥塞,调度器可以在下一轮通信中将某个 GPU 的流量重新分配到节点上的另一个端口。虽然 NCCL 的自动调优会替你完成其中大部分工作,但应对特定且持续存在的问题时,可能仍需手动覆盖。
Consider an extreme case, such as a large, heavily loaded inference cluster hosting a massive MoE LLM model. Here, the network will be a major bottleneck if the system is not tuned properly. This is because of the heavy communication between the nodes in the cluster.考虑一个极端情况,例如一个承载超大规模 MoE LLM 模型、负载很高的大型推理集群。此时,如果系统未经过恰当调优,网络将成为主要瓶颈。这是因为集群中各节点之间存在大量通信。
In such extreme cases, the scheduler may decide to replicate certain data (e.g., experts) on multiple nodes to reduce cross-node queries. Or it can perform operations hierarchically by first aggregating results within each node, then exchanging a summary between nodes. This is in contrast to exchanging full data between all GPUs across nodes.在这类极端情况下,调度器可能决定在多个节点上复制某些数据(例如专家),以减少跨节点查询。或者,它可以分层地执行操作:先在每个节点内部聚合结果,再在节点之间交换汇总信息。这与在所有跨节点 GPU 之间交换完整数据形成对比。
For multinode environments, congestion-aware scheduling is needed to avoid saturating any single network link. This type of scheduling requires careful routing/binding decisions, GPUDirect RDMA to bypass needless memory copies, and multirail NIC utilization to maximize bandwidth.对于多节点环境,需要拥塞感知调度,以避免任何单条网络链路饱和。这类调度需要谨慎的路由/绑定决策、用 GPUDirect RDMA 绕过不必要的显存拷贝,以及利用多轨 NIC 来最大化带宽。
The goal is to extend topology awareness beyond NVSwitch and understand the cluster network’s full topology (e.g., fat-tree, dragonfly, etc.) and adapt communication patterns to that topology. The result is that even at scale with thousands and millions of GPU nodes, internode transfers are orchestrated in a balanced way. This will prevent one slow link from throttling the entire distributed inference system.目标是让拓扑感知超越 NVSwitch,理解集群网络的完整拓扑(例如胖树、蜻蜓等),并使通信模式适配该拓扑。其结果是,即便扩展到数千乃至数百万个 GPU 节点,节点间传输也能以均衡的方式编排。这将避免某一条慢速链路拖慢整个分布式推理系统。
MoE 专家重平衡与重分组
MoE Expert Rebalancing and Regrouping
Large-scale language models increasingly use MoE layers, which introduce unique communication patterns. In an MoE model, different subsets of the neural network, or experts, reside on different GPUs. And each input token is routed to a small number of expert networks for processing.大规模语言模型越来越多地使用 MoE 层,这引入了独特的通信模式。在 MoE 模型中,神经网络的不同子集(即专家)驻留在不同的 GPU 上。每个输入 token 被路由到少量专家网络进行处理。
During inference, for instance, this produces an all-to-all traffic pattern such that tokens are sent to whichever GPU hosts the selected experts. The results are then gathered back. In a naive static assignment of experts to GPUs, certain GPUs may become communication hotspots if many tokens frequently route to experts on those specific GPUs. Additionally, if experts that often work together to process similar tokens are placed far apart in the topology (e.g., one on GPU 0 and another on GPU 71 across the fabric), the tokens will need to continuously travel long paths.例如在推理期间,这会产生全对全(all-to-all)的流量模式:token 被发送到承载所选专家的 GPU,随后结果被收集回来。在将专家静态分配给 GPU 的朴素方案中,如果大量 token 频繁路由到某些特定 GPU 上的专家,这些 GPU 就可能成为通信热点。此外,如果经常协同处理相似 token 的专家在拓扑上相距很远(例如一个位于 GPU 0,另一个位于跨交换网络的 GPU 71),token 就需要持续走很长的路径。
Expert rebalancing is a strategy to localize communication by periodically rearranging which GPU each expert lives on. The key idea is to take advantage of any skew or patterns in the workload. If, for example, expert 5 and expert 19 both receive segments of the same queries, it makes sense to place them on the same GPU (or same node), if possible, so that the communication doesn’t travel too far for those operations.专家重平衡是一种通过定期重新安排每个专家所在的 GPU 来使通信本地化的策略。其核心思想是利用工作负载中的任何倾斜或模式。例如,如果专家 5 和专家 19 都接收同一批查询的各个片段,那么在可能的情况下把它们放在同一个 GPU(或同一节点)上是合理的,这样这些操作的通信就不必传输太远。
Likewise, if expert 7 is very popular and receives many tokens, it may incur heavy inbound traffic to its GPU. The scheduler might move that expert to a less communication-heavy GPU—or even duplicate it if the system allows—to split the load. This rebalancing can happen between inference runs or during periodic maintenance windows in a long-running service. The system collects statistics on communication frequency between experts—or between experts and the expert-gating nodes— and then remaps the experts to GPUs that minimize the highest-traffic links.同样,如果专家 7 非常热门、接收大量 token,它可能给所在 GPU 带来沉重的入站流量。调度器可以把该专家迁移到通信压力较小的 GPU——如果系统允许,甚至可以复制该专家——以分摊负载。这种重平衡可以在两次推理运行之间进行,也可以在长时间运行服务的周期性维护窗口内进行。系统会收集专家之间——或专家与专家门控节点之间——通信频率的统计数据,然后重新映射专家到 GPU,以最小化流量最高的链路的负载。
In practice, implementing MoE expert rebalancing involves a coordinated redistribu-tion of model parameters since experts are essentially subsets of model weights. This should be done infrequently since it’s a heavy operation. But occasional rebalancing can have a big impact in reducing congested transfers.在实践中,实现 MoE 专家再平衡涉及对模型参数的协同重新分配,因为专家本质上是模型权重的子集。这一操作应当尽量少做,因为它开销很大。但偶尔进行一次再平衡,就能在减少拥塞传输方面产生显著效果。
Expert rebalancing should be done during scheduled maintenance windows since moving an expert means transferring potentially GBs of weights. The key is to use logged routing metrics to choose a better placement strategy at runtime.专家再平衡应在计划内的维护窗口中进行,因为迁移一个专家意味着要传输可能高达 GB 量级的权重。关键在于利用记录下来的路由指标,在运行时选择更优的放置策略。
After rebalancing, each GPU will ideally host a combination of experts such that most tokens’ routing stays on a single GPU or at least within the local NVLink group. Any other nonlocal communication will be spread more evenly across the NVLink/ NVSwitch network—rather than repeatedly hitting the same GPU-to-GPU links.再平衡之后,理想情况下每块 GPU 都会承载一组专家,使得大多数 token 的路由都停留在单块 GPU 内,或至少位于本地 NVLink 组内。其他非本地通信则会更加均匀地分散到 NVLink/NVSwitch 网络上,而不是反复冲击同样的 GPU 间链路。
Another related optimization is expert bucketing or grouping. This technique arranges experts that are commonly used together and are assigned to the same group of GPUs (for example, on the same NVSwitch or same server), which reduces cross-group traffic.另一项相关优化是专家分桶或分组。该技术把经常一起使用、且被分配到同一组 GPU(例如位于同一 NVSwitch 或同一台服务器上)的专家安排在一起,从而减少跨组流量。
The scheduler can treat expert placement as a graph partitioning problem. The experts (GPUs) are the nodes in the graph. The edge weights represent the token traffic between experts—as well as from the router to the experts. The graph is partitioned using a minimal cut through the fewest heavy edges. By doing this, MoE communication becomes topology-aware, respects the NVLink/NVSwitch boundaries, and keeps the data exchange confined within those boundaries.调度器可以把专家放置视为一个图划分问题。专家(GPU)是图中的节点。边的权重表示专家之间的 token 流量,以及从路由器到专家的流量。通过最少的重边进行最小割来划分该图。这样一来,MoE 通信就变得拓扑感知,遵守 NVLink/NVSwitch 的边界,并把数据交换限制在这些边界之内。
MoE expert regrouping is an example of congestion-aware scheduling at the model architecture level. It rearranges the workload itself to fit the network—rather than rearranging the network to fit the workload.MoE 专家重组是模型架构层面拥塞感知调度的一个例子。它重排工作负载本身以适配网络,而不是重排网络以适配工作负载。
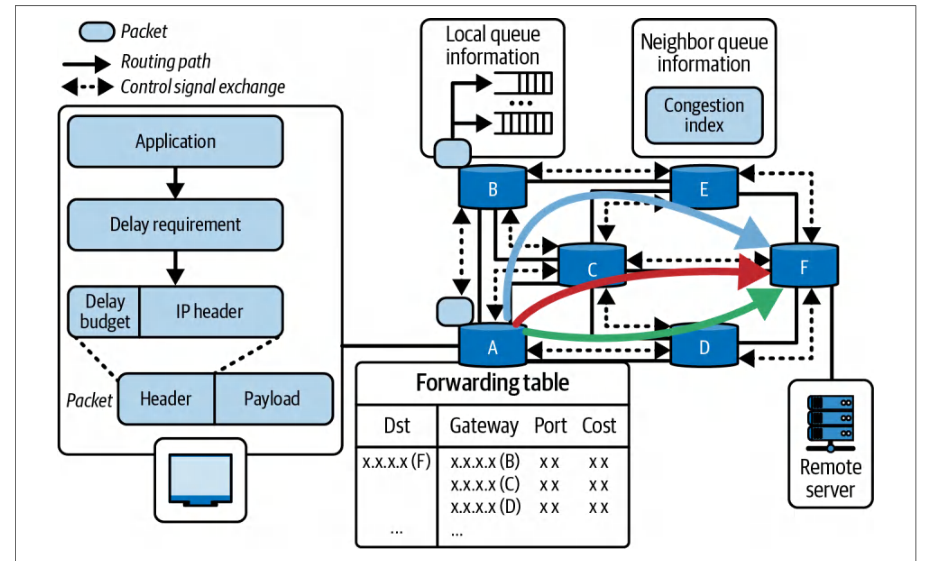
动态拥塞感知调度
Dynamic Congestion-Aware Scheduling
While all the techniques we’ve mentioned can be configured at system startup or design time, the most robust and advanced systems use dynamic scheduling to respond to congestion as it happens. Dynamic congestion-aware scheduling means the system continuously monitors network conditions using the telemetry discussed earlier—and adjusts the scheduling of tasks or communications in real time.尽管我们提到的所有技术都可以在系统启动时或设计阶段配置,但最稳健、最先进的系统会使用动态调度,在拥塞发生时即时响应。动态拥塞感知调度意味着系统利用前面讨论的遥测数据持续监控网络状况,并实时调整任务或通信的调度。
Congestion-aware scheduling and routing helps reduce bottlenecks and maintains high performance under dynamic conditions. This is analogous to network-level dynamic packet routing, as shown in Figure 19-13.拥塞感知的调度与路由有助于减少瓶颈,并在动态条件下保持高性能。这类似于网络级动态数据包路由,如图 19-13 所示。
In a multi-GPU inference context, dynamic strategies include throttling, rerouting, or reordering operations based on congestion feedback. For instance, suppose the scheduler detects that NVLink link 0, connecting two particular GPUs, is currently maxed out because it’s transferring data for a massive tensor during a large pipeline-parallel activation transfer, for instance.在多 GPU 推理场景中,动态策略包括根据拥塞反馈对操作进行限流、重路由或重排序。例如,假设调度器检测到连接两块特定 GPU 的 NVLink 链路 0 当前已经跑满,比如因为它正在一次大规模流水线并行激活传输中搬运一个巨型张量。
If another high-priority transfer is scheduled to use the same link, the scheduler might delay that second transfer by a few milliseconds to let the first one finish and clear out. This is called temporal load balancing, and it essentially inserts a tiny gap to prevent queue buildup. This is analogous to network-switch queue management and NIC-level backpressure. This is better to enqueue briefly than to overload and drop packets.如果另一个高优先级传输被安排使用同一条链路,调度器可能会把第二个传输延迟几毫秒,让第一个传输完成并清空。这称为*时间负载均衡*,它本质上是插入一个极小的间隙,以防止队列堆积。这类似于网络交换机的队列管理和 NIC 级背压。短暂排队总好过过载并丢包。
Conversely, if a normally large transfer is detected to be idle because its source GPU is waiting on computation, for instance, the scheduler could use that time slice to send lower-priority data over the link and fill the idle time. This utilizes available bandwidth and doesn’t interfere with a critical data transfer.反过来,如果检测到一次通常很大的传输处于空闲状态——例如其源 GPU 正在等待计算——调度器就可以利用这个时间片在该链路上发送优先级较低的数据,填补空闲时间。这样既利用了可用带宽,又不会干扰关键的数据传输。
Another dynamic tactic is adaptive routing at the software level such that if one path is congested, an alternate path is chosen if available. In a network with multiple NVSwitch planes or multiple NIC rails, the adaptive runtime will choose a less busy plane for the next communication.另一种动态策略是在软件层面进行自适应路由:如果某条路径拥塞,则在存在可用替代路径时选择替代路径。在具有多个 NVSwitch 平面(plane)或多条 NIC 通道(rail)的网络中,自适应运行时会为下一次通信选择负载较轻的平面。
NCCL does some of this internally when multiple paths exist, but an advanced scheduler could maintain multiple NCCL communicators that are mapped to different path configurations. It could then select among the different paths based on congestion.当存在多条路径时,NCCL 会在内部完成部分此类工作,但高级调度器可以维护多个映射到不同路径配置的 NCCL 通信器(communicator),然后根据拥塞情况在不同路径之间进行选择。
Choosing alternate paths dynamically requires the scheduler to evaluate the best path to take. This might be achieved by using different virtual channels—or adjusting which NVLink port is used for a transfer.动态选择替代路径要求调度器评估应走的最佳路径。这可以通过使用不同的虚拟通道(virtual channel),或调整传输所使用的 NVLink 端口来实现。
Modern NVSwitch systems support multiple virtual channels and hardware qualityof-service (HQOS) settings. The scheduler can use these features to direct nonurgent traffic to a lower-priority channel. This avoids contention with urgent transfers.现代 NVSwitch 系统支持多个虚拟通道和硬件服务质量(HQOS)设置。调度器可以利用这些特性将非紧急流量引导到较低优先级的通道,从而避免与紧急传输争用。
Load-dependent task scheduling is another feature of dynamic congestion management. If an inference server is handling many simultaneous queries that share resources, the scheduler can temporarily queue or reorder some of the queries to avoid peak overlap. This is similar to the earlier discussion on staggering large collectives so that they don’t run concurrently.负载相关的任务调度是动态拥塞管理的另一项功能。如果推理服务器正在处理大量共享资源的并发查询,调度器可以临时将其中部分查询排队或重排,以避免峰值重叠。这类似于前面关于错开大型集合通信以避免其并发执行的讨论。
For instance, consider a situation in which the scheduler knows that query A’s next step will involve a massive all-gather across GPUs. And it sees that query B is just starting and would add another large all-gather at the same time. In this case, the scheduler might postpone launching query B’s step by a brief moment so that query A’s communication can complete without the burden of query B’s resource contention.例如,考虑这样一种情况:调度器知道查询 A 的下一步将涉及跨 GPU 的大规模全收集(all-gather),同时它发现查询 B 刚刚开始,并会在同一时间再增加一次大规模全收集。此时,调度器可能会将查询 B 该步骤的启动短暂推迟,使查询 A 的通信能够在不受查询 B 资源争用负担影响的情况下完成。
This kind of fine-grained scheduling optimizes the pattern of communications over time. Heavy flows are serialized or staggered rather than launched concurrently. The decision is guided by recent telemetry. If the system sees a big spike in NVSwitch utilization when it runs 8 queries in parallel, it might try running only 4 in the first wave, and then 4 immediately after. This makes the system self-tuning because it monitors real-time telemetry data and continuously searches for execution plans that avoid congestion.这类细粒度调度优化了通信随时间的模式:重流量被串行化或错开,而不是并发启动。决策由近期遥测数据指导。如果系统发现在并行运行 8 个查询时 NVSwitch 利用率出现大幅尖峰,它可能会尝试在第一波只运行 4 个,随后立即再运行 4 个。这使系统具备自调优能力,因为它监控实时遥测数据,并持续搜索能够避免拥塞的执行计划。
Dynamic scheduling is typically implemented as a centralized scheduler that monitors all GPUs and network links. This can be combined with a distributed protocol in which GPUs signal congestion, or backpressure, to one another if the destination GPU’s NVLink buffers are full.动态调度通常实现为监控所有 GPU 和网络链路的集中式调度器。这可以与分布式协议结合:当目标 GPU 的 NVLink 缓冲区已满时,各 GPU 相互发出拥塞信号,即背压(backpressure)。
In this backpressure scenario, the destination GPU notifies the source GPU to pause incoming transfers. The smart scheduler can then reschedule tasks on the source GPU while it’s paused so it can perform compute tasks while it waits for the destination GPU to unpause the transfers.在这种背压场景中,目标 GPU 通知源 GPU 暂停传入传输。智能调度器随后可以在源 GPU 暂停期间重新调度其上的任务,使其在等待目标 GPU 解除传输暂停的同时执行计算任务。
Over time, dynamic adjustments like these will keep communication efficient—even with varying batch sizes, input data distributions, and other dynamic workload changes. The system learns the congestion patterns and adapts quickly by modifying the scheduling based on live feedback. The system can use an RL agent (discussed in a previous section) or a set of heuristic rules. This is essential for environments with bursty and unpredictable inference requests.随着时间推移,此类动态调整将保持通信高效——即使批大小、输入数据分布和其他动态工作负载不断变化。系统学习拥塞模式,并基于实时反馈修改调度来快速适应。系统可以使用 RL 智能体(在前一节中讨论过)或一组启发式规则。这对于具有突发性和不可预测推理请求的环境至关重要。
通过精细调优的调度协调 NVSwitch 传输
Coordinating NVSwitch Transfers with Fine-Tuned Scheduling
The core of an NVLink/NVSwitch system is the NVSwitch fabric itself. This is a centralized crossbar that handles many simultaneous GPU-to-GPU transfers. NVSwitch is extremely high-bandwidth and has its own internal scheduling algorithms, including adaptive routing across multiple switch chips and planes.NVLink/NVSwitch 系统的核心是 NVSwitch 交换结构本身。它是一个集中式交叉开关(crossbar),负责处理大量同时进行的 GPU 到 GPU 传输。NVSwitch 带宽极高,并拥有自己的内部调度算法,包括跨多个交换芯片与平面的自适应路由。
However, software can multiply its effectiveness by scheduling data transfers with application-level knowledge, such as pipeline, tensor, and expert-level parallelism strategies. The idea is to orchestrate which GPU pairs communicate—and which times they communicate—in order to maximize parallelism without oversubscribing the cluster fabric.不过,软件可以借助应用层知识来调度数据传输,从而成倍放大其效能,例如流水线并行、张量并行和专家级并行策略。其思路是编排哪些 GPU 对进行通信——以及在什么时刻通信——以在不超额订阅集群交换结构的前提下最大化并行度。
A proven technique is staggering communication waves. This is related to the wave scheduling strategy mentioned earlier for collectives, but it applies more broadly to any overlapping transfers.一种经过验证的技术是错开通信波次。这与前文针对集合通信提到的波次调度策略相关,但它更广泛地适用于任何相互重叠的传输。
Consider all 72 GPUs in a NVL72 rack needing to send data to a specific peer, such as a central parameter server in which GPU 0 collects all the results from all 72 GPUs. If all 71 other GPUs send their data at the exact same time, GPU 0’s 18 NVLink links— and the NVSwitch that connects them—will experience a huge burst of 71 inputs, as shown in Figure 19-14. This will exceed the amount of bandwidth that can be delivered at that moment.设想 NVL72 机架中的全部 72 个 GPU 都需要向某个特定对端发送数据,例如一个集中式参数服务器,其中 GPU 0 收集全部 72 个 GPU 的所有结果。如果其余 71 个 GPU 在同一时刻发送数据,GPU 0 的 18 条 NVLink 链路——以及连接它们的 NVSwitch——将承受 71 路输入的巨大突发流量,如图 19-14 所示。这将超出该时刻所能提供的带宽。
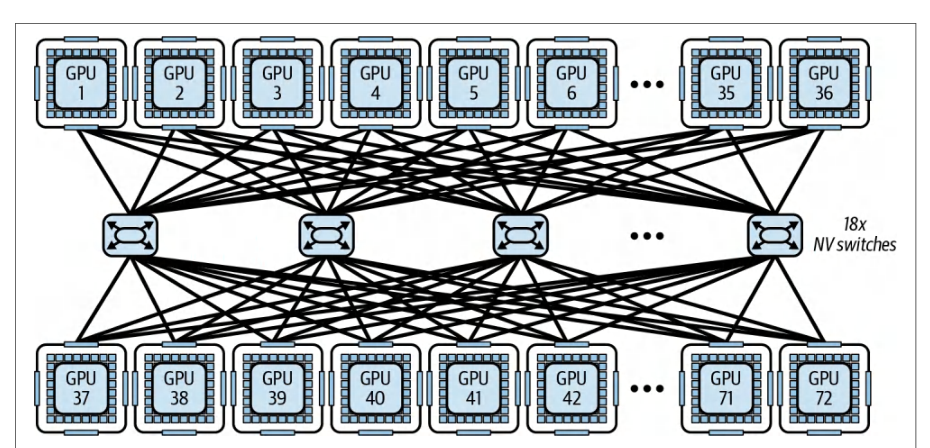
In this case, NVSwitch will need to buffer and serialize many of those transfers. This leads to latency spikes. Instead, a coordinated and optimized approach is to partition the senders into four groups: group 1 (GPUs 1–18) sends first, then a few microseconds later group 2 (GPUs 19–36) sends, and so on.在这种情况下,NVSwitch 需要缓冲并串行化其中许多传输。这会导致时延尖峰。相反,一种经过协调与优化的做法是将发送方划分为四组:第 1 组(GPU 1–18)先发送,几微秒后第 2 组(GPU 19–36)发送,依此类推。
From GPU 0’s perspective, it receives four smaller waves of traffic in sequence. At any given instant, roughly only 18 GPUs are actively sending to GPU 0. This perfectly fits within the GPU’s 18-port capacity. NVSwitch routes the traffic without needing to queue. By the time group 4 finishes, GPU 0 has received all of the data—and none of the NVLink links were saturated since the traffic was smoothed and balanced over time.从 GPU 0 的角度看,它依次收到四个更小的流量波次。在任意时刻,大约只有 18 个 GPU 正在向 GPU 0 发送数据。这恰好落在该 GPU 的 18 端口容量之内。NVSwitch 无需排队即可路由这些流量。到第 4 组完成时,GPU 0 已收到全部数据——并且由于流量在时间上被平滑和均衡,没有任何 NVLink 链路达到饱和。
This wave-staggering approach generalizes to many patterns. All-to-all exchanges can be broken into pairwise exchanges that rotate in rounds. This is often called the butterfly or shuffle pattern. Shuffling schedules which GPUs talk to one another at each timestep such that each NVSwitch port stays busy, but not excessively busy.这种波次错开方法可推广到许多模式。全对全(all-to-all)交换可以拆分为按轮次轮转的成对交换。这通常被称为*蝶形*或*混洗模式*。混洗会调度每个时间步中哪些 GPU 相互通信,使每个 NVSwitch 端口保持忙碌,但不过度忙碌。
The scheduler for NVSwitch transfers can use a time-sliced algorithm, which allocates communication slots to specific GPU pairs or GPU groups. So instead of launching one large, free-for-all bulk transfer, the scheduler can perform many small, synchronized communication steps—each allotted a specific time slot. This is similar to time-division multiplexing, described earlier, and it creates a predictable, conflict-free use of the NVSwitch crossbar.NVSwitch 传输的调度器可以采用时间分片算法,将通信时隙分配给特定的 GPU 对或 GPU 组。因此,调度器不必发起一次大型的、无序争抢的批量传输,而是可以执行许多小的、同步的通信步骤——每个步骤分配一个特定时隙。这类似于前文所述的时分复用(time-division multiplexing),它使 NVSwitch 交叉开关的使用变得可预测且无冲突。
It’s worth noting that NVSwitch hardware itself will attempt to reduce contention on the network. For instance, if multiple flows are contending for the same link, NVSwitch will interleave packets from each flow to ensure fair scheduling.值得注意的是,NVSwitch 硬件本身会尝试减少网络上的争用。例如,如果多条流争用同一条链路,NVSwitch 会交错来自各条流的数据包,以确保公平调度。
It may also adaptively choose different internal crossbar paths, if available. However, from a software perspective, we can avoid hitting these limits in the first place by applying these adaptive techniques into our network design.它还可能自适应地选择不同的内部交叉开关路径(如果存在)。不过,从软件角度看,我们可以通过将这些自适应技术应用到网络设计中,从一开始就避免触及这些限制。
Fine-tuned scheduling also includes concurrency control by limiting how many heavy transfers run in parallel during inference. For example, during a multi-GPU inference pipeline, you might avoid launching all expert-gather or broadcast operations across GPUs at the same time. By design, this trades a bit of parallelism for less contention.精细调优的调度还包括并发控制,即限制推理期间并行运行的重型传输数量。例如,在多 GPU 推理流水线中,可以避免同时在各 GPU 上发起所有专家收集(expert-gather)或广播操作。按设计,这是用少量并行度换取更少的争用。
For instance, instead of triggering 12 collective transfers simultaneously—which risks saturating NVSwitch and NVLink—a scheduler can stagger them by running up to 4 high-volume transfers at a time, waiting for those to complete, and then launching the next set. Because NVSwitch is extremely fast, this serialized approach likely finishes sooner because it avoids the congestion caused by too many overlapping transfers.例如,调度器不必同时触发 12 个集合传输——这有使 NVSwitch 和 NVLink 饱和的风险——而是可以错开它们:一次最多运行 4 个高流量传输,等待这些传输完成,然后再启动下一组。由于 NVSwitch 速度极快,这种串行化方式很可能更早完成,因为它避免了过多重叠传输造成的拥塞。
Coordinating NVSwitch transfers is about treating the communication fabric as a shared resource that can be scheduled—similar to how one would schedule GPU kernels and CPU threads. By scheduling network resources, the system makes sure that high-priority traffic avoids interference. It fills idle gaps with lower-priority traffic to keep utilization high.协调 NVSwitch 传输,就是把通信网络结构(fabric)视为一种可调度的共享资源——类似于调度 GPU 内核和 CPU 线程的方式。通过调度网络资源,系统确保高优先级流量免受干扰,并用低优先级流量填补空闲间隙,以保持高利用率。
Techniques like staggering and grouping communications will increase effective throughput of the NVSwitch by avoiding severe contention patterns. This leads to more predictable and lower-latency communication, which is vital for inference serving where tail latency, or slow outlier responses caused by a congested network, is a concern.错开与分组通信等技术通过避免严重的争用模式,提高 NVSwitch 的有效吞吐量。这带来更可预测、时延更低的通信,对于推理服务至关重要——在推理服务中,尾时延(即由网络拥塞导致的缓慢离群响应)是一大顾虑。
In short, congestion-aware, topology-aware scheduling in multi-GPU inference systems is all about how to intelligently match the communication pattern to the given hardware layout. High-performance inference systems will monitor link usage in real time and adapt to the NVLink/NVSwitch topology. It does this through careful placement of tasks, optimized collective algorithm configurations, multinode routing tweaks, MoE expert reallocation, dynamic runtime adjustments, and fine-grained coordination of data transfers.简而言之,多 GPU 推理系统中的拥塞感知、拓扑感知调度,核心在于如何智能地将通信模式与给定的硬件布局相匹配。高性能推理系统会实时监控链路使用情况,并适配 NVLink/NVSwitch 拓扑。它通过精心安排任务放置、优化集合通信算法配置、调整多节点路由、重新分配 MoE 专家、动态运行时调整以及对数据传输进行细粒度协调来实现这一点。
其他自适应与动态优化技术
Additional Adaptive and Dynamic Optimization Techniques
Next are some additional dynamic inference and runtime-adaptation techniques that complement the core tuning strategies we presented. As of this writing, these ideas are experimental and not widely available. However, they are promising and worth covering. Each technique here includes a brief description and links to further reading.接下来介绍一些额外的动态推理与运行时自适应技术,它们与我们前面介绍的核心调优策略相辅相成。截至本文撰写时,这些想法仍处于实验阶段,尚未广泛可用。但它们前景可观,值得介绍。这里的每项技术都包含简要说明和延伸阅读链接。
动态提前退出网络
Dynamic Early-Exit Networks
Early-exit models allow an LLM to self-truncate its generation when sufficient confidence is reached. This reduces unnecessary compute for easy inputs, for instance. Dynamic early-exit methods monitor intermediate representations and logit entro-pies to decide, at each layer or token, if it should stop computation and emit a final output.提前退出(early-exit)模型允许 LLM 在达到足够置信度时自行截断生成过程。例如,这可以减少简单输入上的不必要计算。动态提前退出方法会监控中间表示和对数几率熵(logit entropy),以决定在每一层或每个 token 处是否应停止计算并输出最终结果。
These networks require special model architecture or training since they add auxiliary classifiers at intermediate layers. However, they can produce up to 30%–50% inference speedup on reasoning tasks without accuracy loss (see https://oreil.ly/dn3vl and https://oreil.ly/73AeE).这类网络需要特殊的模型架构或训练方式,因为它们要在中间层添加辅助分类器。不过,它们在推理任务上可带来最高 30%–50% 的推理加速,且不损失精度(参见 https://oreil.ly/dn3vl 和 https://oreil.ly/73AeE)。
输入感知的层跳过(DASH)
Input-Aware Layer Skipping (DASH)
Frameworks like DASH present inference as a Markov Decision Process, which dynamically decides, per-token, whether to execute or skip each transformer layer based on input characteristics. By learning a small scoring network, DASH can skip 20%–40% of layers for many tokens.像 DASH 这样的框架将推理表述为马尔可夫决策过程(Markov Decision Process),基于输入特征为每个 token 动态决定是执行还是跳过每个 Transformer 层。通过学习一个小型评分网络,DASH 可以对许多 token 跳过 20%–40% 的层。
DASH typically requires a modified model with gating at each layer. However, it can reduce inference cost significantly while maintaining performance on NLP benchmarks (https://oreil.ly/mz59T and https://oreil.ly/oL_Lr).DASH 通常需要一个在每一层都带有门控的修改版模型。不过,它可以在保持 NLP 基准性能的同时显著降低推理成本(https://oreil.ly/mz59T 和 https://oreil.ly/oL_Lr)。
推测式 MoE 专家路由与通信削减
Speculative MoE Expert Routing and Communication Reduction
For MoE models, speculative expert routing anticipates which experts will be activated for upcoming tokens and co-shuffles tokens and expert assignments ahead of time.对于 MoE 模型,推测式专家路由(speculative expert routing)会预测即将到来的 token 将激活哪些专家,并提前对 token 与专家分配进行协同重排。
This technique involves sending tokens to predicted experts early. If prediction is wrong, some work is wasted. However, overall communication is reduced when predictions are good. This helps to reduce cross-node bandwidth use by up to 30% compared to static expert parallel (EP) + tensor parallel (TP) deployments.该技术会提前将 token 发送至预测的专家。如果预测错误,部分工作会被浪费。然而,当预测准确时,整体通信量会降低。与静态专家并行(EP)+ 张量并行(TP)部署相比,这有助于将跨节点带宽占用降低最多 30%。
使用 LazyLLM 的动态 token 剪枝
Dynamic Token Pruning with LazyLLM
LazyLLM selectively computes KV cache only for tokens deemed as important defined using a lightweight scoring function. It prunes the low-impact tokens (e.g., stopwords and filler tokens) out of both the prefill and decode. By focusing expensive attention computations on only relevant tokens, LazyLLM reports 20%–30% end-to-end latency reduction on long-context workloads.LazyLLM 仅对通过轻量级评分函数判定为重要的 token 选择性地计算 KV 缓存。它会将低影响的 token(例如停用词和填充词)从预填充和解码中剪除。通过将昂贵的注意力计算仅集中在相关 token 上,LazyLLM 报告在长上下文工作负载上可实现 20%–30% 的端到端时延降低。
面向边缘的 MoE 内存预算
Edge-Oriented MoE Memory Budgeting
Dual routing and dynamic scheduling techniques introduce a potential memory issue for expert weights in constrained environments, such as edge deployments. In practice, this means maybe keeping a subset of experts active in GPU memory and swapping others from flash storage as needed. It does this based on usage frequency.双路由与动态调度技术在资源受限的环境(例如边缘部署)中会给专家权重带来潜在的内存问题。在实践中,这意味着可能只在 GPU 显存中保留一部分活跃专家,并按需从闪存存储换入其他专家。它依据使用频率来完成这一操作。
By dynamically adjusting which low-bit experts reside in memory (versus being offloaded), inference systems can maintain high expert-activation rates while maintaining lower memory usage.通过动态调整哪些低位宽专家驻留于内存(而非被卸载),推理系统可以在保持较高专家激活率的同时维持较低的显存占用。
动态量化与激活范围调整
Dynamic Quantization and Activation Range Adjustment
While static PTQ and QAT are well-known techniques, an on-the-fly quantization strategy can adjust activation-quantization parameters during inference in real time. They can use sliding-window statistics to modify the observer ranges (for activation quantizers) every N tokens, for example.静态 PTQ 与 QAT 是众所周知的技术,而即时量化策略可以在推理过程中实时调整激活量化参数。例如,它们可以利用滑动窗口统计量,每隔 N 个 token 修改(激活量化器的)观测器范围。
This type of dynamic activation quantization will monitor activation statistics in real time and recompute observer ranges every N tokens. This way, FP16 can be allocated to “hot” layers with high variance and FP8 to “cool” layers with low-variance. Low-variance layers are constrained within a narrow dynamic range. This minimizes quantization error and maximizes throughput.这类动态激活量化会实时监控激活统计量,并每隔 N 个 token 重新计算观测器范围。这样一来,就可以将 FP16 分配给方差较高的“热”层,将 FP8 分配给方差较低的“冷”层。低方差层被约束在较窄的动态范围内。这可以最小化量化误差并最大化吞吐量。
Because low-variance layers produce activations that are clustered tightly around a mean, FP8’s limited exponent and mantissa bits (e.g., E4M3 format) are sufficient enough to represent the activations’ values accurately. This produces significant compute and memory savings—and without noticeable accuracy degradation.由于低方差层产生的激活紧密聚集在均值附近,FP8 有限的指数位与尾数位(例如 E4M3 格式)足以准确表示这些激活值。这带来了显著的计算与内存节省,且没有明显的精度下降。
Consider using a hybrid FP8 strategy such as E4M3 for the forward pass (e.g., activations and weights) and E5M2 for the backward pass (e.g., gradients). It’s recommended to use a delayed scaling mechanism as shown in the following code using the Transformer Engine:可以考虑采用混合 FP8 策略,例如前向传播(如激活与权重)使用 E4M3,反向传播(如梯度)使用 E5M2。建议使用延迟缩放机制,如下方使用 Transformer Engine 的代码所示:
from transformer_engine.common.recipe import Format, DelayedScaling
recipe = DelayedScaling(
    # 前向 E4M3,反向 E5M2
    fp8_format=Format.HYBRID,
    amax_history_len=1024,
from transformer_engine.common.recipe import Format, DelayedScaling
recipe = DelayedScaling(
    # E4M3 fwd, E5M2 bwd
    fp8_format=Format.HYBRID,
    amax_history_len=1024,
    # 延迟缩放窗口
    amax_compute_algo="max",
)
    # delayed scaling window
    amax_compute_algo="max",
)
Here, we set the delayed scaling window using amax_history_len=1024, which is a common default. It’s recommended to keep amax_compute_algo='max' unless convergence analysis suggests otherwise.这里,我们通过 amax_history_len=1024 设置延迟缩放窗口,这是一个常见的默认值。除非收敛性分析表明需要调整,否则建议保持 amax_compute_algo='max'。
Meanwhile, FP16 remains reserved for layers with larger activation swings, or “hot” layers. These layers need to use a broader dynamic range to capture the numerical fidelity required for critical computations.与此同时,FP16 仍保留给激活波动较大的层,即“热”层。这些层需要使用更宽的动态范围,以捕捉关键计算所需的数值保真度。
This hybrid precision strategy works well for inference pipelines that don’t require offline calibration. They can dynamically modify numerical fidelity at each layer. This balances overall performance and model accuracy.这种混合精度策略非常适合不需要离线校准的推理流水线。它们可以在每一层动态调整数值保真度。这样便在整体性能与模型精度之间取得了平衡。
关键要点
Key Takeaways
On modern GPUs, the approaches discussed in this chapter are practical ways to squeeze every bit of performance from these multi-trillion-parameter models. In real-world deployments, these dynamic runtime adaptation techniques can make or break a high-performance inference service offering. The following are some key takeaways from this chapter:在现代 GPU 上,本章讨论的这些方法是压榨这些数万亿参数模型每一分性能的实用手段。在实际部署中,这些动态运行时自适应技术可能成就、也可能毁掉一个高性能推理服务。以下是本章的一些关键要点:
- Steady-state inference with torch.compile使用 torch.compile 实现稳态推理
- Prefer
mode="reduce-overhead"or autotune modes if you can afford the warmup time. This will help minimize runtime overhead for low-latency inference workloads.如果能够承受预热时间,优先使用mode="reduce-overhead"或自动调优模式。这有助于将低时延推理工作负载的运行时开销降到最低。
- Kernel-level autotuning内核级自动调优
- Dynamically optimize GPU kernels and tile sizes. Leverage the Tensor Memory Accelerator (TMA) for asynchronous memory prefetch when possible. Use libraries and compilers that provide autotuning like CUTLASS and Triton—rather than hand-tuning them, unless absolutely necessary for performance.动态优化 GPU 内核与分块大小。尽可能利用张量内存加速器(TMA)进行异步内存预取。使用 CUTLASS、Triton 等提供自动调优的库和编译器,而不是手工调优——除非性能上绝对必要。
- Adaptive precision自适应精度
- Switch between 8-bit and 4-bit floating point (FP8/FP4) during inference to balance speed and accuracy. You can also mix with 16-bit precision as needed. Use the Transformer Engine for FP8 in PyTorch since
torch.autocast()does not support FP8 directly.在推理过程中于 8 位与 4 位浮点(FP8/FP4)之间切换,以平衡速度与精度。还可以按需与 16 位精度混合使用。在 PyTorch 中使用 Transformer Engine 实现 FP8,因为torch.autocast()并不直接支持 FP8。
- Disaggregated inference pipeline解耦推理流水线
- Separate the prefill (prompt processing) and decode (generation) phases across resources, and context-aware request routing based on real-time factors like KV cache hits, queue depth, and load. This maintains high throughput with long prompts—without slowing down short-prompt responses.将预填充(提示处理)与解码(生成)阶段分离到不同资源上,并基于 KV 缓存命中、队列深度和负载等实时因素进行上下文感知的请求路由。这样可以在长提示下保持高吞吐量,同时不会拖慢短提示的响应。
- Dynamic parallelism strategies动态并行策略
- Perform on-the-fly decisions between data-parallel, tensor-parallel, pipeline-parallel, and hybrid execution combinations depending on input/output sequence lengths and model structure—including MoE routing. These decisions include replicating or sharding the model.根据输入/输出序列长度和模型结构(包括 MoE 路由),在数据并行、张量并行、流水线并行以及混合执行组合之间即时做出决策。这些决策包括复制模型还是对模型进行分片。
- Adaptive decoding and scheduling自适应解码与调度
- Use techniques, such as speculative decoding, in-flight batch reshaping, and token-level scheduling, to improve throughput and latency. These techniques are implemented in engines like vLLM, SGLang, and NVIDIA TensorRT-LLM. This validates their effectiveness in production settings.使用推测解码(speculative decoding)、在途批重塑(in-flight batch reshaping)和 token 级调度等技术来提升吞吐量和时延。这些技术已在 vLLM、SGLang 和 NVIDIA TensorRT-LLM 等引擎中实现。这验证了它们在生产环境中的有效性。
- Memory management and Unified Memory tuning内存管理与统一内存调优
- Utilize Grace CPU’s memory with unified addressing to offload infrequently used KV cache pages to CPU or NVMe. Using APIs like
cudaMemAdviseandcudaMemPrefetchAsyncfor optimal placement. Make sure to use GPUDirect Storage, if available. This will directly page data from NVMe to GPU memory when needed—bypassing the CPU.利用 Grace CPU 的统一寻址内存,将不常使用的 KV 缓存页卸载到 CPU 或 NVMe。使用cudaMemAdvise和cudaMemPrefetchAsync等 API 实现最优放置。确保在可用时使用 GPUDirect Storage。这样可以在需要时直接将数据从 NVMe 分页到 GPU 显存——绕过 CPU。
- Profiling-driven optimization性能剖析驱动的优化
- Use tools like NVML, Nsight Systems/Compute, NVTX instrumentation, and Prometheus metrics to identify bottlenecks at runtime and automatically apply graph and kernel optimizations. Analyze telemetry using AI to detect anomalies and optimization opportunities.使用 NVML、Nsight Systems/Compute、NVTX 插桩和 Prometheus 指标等工具,在运行时识别瓶颈,并自动应用图优化和内核优化。利用 AI 分析遥测数据,以检测异常和优化机会。
结语
Conclusion
The techniques covered in this chapter transform a static inference deployment into a self-optimizing, adaptive engine. By monitoring runtime signals (latency, utilization, memory, network throughput) and applying strategies like dynamic parallelism, precision scaling, autotuned kernels, proactive caching, RL-based control, and smart scheduling, one can push ultralarge model inference to its limits.本章介绍的技术将静态推理部署转变为自我优化、自适应的引擎。通过监控运行时信号(时延、利用率、内存、网络吞吐量),并应用动态并行、精度缩放、自动调优内核、主动缓存、基于强化学习(RL)的控制和智能调度等策略,可以将超大规模模型推理推向极限。
A successful inference service can handle massive amounts of users, large input contexts, lots of uploaded documents, extensive reasoning, and strict latency SLAs all while supporting massive model sizes. And it will do this cost-effectively since it won’t need as much hardware to achieve the same throughput.一个成功的推理服务能够处理海量用户、大型输入上下文、大量上传文档、大量推理过程,并满足严格的时延 SLA,同时支持超大模型规模。而且它将以高成本效益的方式做到这一点,因为达到相同吞吐量所需的硬件更少。
Remember that the network fabric is part of the system codesign—and not an after-thought. The idea is to keep the NVLink and NVSwitch cluster fabric fully utilized. This can improve throughput-scaling that approaches near-linear in ideal conditions— while maintaining low latency—as models and GPU clusters continue to grow. With proper scheduling, the GPUs in an NVLink/NVSwitch fabric behave like a tightly coupled accelerator—acting almost as a single large GPU from a software perspective.请记住,网络互连结构(network fabric)是系统协同设计的一部分——而不是事后才考虑的事项。其理念是让 NVLink 和 NVSwitch 集群互连结构保持充分利用。随着模型和 GPU 集群不断增长,这可以提升吞吐量的扩展性,在理想条件下接近线性——同时保持低时延。通过合理的调度,NVLink/NVSwitch 互连结构中的 GPU 表现得像一个紧耦合的加速器——从软件视角看几乎如同单个大型 GPU。
Every strategy is a tool in the AI system performance engineer’s toolkit. The most effective solutions usually combine these tools. For example, you might train an RL policy to decide when to switch parallelism modes or adjust precision—or use prewarming to keep a continuous batching scheduler primed and ready.每种策略都是 AI 系统性能工程师工具箱中的一件工具。最有效的解决方案通常会将这些工具组合起来。例如,你可以训练一个 RL 策略来决定何时切换并行模式或调整精度——或者使用预热(prewarming)让连续批处理调度器保持就绪状态。
And remember that you don’t have to implement these all at once. Even just one or two can produce noticeable improvements. Start with what’s easiest (e.g., caching and batching improvements), then layer in the others.并且请记住,你不必一次性实现所有这些。即使只实现一两个,也能带来明显的改善。从最容易的入手(例如缓存和批处理改进),然后再逐步叠加其他技术。
The theme with these techniques is flexibility and adaptability. The inference runtime should be able to reconfigure itself in response to the current workload. This is how you can turn a massive LLM into a well-tuned, scalable production service—efficiently and cost-effectively.这些技术的共同主题是灵活性和适应性。推理运行时应当能够根据当前工作负载重新配置自身。这样你才能将庞大的 LLM 转变为调优良好、可扩展的生产服务——高效且具有成本效益。